By default, there are no ready-to-be-used actions in Zabbix such as configuration backup or firmware upgrade. The Zabbix NMS is a general system which requires special features to be implemented by RACOM or by the user himself.
We provide the user with a guide how to use and define these special features and within the RAy2 template, we already prepared several examples:
Configuration backup
Displaying the current Firmware version
Firmware upgrade
| Note | |
|---|---|
If you have troubles running scripts or making your own, contact
us on |
The whole implementation can be quite time consuming, but once you successfully run the first script, the others are very similar and its implementation is straightforward.
Within the Template, there are three scripts. As you now realise, having the configuration backup files can be crucial if replacing the unit. There is nothing easier than just uploading the configuration file into a brand new RAy2 unit.
Before creating and running the first scripts, you need to prepare the Zabbix server (and the Linux operating system). In this example, we configure the CentOS 7 operating system with Zabbix 3 installed via packaging system.
The following steps can be done in different order, but following this order is absolutely fine.
By default, the zabbix_server configuration file is located in the /etc/zabbix/zabbix_server.conf file. Find the line with “SSHKeyLocation” parameter and define it with this value:
SSHKeyLocation=/home/zabbix/.ssh
This is the location of the RSA private SSH key which will be used to access the RAy2 units.
Restart the Zabbix server afterwards.
# systemctl restart zabbix-server
The scripts must be uploaded to correct directory manually. The default directory is /usr/lib/zabbix/externalscripts/. Copy the script files from the ZIP Template file to this directory. The target state should look similar to this output:
# ls -l /usr/lib/zabbix/externalscripts/
total 48
-rw-r--r--. 1 zabbix zabbix   933 Mar 14 15:40 cli_upgrade_ray.sh
-rwxr-xr-x. 1 zabbix zabbix   649 Mar  9 16:58 ray_cli_cnf_backup_get.sh
-rwxr-xr-x. 1 zabbix zabbix   137 Mar  9 13:59 ray_cli_fw_show.sh
-rwxr-xr-x. 1 zabbix zabbix  3202 Mar 15 08:40 ray_cli_fw_upgrade.sh
-rw-r--r--. 1 zabbix zabbix    77 Mar 15 08:31 script-log.txt
-rwxr-xr-x. 1 zabbix zabbix 17200 Mar  1 13:24 snmptrap.sh
There are three executable scripts via the Zabbix web interface (starting with “ray_”) and one additional script “cli_upgrade_ray.sh” which is used by one of the previous script. The LOG output of those scripts is in script-log.txt file. There is also the snmptrap.sh file which you should have there for the SNMP TRAP functionality.
Make sure that the files have the zabbix user/group and are executable.
# chown zabbix:zabbix /usr/lib/zabbix/externalscripts/*
# chmod +x /usr/lib/zabbix/externalscripts/*
The Zabbix user cannot login to the bash by default. We need modify the /etc/passwd file as follows:
# chsh -s /bin/bash zabbix
# cat /etc/passwd
zabbix:x:996:994:Zabbix Monitoring System:/home/zabbix:/bin/bash
Make sure that the last part after the “:” has a correct path to the bash binary.
Do not edit the UID and GID, these are created by CentOS automatically and can be different in your installation.
| Note | |
|---|---|
You might need to install “util-linux-user” for the “chsh” command. |
If not already created, create the HOME directory for the Zabbix user.
# usermod -m -d /home/zabbix zabbix
# chown zabbix:zabbix /home/zabbix
# chmod 700 /home/zabbix
| Note | |
|---|---|
You may need to run the “usermod” command once again. |
Create the directories for the saved configuration and firmware files and change the access rights.
# mkdir /home/zabbix/configuration-backup
# mkdir /home/zabbix/firmware
# mkdir /home/zabbix/configuration-backup/ray
# mkdir /home/zabbix/firmware/ray
# chown -R zabbix:zabbix /home/zabbix/
The directory for the SSH key should now be located in /home/zabbix/.ssh directory. Change the current directory to this one and login as zabbix.
# su zabbix
A new prompt appears. Because, we cannot access the RAy2 units using their password via scripts, we need to upload the SSH keys into every unit we want to control. You can either have you own RSA/DSA key or you can create a new one following this example. Run
bash-4.2$ ssh-keygen -t rsa
Follow the guide of the ssh-keygen application and leave the passphrase empty.
To copy our RSA key into the RAy2 units, run the following command:
bash-4.2$ ssh-copy-id admin@10.250.2.225
Just replace 10.250.2.225 with the correct RAy2 IP address. The prompt will ask for the Admin password, fill it in and click Enter. Now, you should have the access into the unit without using a password. Check it via this command:
bash-4.2$ ssh admin@10.250.2.225
| Note | |
|---|---|
You might need to define the key manually with -i parameter. |
You should be logged in the RAy2 unit without writing the password.
The script files can be downloaded within the template ZIP file. Save them in the correct directory (/usr/lib/zabbix/externalscripts/) of your Zabbix distribution. Then, the scripts must be manually created in the Zabbix Administration – Scripts menu. See the example below and create Zabbix scripts for all RAy2 scripts.

If you open one of them, you can modify them as required.
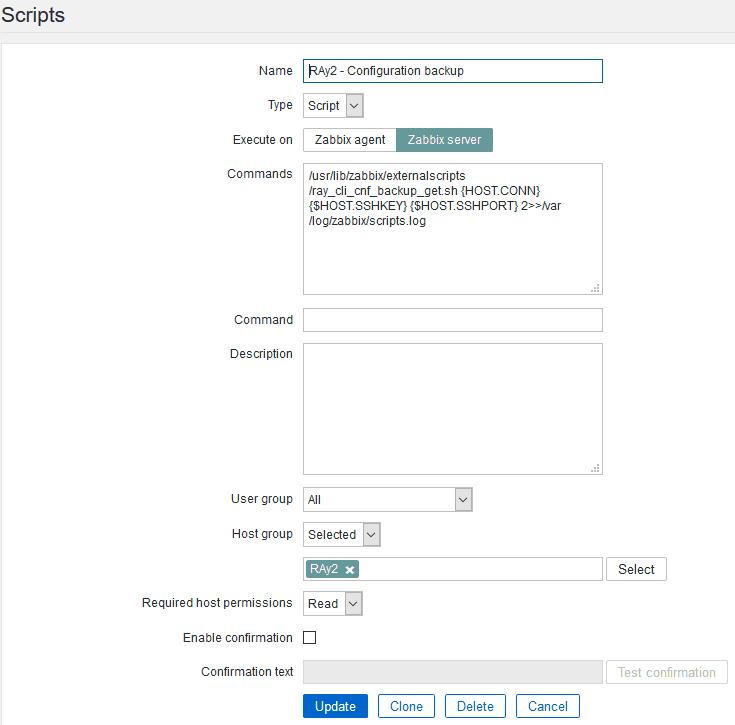
The Type must be set to “Script” and the Execute on parameter to “Zabbix server”. The command can be modified as required. There is a full path to the script saved on the server and the parameters. The script output is appended to the mentioned log file.
The script can apply to ALL hosts or just one group – in our example, the group name is “RAY2”.
The parameters are MACROs which should be enabled by default due to our Template. Each RAy2 unit uses the SSH port 22 and the SSH key saved in /home/zabbix/.ssh/id_rsa file by default. If you need to modify any of these parameters, go to the Configuration – Hosts menu and edit the particular Host’s MACROs (Inherited and host macros submenu).
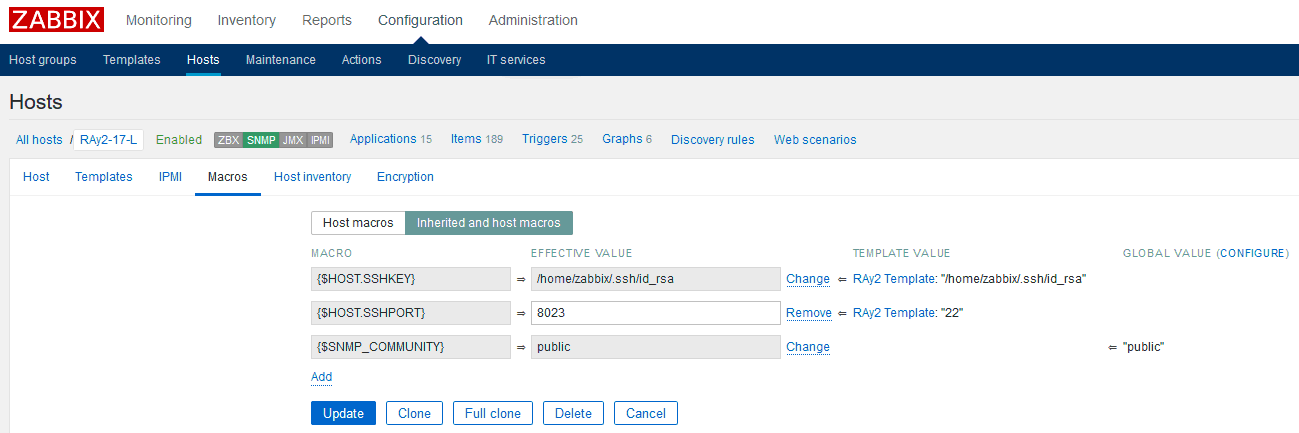
To edit any of the parameters, click on the “Change” button and Update the Host.
If the operating system is CentOS and has the SELinux security option enabled, the scripts will not run properly due to these restrictions. Please consult this with your IT department, or contact RACOM technical support.
| Important | |
|---|---|
Do not rush with SELinux rules. |
A similar approach is required for the Bash, SNMP traps, logging the script output, etc.
The scripts can be tested via clicking on the Hosts in the Web interface. You can click on them when they are displayed within the Last 20 Issues on your Dashboard, or within Maps where they are always displayed.
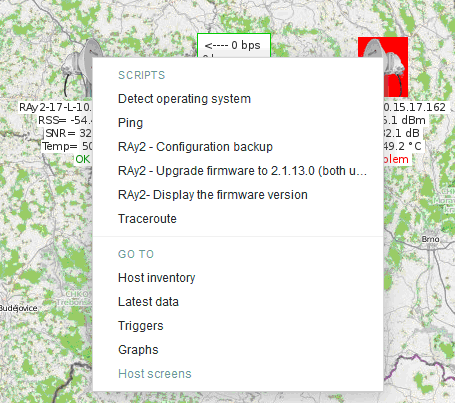
If you click on any of the scripts, the corresponding script runs and the output is displayed in the pop-up window. You can test the Zabbix general ones such as “Ping” or “Traceroute” first.
| Note | |
|---|---|
You may be required to change the SELinux rules or to install “traceroute” application via the command line (yum install). |
The easiest script displays the current firmware version. The version should be displayed within several seconds in the pop-up window.
Another script is the Configuration backup. The expected output should display a full path to the stored file (in the /home/zabbix/configuration-backup/ray directory).
The last script makes the Firmware upgrade. The script copies the firmware and another script into the unit and if successfully transmitted, it displays the information in the pop-up window. Due to Zabbix functionality, there is no way to wait for the upgrade to be finished and be informed about it within this pop-up window. Check the Firmware version after several minutes (e.g. 10 minutes) to check whether the upgrade was successful. Note that the script upgrades both units of the selected link! If the upgrade was not finished successfully, check the LOG file or login to the unit via SSH and check the internal log files (/var/log/) and the script log in the /tmp directory. You may also need to check the SELinux rules.
Once configured correctly, running the scripts is easy. If you
need to add a new host, just copy the SSH key and you are ready to use
it. And if a new script is required, see these examples and create
your own scripts or consult creating them with our technical support
at <support@racom.eu>.