Responses from Several OID objects are unsigned integers, but these values do have a special meaning.
Example RacomRay.systemStatus
“0” stands for “na” (not available)
“1” stands for “ok”
“2” stands for “warning”
“3” stands for “alarm”
Unfortunately, by default, you can see only the numeric values at the Zabbix front-end. The Value mappings are automatically imported with the RAy2 template or it can be imported separately in the Administration – General – Value Mappings menu.
| Note | |
|---|---|
This syntax feature is used throughout all MIB tables, not only the RAy MIB table. |
If you create any Value map manually, follow this procedure.
To add new value mappings, go to Administration → General → Value Mapping. Click on the “Create value map” button and insert the values, which are mentioned on the following lines. There is an Item list, which uses these value mappings (either link them manually or automatically by importing the template).
| RacomRay.AlarmState | Items: |
|---|---|
| 0 → na | Temperature alarm state |
| 1 → up | Low voltage alarm state |
| 2 → down | High voltage alarm state |
| 3 → ack | RSS alarm state |
| SNR alarm state | |
| Local Ethernet $1 Link Down alarm state | |
| RF Power Fail alarm state | |
| Net bitrate (air speed) below Limit alarm state | |
| BER alarm state | |
| Peer disconnect alarm state | |
| WiFi Host Access Point on alarm state |
| RacomRay.channelArrangement | Items: |
|---|---|
| 0 → na | Channel arrangement |
| 1 → accp | |
| 2 → acap | |
| 3 → ccdp |
| RacomRay.duplex | Items: |
|---|---|
| 0 → na | Ethernet$1 duplex |
| 1 → full | |
| 2 → half |
| RacomRay.lineStatusII | Items: |
|---|---|
| 0 → na | Radio link status |
| 1 → setup | |
| 2 → single | |
| 3 → connecting | |
| 4 → authorizing | |
| 5 → ok | |
| 6 → analyzer |
| RacomRay.mdix | Items: |
|---|---|
| 0 → na | Ethernet$1 MDI-X / MDI |
| 1 → mdi | |
| 2 → mdi-x |
| RacomRay.modulationIndex | Items: |
|---|---|
| 0 → na | Tx modulation index |
| 1 → qpsk | Rx modulation index |
| 2 → qam16 | |
| 3 → qam32 | |
| 4 → qam64 | |
| 5 → qam128 | |
| 6 → qam256 |
| RacomRay.OptionSetting | Items: |
|---|---|
| 0 → na | Management interface: Telnet |
| 1 → on | Management interface: VLAN on/off |
| 2 → off | Management interface: HTTP |
| 3 → auto | Secure peer mode |
| Channel matching | |
| Ethernet$1 pause | |
| Ethernet$1 autonego | |
| Ethernet$1 asymmetric pause |
| RacomRay.rfPowerStatus | Items: |
|---|---|
| 0 → na | RF Power amplifier OK/Failure |
| 1 → ok | |
| 2 → fail |
| RacomRay.ServiceState | Items: |
|---|---|
| 0 → na | Peer station user Ethernet $1 link status |
| 1 → up | |
| 2 → down |
| RacomRay.sshd | Items: |
|---|---|
| 1 → na | Management interface: SSH |
| 2 → onlykey | |
| 3 → off |
| RacomRay.systemStatus | Items: |
|---|---|
| 0 → na | Unit status |
| 1 → ok | |
| 2 → warning | |
| 3 → alarm |
| RacomRay.voltageSource | Items: |
|---|---|
| 0 → na | Source of supply voltage |
| 1 → aux | |
| 2 → poe |
| ICMP ping – Accessibility | Items: |
|---|---|
| 0 → ICMP ping fails | ICMP ping – Accessibility |
| 1 → ICMP ping successful |
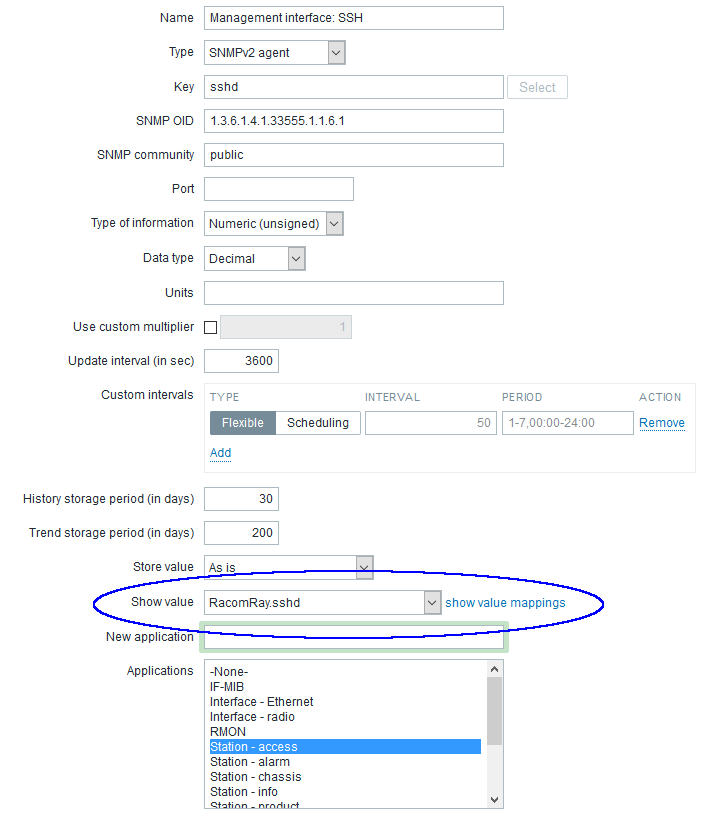
Go to Configuration → Templates and choose one of the imported template. Open the item configuration window and click on the chosen item to view and edit its settings.
Choose the appropriate value map in the Menu “Show value” and save the changes.
Example: RacomRay.sshd