In this chapter, we will go through several examples in order to explain ARP proxy and VLAN features in practice. All examples will have the same hardware configuration and we will alter the software settings only (ARP proxy, VLAN tagging, routing, …). Regular PCs will be used instead of RTUs.
Please follow the examples one by one to fully understand the configuration differences and benefits of various solutions.
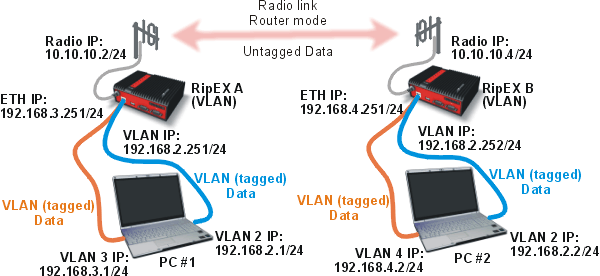
We will begin with a basic configuration example without using ARP proxy or VLANs. See the following diagram:
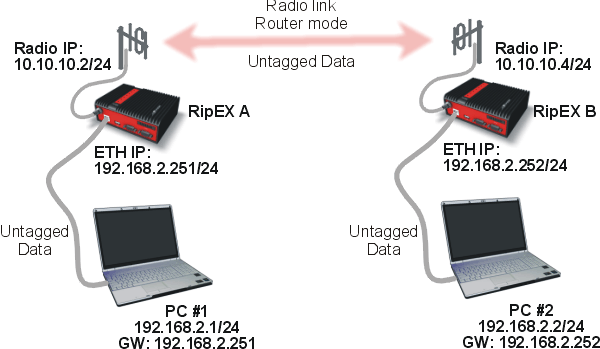
This example does not reflect the common configuration, because the computers share the same IP subnet, but behind different RipEX units in the Router mode. Usually the RipEX units would connect different IP subnets. This can easily be done with ARP proxy, but in this example, we can configure it with special routing rules.
| Note | |
|---|---|
Do not connect the PCs via X5 converter, but use the Ethernet interface. You can use the X5 converter just for configuration steps, not the connectivity tests. |
To access the first RipEX unit, go to the Settings and name it RipEX A. Set the following IP addresses:
Radio IP address: 10.10.10.2, mask 255.255.255.0
Ethernet IP address: 192.168.2.251, mask 255.255.255.0
On the second unit, set the name to RipEX B and configure it with the appropriate IP addresses:
Radio IP address: 10.10.10.4, mask 255.255.255.0
Ethernet IP address: 192.168.2.252, mask 255.255.255.0
See the RipEX A settings on the following screen-shot.
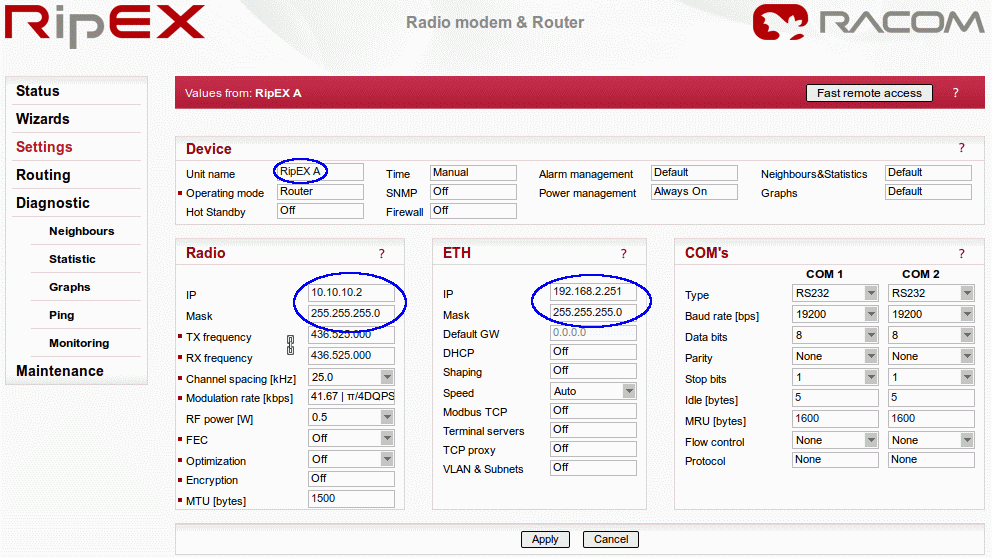
Do not forget to set the same TX/RX frequencies, Channel spacing, Modulation rate and other parameters on both RipEX units. Do not enable ARP proxy or VLAN.
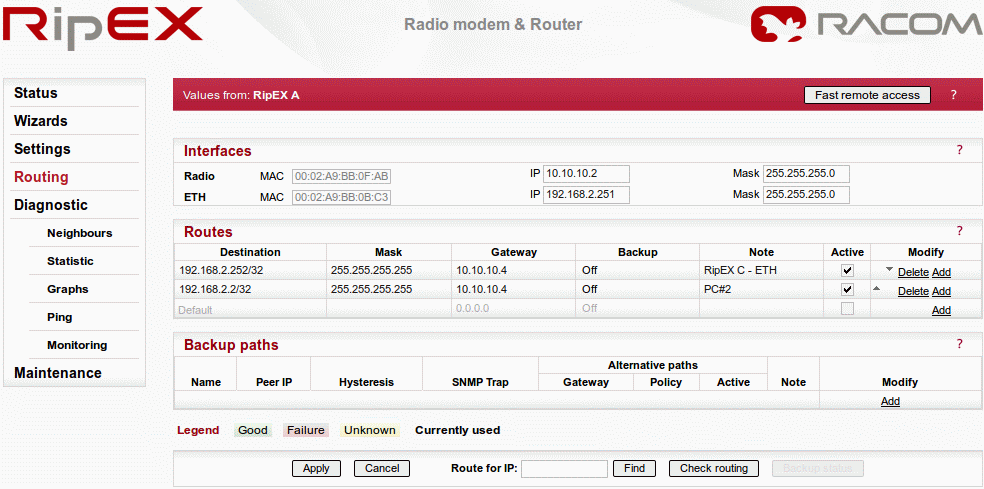
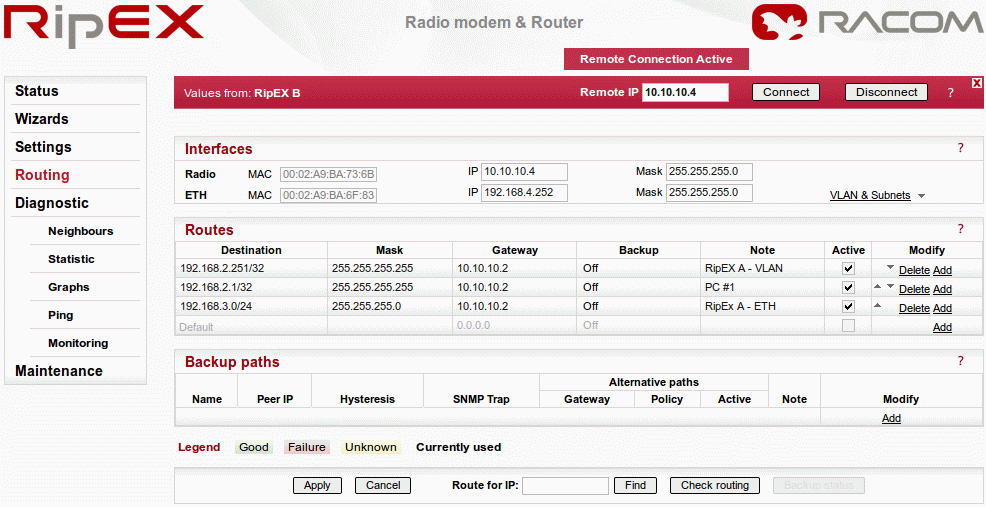
The next step is to set Routing (see the Routing menu). Configure RipEX A with these routing rules:
Destination: 192.168.2.252/32, Mask: 255.255.255.255, Gateway 10.10.10.4
Destination: 192.168.2.2/32, Mask: 255.255.255.255, Gateway 10.10.10.4
RipEX B will have very similar routes:
Destination: 192.168.2.251/32, Mask: 255.255.255.255, Gateway 10.10.10.2
Destination: 192.168.2.1/32, Mask: 255.255.255.255, Gateway 10.10.10.2
Do not forget to activate both routes. You can also add a note to each route. See the RipEX A Routing example:
When we have successfully configured both RipEX units, we can proceed with computers settings.
PC #1: IP address: 192.168.2.1, Mask: 255.255.255.0, Default Gateway: 192.168.2.251
PC #2: IP address: 192.168.2.2, Mask: 255.255.255.0, Default Gateway: 192.168.2.252
| Note | |
|---|---|
If you do not know how to configure these computers, see the RipEX manual, https://www.racom.eu/eng/products/m/ripex/bench-test.html#connect-PC. |
In the common configuration with two different IP subnets behind our RipEX units, we would not need any further action to get the end-point connectivity. In this example, we must add two routes on both computers.
To add routing rules in Windows, you need to execute Windows Command Processor (cmd). Click on the button and then type Command Prompt or cmd in the Start Search field. Select the Command Prompt icon.
After the Command Prompt window appears, type the following commands on PC #1:
route add 192.168.2.252 mask 255.255.255.255
            192.168.2.251
route add 192.168.2.2 mask 255.255.255.255 192.168.2.251
You also need to add similar routing rules on PC #2:
route add 192.168.2.251 mask 255.255.255.255 192.168.2.252route add 192.168.2.1 mask 255.255.255.255 192.168.2.252
| Note | |
|---|---|
You need Admin privileges to add a route in Windows 7. |

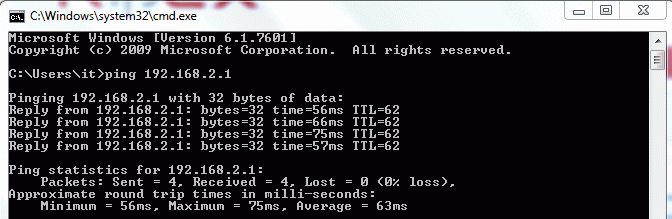
Check the connectivity by executing a ping command, which is also executed from the Command prompt. Type “ping 192.168.2.1” or “ping 192.168.2.251” if you are executing the ping from the PC #1 and check the results. You can also try the other direction, just switch IP addresses. See the following example:
| Note | |
|---|---|
If the ping is not successful, try to turn the Windows firewall off. It can block the ping packets. |
If we would not have computers as the end-stations, but only simple RTUs, it may happen that routes and default gateways cannot be configured. In this case, we need to reach the connectivity via the ARP proxy feature. See the diagram:
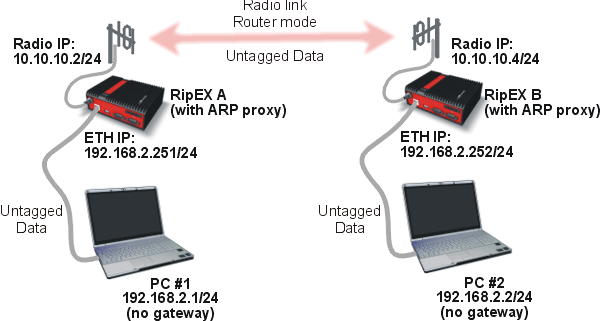
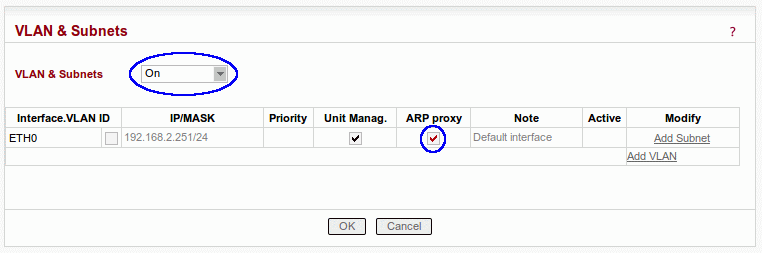
On both RipEX units we have almost everything already configured. Just go to the Settings menu and click on the VLAN & Subnets button.
Turn the feature on, and check the ARP proxy option on both units. Confirm and apply the changes.
You do not need to change the routing rules. Just remember that the ARP proxy feature works for all destination IP addresses in the RipEX routing table. RipEX will not mimic ARP proxy replies to any other IP address.
Add routing rules to enable ARP proxy on other IP addresses (e.g. if wanting to use the ARP proxy for IP addresses 192.168.2.8-15, add the IP subnet 192.168.2.8/29 into the routing rules).
Both computers have the same IP addresses as in the basic configuration example. Just remove the default gateway.
PC #1: IP address: 192.168.2.1, Mask: 255.255.255.0
PC #2: IP address: 192.168.2.2, Mask: 255.255.255.0
You need to delete the routing rules we added previously, just go the the Command prompt again and type in the following commands:
PC #1:
route delete 192.168.2.252 mask 255.255.255.255 192.168.2.251
route delete 192.168.2.2 mask 255.255.255.255 192.168.2.251
PC #2:
route delete 192.168.2.251 mask 255.255.255.255 192.168.2.252
route delete 192.168.2.1 mask 255.255.255.255 192.168.2.252
The test is exactly the same as described in Chapter Section 3.1.3, “Test the Connectivity”.
The most important thing to remember with the ARP proxy example is that we did not need to configure any default gateway or routing rules on the computers (RTUs). Thanks to this, we can even add “simple” RTUs to our network and we can have the same IP subnets behind different RipEX units.
| Tip | |
|---|---|
Give careful thought to the network design, because a good design can dramatically reduce the number of necessary routing rules in the RipEX routing table. |
Example 3.1. Routing rules
You have four end stations with IP addresses 192.168.2.1, .2.2, .2.5 and 2.6 and you need two of them behind RipEX A and two of them behind RipEX B. With 192.168.2.1 and .2.2 behind RipEX A, you will need to add only one rule in the RipEX B: 192.168.2.4/30 via RipEX A. Otherwise you will need to add two rules (e.g. with .2.1 and .2.5 IP addresses).
We will explain two similar examples to show the VLAN functionality.
In this example, we will have a VLAN ID 2 used between RipEX A and PC #1. RipEX management traffic on the same Ethernet port would be untagged.
Traffic on the radio channel is always untagged.
Traffic between RipEX B and PC #2 will be also untagged.
See the following diagram:
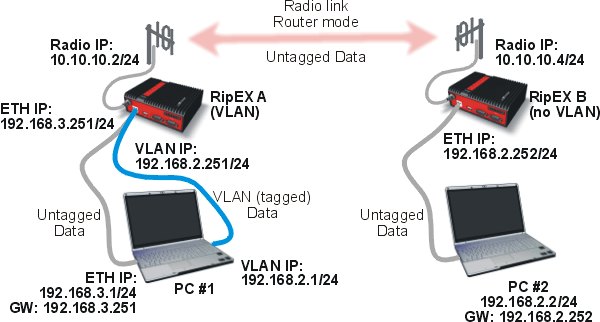
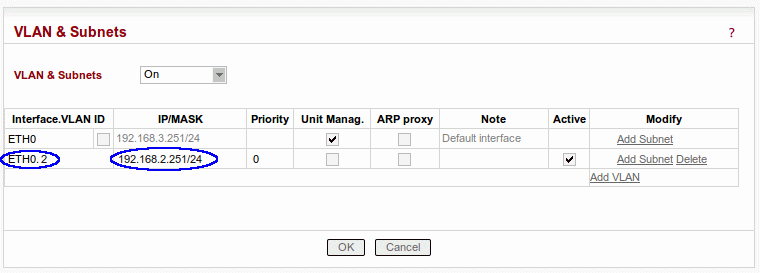
The configuration on RipEX A will be a little more complicated. There will be two subnets, one for VLAN and one for other traffic. Go to the Settings menu and change the Ethernet IP address to 192.168.3.251. Then click on the VLAN & Subnets button and add a new VLAN – we will use VLAN ID 2 with an IP address 192.168.2.251.
On RipEX B, turn the VLAN & Subnets option off.
The routing rules can stay exactly the same as in the previous ARP proxy example on both RipEX units. If you want to have RipEX A management (ETH) IP subnet reachable from RipEX B, you can add this routing rule: 192.168.3.0/24 via 10.10.10.2. But this is not necessary for the end-station connectivity.
PC #2 IP configuration is the same:
IP address: 192.168.2.2
Subnet Mask: 255.255.255.0
Default Gateway: 192.168.2.252
Setting of PC#1 is not so straightforward. Please set the following parameters:
IP address: 192.168.3.1
Subnet Mask: 255.255.255.0
Default Gateway: 192.168.3.251
As you can see we are connected to RipEX A within the 192.168.3.0/24 management IP subnet. But we still need to configure the VLAN interface. This step depends very much on the Operating system (OS) you use. We will describe the necessary steps in Ubuntu 12.04 and will give you a short Windows 7 example too.
Ubuntu 12.04
In the command prompt, run the following commands:
modprobe 8021q
vconfig add eth0 2
ip link set eth0.2 up
ip link set mtu 1496 dev eth0.2
ip addr add 192.168.2.1/24 dev eth0.2
The most important command is vconfig, which creates the VLAN interface called eth0.2. We enabled the interface, decreased the MTU because 4 additional bytes are added to each frame due to the VLAN tag and of course we assigned the IP address to the interface.
The last two commands create routes so any packet destined to the 192.168.2.2 or 192.168.2.252 is routed via 192.168.2.251 gateway (RipEX VLAN interface).
Windows 7
There is no tool like vconfig in Windows 7. The VLAN features depend on the network adapter and driver installed. Please see the respective download sites of your network card to obtain the correct VLAN enabled driver.
| Note | |
|---|---|
There is also the possibility that your network card will not support VLANs at all. |
To see what network card and driver you have, go to menu. Here you should see your network card. Right click on it and select the Properties option.
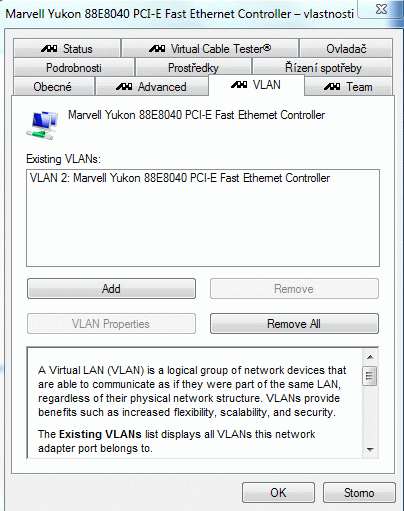
On the example, we added a VLAN 2 interface. See the respective network card manuals for more details.
If you were successful in adding a new VLAN interface. You should see this interface among other physical network interfaces. Set the IP address, mask and gateway as usual:
IP address: 192.168.2.1
Subnet Mask: 255.255.255.0
Default Gateway: 192.168.2.251
Now you just need to add routes to the 192.168.2.2 and 192.168.2.252 IP addresses. Run the Command prompt and type:
route add 192.168.2.252 mask 255.255.255.255 192.168.2.251
route add 192.168.2.2 mask 255.255.255.255
            192.168.2.251
| Note | |
|---|---|
You need Admin privileges to add a route in Windows 7. |
The test is exactly the same as described in prvious chapters.
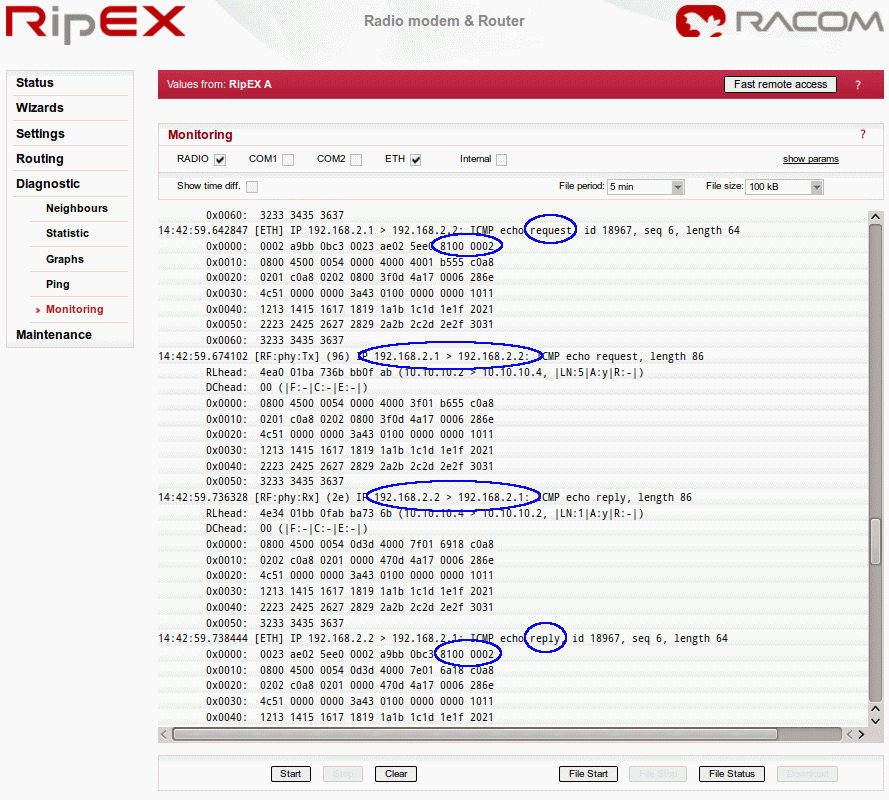
You can run the Monitoring feature in RipEX to capture packets on the radio/Ethernet interfaces and see Ethernet VLAN tags and other valuable information. See the following example:
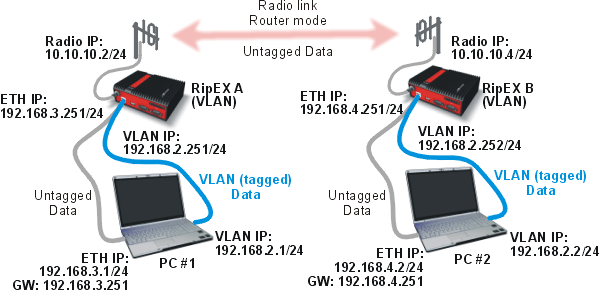
We can also configure VLANs on both RipEX units so the VLAN (tagged) data will be transmitted via the Ethernet link between PC #2 and RipEX B too. However, traffic is always untagged on the radio channel.
See the following diagram:
RipEX A has the same configuration as in the previous example. If you want to test the connectivity of RipEX ETH interfaces, you need to add this routing rule:
Destination: 192.168.4.0/24, Mask: 255.255.255.0, Gateway 10.10.10.4
RipEX B needs several changes. Change the Ethernet IP address to 192.168.4.252 with the mask 255.255.255.0. Now go to the VLAN & Subnets menu, enable the feature and add a new VLAN – we will use VLAN ID 2 with the IP address 192.168.2.252.
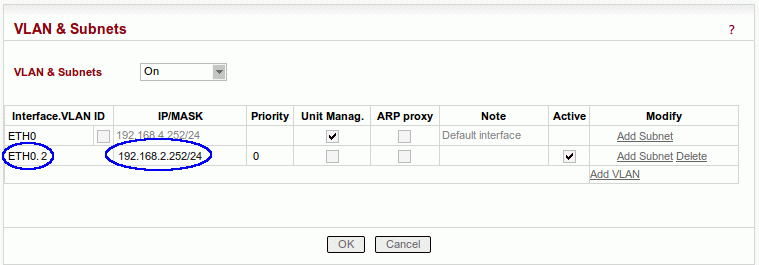
The VLAN ID is the same as used on RipEX A, but we can set any ID when needed.
| Note | |
|---|---|
You can try to enable VLAN on the default interface after you complete this example. |
The RipEX B routing table consists of three rules:
Destination: 192.168.2.251/32, Mask: 255.255.255.255, Gateway 10.10.10.2
Destination: 192.168.2.1/32, Mask: 255.255.255.255, Gateway 10.10.10.2
Destination: 192.168.3.0/24, Mask: 255.255.255.0, Gateway 10.10.10.2
We do not need to change anything on PC #1. PC #2 needs the following changes:
IP address: 192.168.4.2, mask 255.255.255.0, gateway 192.168.4.252
Now we need to add the VLAN interface with an ID 2. See the procedure in the previous example.
When you have added the VLAN interface, add the following routing rules:
route add 192.168.2.251 mask 255.255.255.255
            192.168.2.252
route add 192.168.2.1 mask 255.255.255.255
            192.168.2.252
| Note | |
|---|---|
You need the admin privileges to add a route in Windows 7. |
Now you should be experienced enough for the next test. Set another VLAN ID on both computers. Use the same VLAN ID on ETH.0 interface for the RipEX management. You will have a “VLAN only” network.
See one of the possible examples:
| Note | |
|---|---|
VLAN 2 is on the same subnet 192.168.2.0/24. VLAN 3 is on the subnet 192.168.3.0/24 and VLAN 4 is on the 192.168.4.0/24 subnet. |