The IPsec tunnel can be established among all devices compatible with IPsec protocol (RipEX, CISCO, etc.). This chapter explains and shows the RipEX and CISCO ASA configuration steps and IPsec interconnectivity over the Ethernet infrastructure.
CISCO router/firewall can be used as a powerful IPsec concentrator utilizing tens, hundreds or thousands of IPsec tunnels. If you already have a company infrastructure and VPN connectivity and you need to have remote access to the whole RipEX network in a secure way, CISCO IPsec concentrator (or any other similar supplier) is one of the solutions.
| Note | |
|---|---|
You can use RipEX instead of a CISCO router, but keep in mind the limitation of 8 simultaneous IPsec tunnels. |
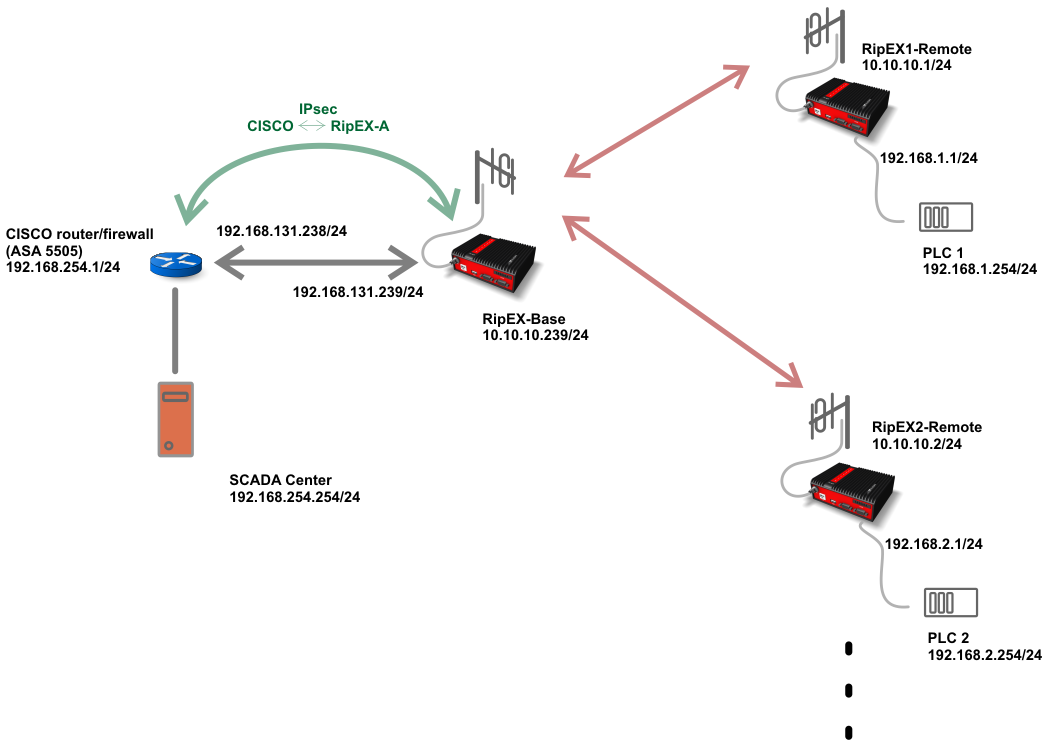
The connection between CISCO and RipEX routers can go over any infrastructure, including other routers, switches or firewalls via any connectivity type (cellular network, p2p microwave links, …). For this simple example, only the “direct” or “switched” connection is used, i.e. both are within one Layer2 subnet: 192.168.131.0/24.
The central location behind the CISCO ASA router is configured with 192.168.254.0/24 network. This SCADA center monitors all remote PLC units. The PLCs can either be connected via Ethernet, or via RS232 links (RTUs).
Configuration of the central CISCO router and RipEX-Base will be explained in detail. Other RipEX units’ configurations are straight-forward and will be explained briefly.
Parameters:
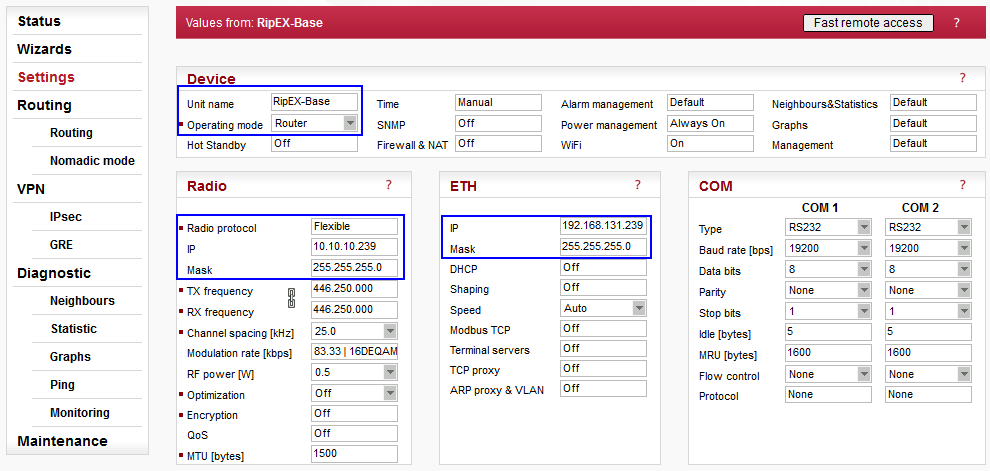
| Unit name | RipEX-Base |
| Operating mode | Router (IPsec can only be configured in Router mode) |
| Radio protocol | Flexible (you can choose either of the two supported protocols – Flexible or Base driven) |
| Radio IP/Mask | 10.10.10.239/24 |
| ETH IP/Mask | 192.168.131.239/24 |
| Note | |
|---|---|
See previous chapters, the manual or web interface help on other parameters. |
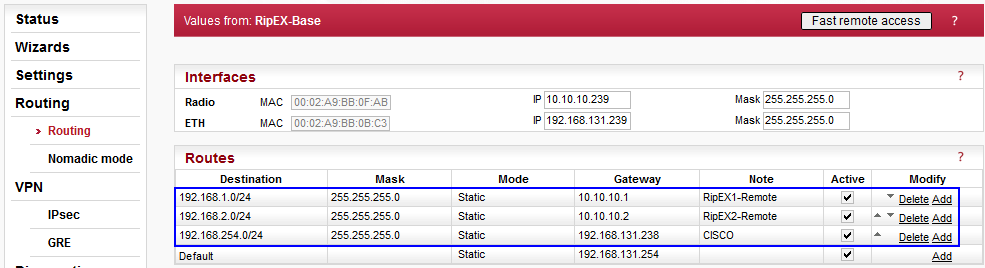
Three static routes are configured to meet the topology being used:
192.168.1.0/24 via 10.10.10.1 (connection to RipEX1-Remote Ethernet subnet)
192.168.2.0/24 via 10.10.10.2 (connection to RipEX2-Remote Ethernet subnet)
192.168.254.0/24 via 192.168.131.238 (connection to CISCO subnet)
The first two routes are necessary to access remote subnets via the Radio channel and there is no IPsec configured. The third route to 192.168.254.0/24 network is also necessary and once IPsec is established, packets sent to this remote network will be encapsulated (following the IPsec selectors’ configuration).
CISCO ASA is configured via CLI commands.
| Note | |
|---|---|
A Windows “putty” application can be used to access CISCO CLI environment (e.g. via Console port / RS232). Once logged in, type “enable” and “conf t” to access configuration menu. See the CISCO documentation for more details. |
Parameters:
hostname ciscoasa
The CISCO ASA hostname (hostname can be used as a Peer ID for IPsec if required)
interface Ethernet0/0
 switchport access vlan 2
interface Vlan1
 nameif inside
 security-level 100
 ip address 192.168.254.1 255.255.255.0
interface Vlan2
 nameif outside
 security-level 0
 ip address 192.168.131.238 255.255.255.0
Ethernet interface IP configuration. The internal (inside) LAN is configured with 192.168.254.1/24 subnet. The external (outside) interface is set to 192.168.131.238/24 and it’s set for the Ethernet0/0 interface.
object network vpn-local-192.168.254.0
 subnet 192.168.254.0 255.255.255.0
object network vpn-remote-192.168.1.0
 subnet 192.168.1.0 255.255.255.0
object network vpn-remote-192.168.2.0
 subnet 192.168.2.0 255.255.255.0
nat (inside,outside) source static vpn-local-192.168.254.0 vpn-local-192.168.254.0 destination static vpn-remote-192.168.2.0 vpn-remote-192.168.2.0
nat (inside,outside) source static vpn-local-192.168.254.0 vpn-local-192.168.254.0 destination static vpn-remote-192.168.1.0 vpn-remote-192.168.1.0
The “object” settings define three objects with their network and mask. Objects are used to simplify other configuration steps.
NAT (Network Address Translation) rules are created to forward the communication between local and remote subnets.
| Note | |
|---|---|
Different approaches are possible. |
Remote RipEX units must also be set in Router mode with correct Radio parameters applied. The only routing rule required is a “Default gateway” to the central RipEX-Base unit’s radio IP (10.10.10.239).

The complete RipEX IPsec configuration used in this example is:

CISCO configuration:
access-list l2l-list extended permit ip object vpn-local-192.168.254.0 object vpn-remote-192.168.1.0
access-list l2l-list extended permit ip object vpn-local-192.168.254.0 object vpn-remote-192.168.2.0
crypto ipsec ikev2 ipsec-proposal ikev2proposal
 protocol esp encryption aes-192
 protocol esp integrity sha-1
crypto ipsec security-association pmtu-aging infinite
crypto map ikev2map 1 match address l2l-list
crypto map ikev2map 1 set pfs group20
crypto map ikev2map 1 set peer 192.168.131.239
crypto map ikev2map 1 set ikev2 ipsec-proposal ikev2proposal
crypto map ikev2map 1 set security-association lifetime seconds 3600
crypto map ikev2map interface outside
crypto ca trustpool policy
crypto ikev2 policy 1
 encryption aes-256
 integrity sha512
 group 19
 prf sha512
 lifetime seconds 14400
crypto ikev2 enable outside
group-policy ripexTrialPol internal
group-policy ripexTrialPol attributes
 vpn-tunnel-protocol ikev2
 ipsec-udp enable
tunnel-group 192.168.131.239 type ipsec-l2l
tunnel-group 192.168.131.239 general-attributes
 default-group-policy ripexTrialPol
tunnel-group 192.168.131.239 ipsec-attributes
 ikev2 remote-authentication pre-shared-key RacomRipEX
 ikev2 local-authentication pre-shared-key RacomRipEX
Selected RipEX-CISCO IPsec parameters

CISCO commands:
CISCO defines “Peer address” via a command
crypto map ikev2map 1 set peer 192.168.131.239
Tunnel type must be configured using a “tunnel-group” command:
tunnel-group 192.168.131.239 type ipsec-l2l
tunnel-group 192.168.131.239 general-attributes
 default-group-policy ripexTrialPol
A policy for using IKEv2 is created and named “ripexTrialPol”.
group-policy ripexTrialPol internal
group-policy ripexTrialPol attributes
 vpn-tunnel-protocol ikev2
 ipsec-udp enable
The policy states that IKEv2 is allowed (IKEv1 is NOT allowed) and IPsec traffic via UDP datagrams.
The Local and Peer IDs are configured as IP addresses automatically in CISCO. If a different ID is required, enter the IPsec attributes tunnel configuration and choose the required identity.
ciscoasa(config)# tunnel-group 192.168.131.239 ipsec-attributes
ciscoasa(config-tunnel-ipsec)# isakmp identity <option>
For example, the hostname can be used as the CISCO ID using:
ciscoasa(config-tunnel-ipsec)# isakmp identity hostname
In such a case, change the Peer ID to “ciscoasa” in the RipEX-Base IPsec configuration.
The traffic selectors in RipEX correspond to the following CISCO parameters:
access-list l2l-list extended permit ip object vpn-local-192.168.254.0 object vpn-remote-192.168.1.0
access-list l2l-list extended permit ip object vpn-local-192.168.254.0 object vpn-remote-192.168.2.0
These commands specify the “interesting traffic” which will be encrypted. Notice its name “l2l-list” which is also used in other parameters/commands.
RipEX parameters:
CISCO commands:
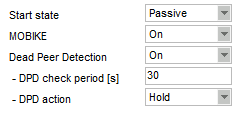
Check your CISCO device manual if parameters in Fig. 7 are or are not supported. The tested CISCO ASA automatically starts the IPsec tunnel and thus, RipEX is set to the “Passive” mode. MOBIKE and DPD were not configurable, but could be enabled in RipEX. DPD takes care of the tunnel “health” and can force tunnel re-establishment. The MOBIKE parameter is “on” by default, but if the topology is static, it can be turned off.
| Note | |
|---|---|
In newer CISCO iOS, the DPD mechanism should be supported using
the tunnel-group ipsec-attributes “ |
RipEX parameters:
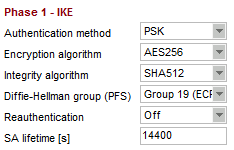
RipEX only supports the PSK authentication method.
CISCO commands:
CISCO PSK configuration is shown later in the PSK pass-phrase settings.
Other parameters can be configured via the IKEv2 policy:
crypto ikev2 policy 1
 encryption aes-256
 integrity sha512
 group 19
 prf sha512
 lifetime seconds 14400
The PRF is not configurable in RipEX and it’s always the same as integrity algorithm. The SA lifetimes do not need to be the same on both IPsec tunnel end-points. Once the CISCO or RipEX SA lifetime is reached, the re-keying (re-authentication) is started and lifetime values are reset at both end-points.
| Note | |
|---|---|
Reauthentication was not configurable in a tested CISCO ASA iOS version. Reauthentication is useful as the authentication method if certificates are being used. |
RipEX parameters:
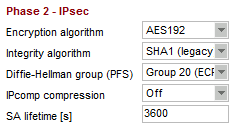
crypto ipsec ikev2 ipsec-proposal ikev2proposal
 protocol esp encryption aes-192
 protocol esp integrity sha-1
crypto map ikev2map 1 set pfs group20
crypto map ikev2map 1 set ikev2 ipsec-proposal ikev2proposal
crypto map ikev2map 1 set security-association lifetime seconds 3600
| Note | |
|---|---|
IPcomp was not implemented in tested CISCO ASA iOS. |
RipEX parameters:
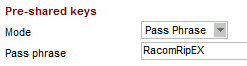
CISCO commands:
tunnel-group 192.168.131.239 ipsec-attributes
 ikev2 remote-authentication pre-shared-key RacomRipEX
 ikev2 local-authentication pre-shared-key RacomRipEX
| Note | |
|---|---|
If you run the “show run” command to see the configured parameters, the PSK is displayed as *****. |
Other important CISCO parameters:
crypto map ikev2map 1 match address l2l-list
Create a crypto map and match it to the previously create ACL rules named “l2l-list”
crypto map ikev2map interface outside
Apply the crypto map to the correct interface
crypto ikev2 enable outside
Enable IKEv2 on a correct interface
| Note | |
|---|---|
Check the IPsec/IKEv2 details with respective manuals. |
CISCO devices have several ways to debug issues with IPsec, here are some of them:
ciscoasa(config)# show crypto ikev2 sa detail
Detailed information about active IKEv2 Security Associations
ciscoasa(config)# show crypto ipsec sa
Information about active IPsec Security Associations
ciscoasa(config)# deb crypto ikev2 protocol
ciscoasa(config)# deb crypto ikev2 platform
Debug output for IKEv2