Setting up the IP address in the PC
For configuration of the link a suitable IP address has to be set up in the PC, for example 192.168.169.160
Open the Start menu, Control Panel
In new window choose Network and Internet
Continue View network status and tasks
In new window choose Change adapter settings:

In the Network Connections window, right-click on Local area connection and then left-click on Properties:
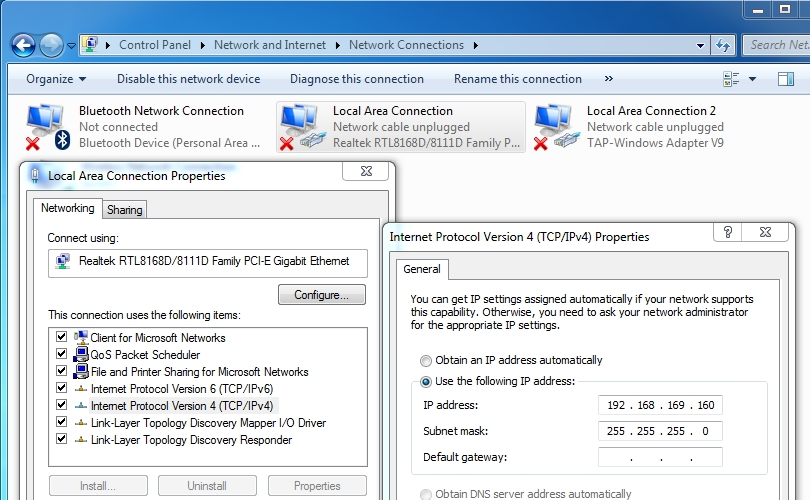
Select Internet Protocol Version 4 (TCP/IPv4) and Properties
On the General tab select Use the following IP address
Enter IP Address 192.168.169.160
Set Subnet mask to 255.255.255.0
Click OK to acknowledge these settings and close all windows
Checking the IP address in the PC
In Windows 7 proceed in the following manner:
Interconnect the configured unit and PC with an Ethernet cable
Under the Start menu, type the command cmd in the “Search programs and files” box
and press Enter.Inside the
cmd.exewindow that opens, enter the command ipconfig at the command prompt
and find the information about IP address and mask among the list of messages returned.
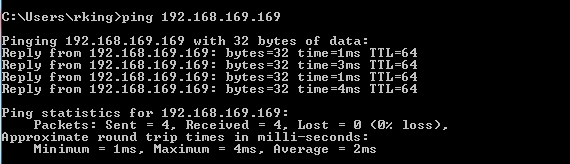
Checking the PC – unit connection using Ping
Check the connection between the PC and the unit via the Ethernet cable.
Under the Start menu, type the command cmd in the “Search programs and files” box
and press Enter.Inside the
cmd.exewindow that opens, type ping 192.168.169.169 at the command prompt
and press Enter.Ping times and statistics are returned as shown:
If no communication takes place a message appears with the text “Request timed” out.
If communication between the web browser and the unit does not take place check the browser settings. E.g. the “Work offline” item in the File menu must not be crossed out.