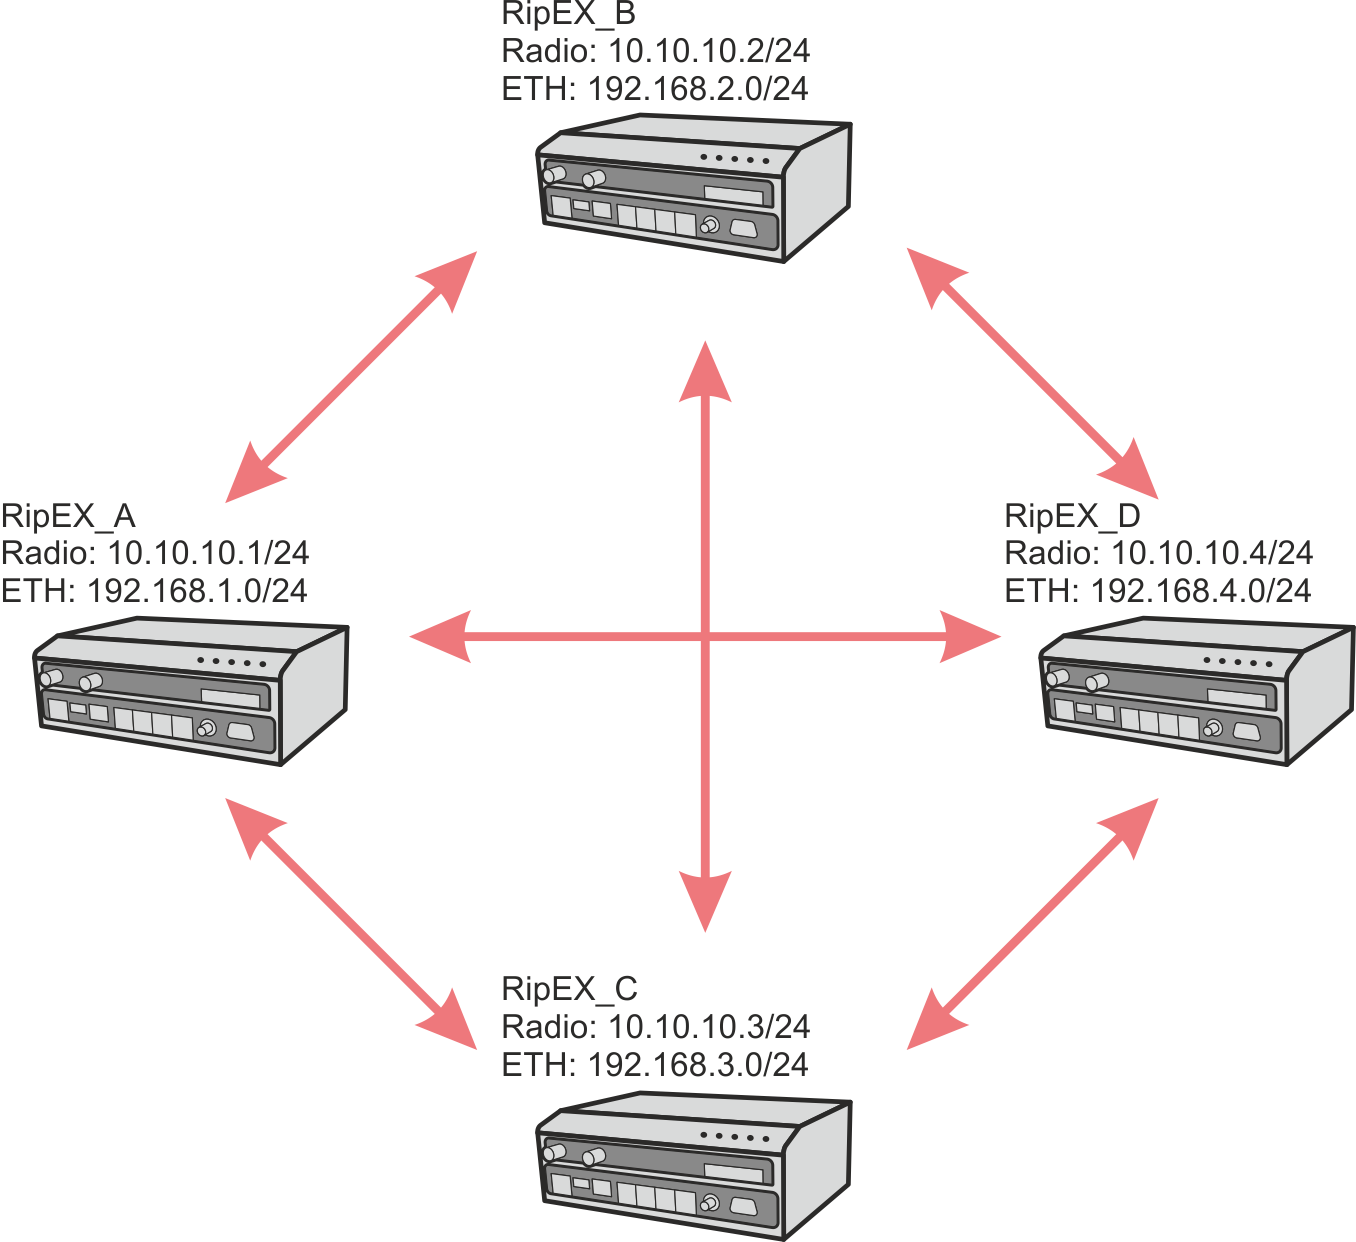
The first example shows how Babel can be used to propagate RipEX2’s LANs automatically instead of static routes. The topology allows every device to directly see each other resulting in a situation that all communication goes directly between two particular RipEX2 units. There is no dedicated repeater or another technology such as LTE or Fibre optics.
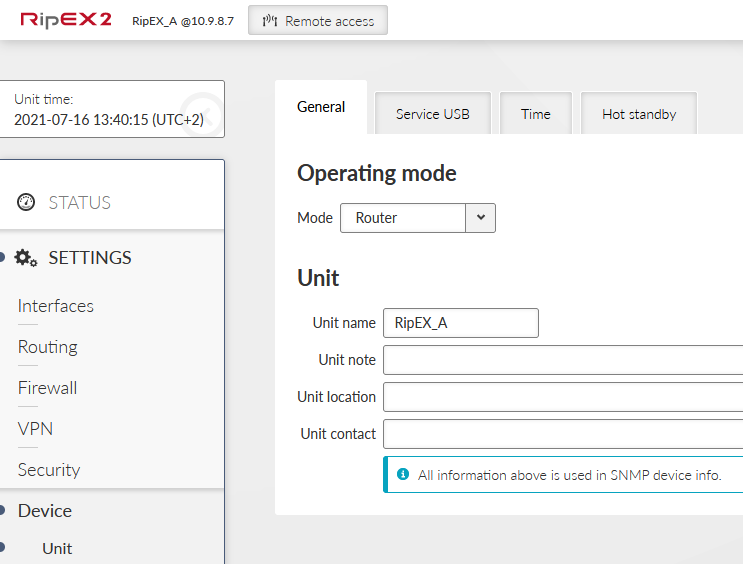
Start with unit’s Name and Mode. Go to the SETTINGS – Device – Unit menu. Select the “Router” mode, because it is not possible to configure dynamic routing protocols in the Bridge mode. Set the name to “RipEX_A”.
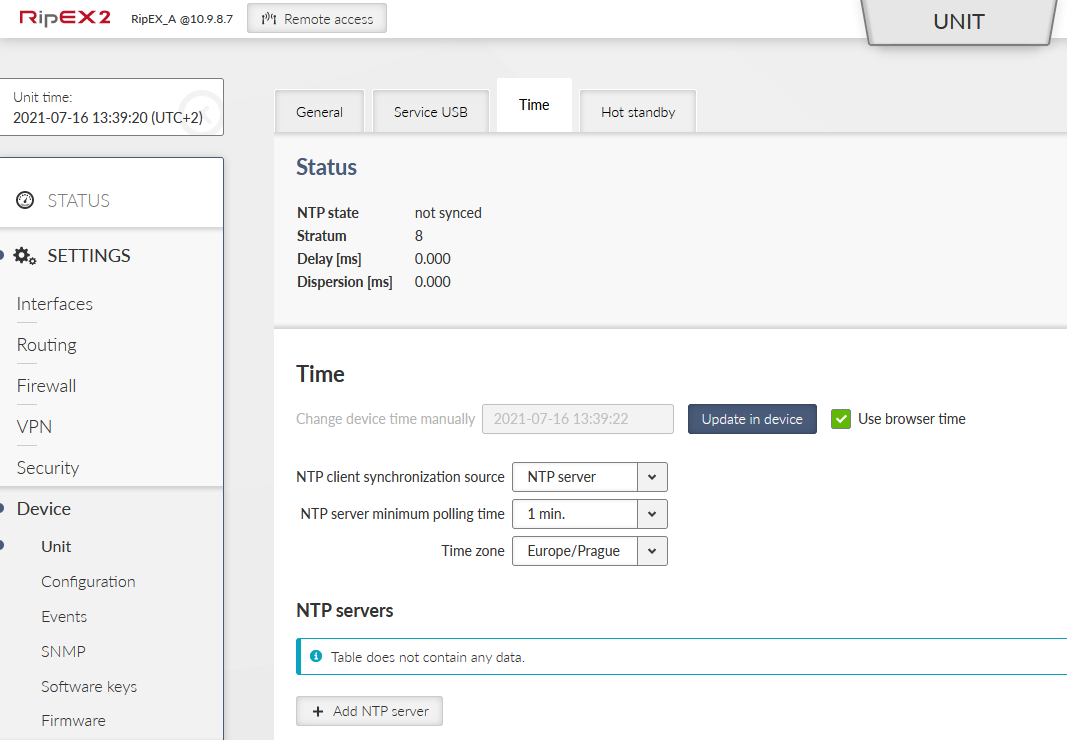
You can also set a correct time in the unit, either via a working NTP server or just manually update it by the time in your browser (“Update in device” button and a check-box “Use browser time”). This is useful in general and mainly for debugging purposes (Statistics, monitoring, …). It is not required by Babel protocol.
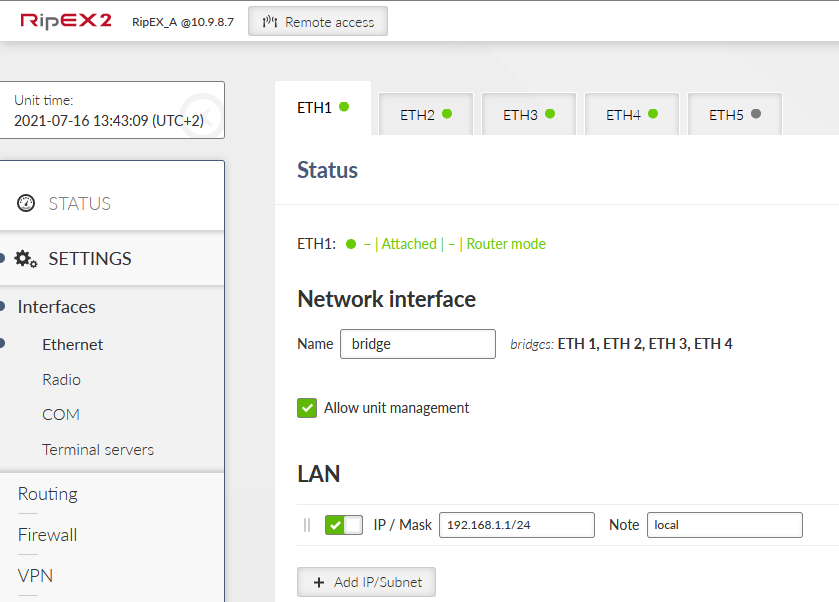
Configure a correct Ethernet IP address 192.168.1.1/24 (bridged on all ETH ports).
Go to the Radio submenu and configure the Radio interface. You can accommodate most of the parameters to suit your needs, but be consistent throughout this application note and all its examples.
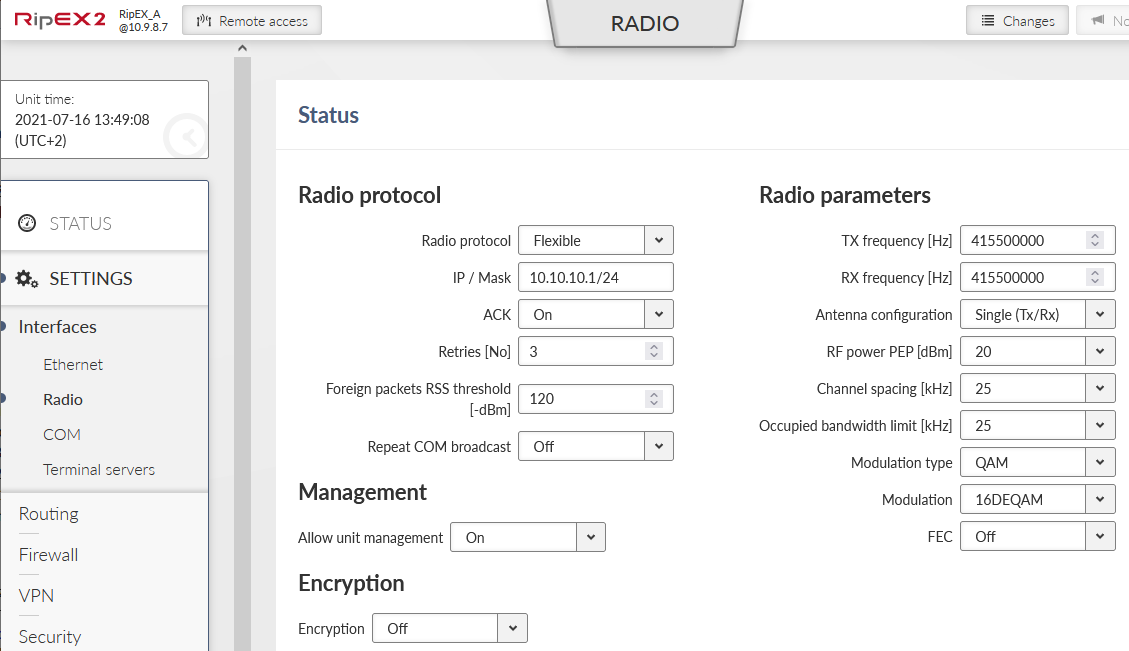
Settings:
Radio protocol | Flexible |
IP / Mask | 10.10.10.1/24 |
Radio protocol | Flexible |
ACK | On |
Retries | 3 |
TX/RX frequencies | 415.500.000 MHz |
Antenna configuration | Single (Tx/Rx) |
RF power PEP | 20 dBm (testing on the desk, lowest power) |
Channel spacing and OBW | 25 kHz |
Modulation and its type | QAM, 16DEQAM |
FEC | Off |
| Note | |
|---|---|
Using the Flexible Radio protocol via a simplex channel (half-duplex operation) might result in a FULL MESH organized network. When BDP Radio protocol is set, using the Babel dynamic routing results in a self-configuring network with a STAR topology. There is no Encryption set, neither any Individual link options within these examples. |
The most important menu is SETTINGS – Routing – Babel. Activate the protocol and set the Router ID to unique 1.1.1.1 and enable Routing offering so that it forwards received routes to other neighbor.

Go to the Network panel and create a new Wireless network.
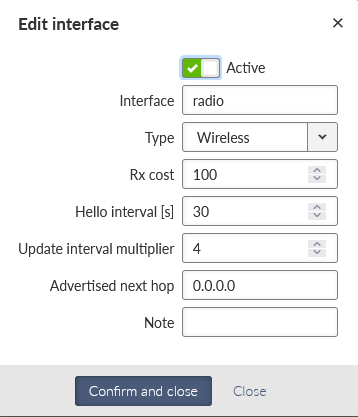
Interface must be “radio” (interface name) and its type “Wireless” (it is a radio channel). Change the Rx cost from default 128 to 100.
Increase the Hello interval to 30 seconds. This is important so that Babel does not send too many overhead packets on the radio channel. Decision on this (and other) parameters is always a “tradeoff”. Lower the interval, quicker protocol operations such as topology changes detection or complete routing propagation, but in a cost of higher Radio channel utilization.
Keep in mind that if you run low FSK or even low QAM modulation, the primary goal is still correct SCADA operation and not overhead data.
Another parameter to be set is Update interval multiplier and is set to default 4. This number multiplies the Hello interval (in our example it is 4×30 seconds = 2 minutes). Router updates packets are sent in ~ 2 minutes intervals.
This setup, the same in all 4 RipEX2 units, results in approximately 1 Babel packet per 10 second, i.e., 100 bps. The topology change can be detected and spread across a network within quite a long interval, ranging from 30 seconds to several minutes. Optimize these values to suit your topology, used modulation type and SCADA traffic.
Go to another panel “Static rules” and configure advertised network 192.168.1.0/24 with default metric equal to 0.

Go to another panel “Import filter” and create a new rule. The only non-default parameter we need to set is “Local preferred source address” (LPSA) – set it to 192.168.1.1 (Ethernet IP of RipEX_A). This is a preferred source IP address for locally generated packets.
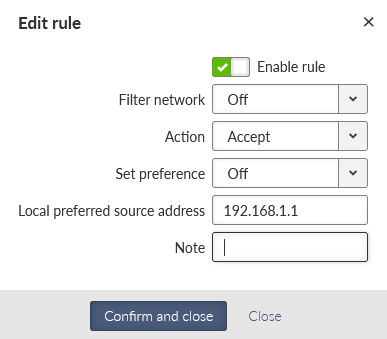
We do not configure anything in the “Export filter” panel.
The configuration is complete. Go to the “Changes” menu (upper right corner button) and save the changes.
Other units share most of the settings we configured in RipEX_A. We just highlight the differences compared to RipEX_A setup.
RipEX_B
Unit name | RipEX_B | ||||||
Ethernet IP | 192.168.2.1/24 | ||||||
Radio IP | 10.10.10.2 | ||||||
Babel routing |
|
RipEX_C
Unit name | RipEX_C | ||||||
Ethernet IP | 192.168.3.1/24 | ||||||
Radio IP | 10.10.10.3 | ||||||
Babel routing |
|
RipEX_D
Unit name | RipEX_D | ||||||
Ethernet IP | 192.168.4.1/24 | ||||||
Radio IP | 10.10.10.4 | ||||||
Babel routing |
|
Once configured, you can wait until the network converges to the correct routing, or you can also reboot all the units so the protocol starts from scratch.
Go to the DIAGNOSTICS – Routing menu and check the Babel panel. Let’s go through individual tables.
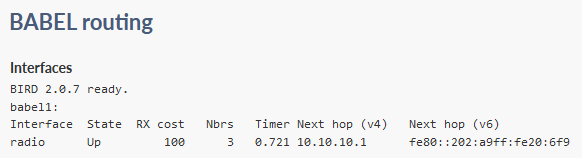
In the 1 st table, we can see all interfaces on which Babel is either configured or found. If the interface is missing, but should be there, it probably failed while initialization (e.g., because of missing link IPv6 address).
State | Interface state, either “up” or “down” |
Rx cost | It displays configured received cost (for other neighbor) |
Nbrs | Number of detected neighbors on particular interface |
Time | Number of seconds until next Babel Hello or Update transmission |
Nexthop | What “next-hop” address the router offers to neighbors (IPv4 and IPv6)
|
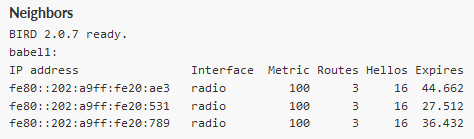
IP address | Neighbor’s IPv6 link address |
Interface | Interface on which the neighbor was found |
Metric | Current metric for receiving from neighbor |
Routes | Number of routes received from neighbor |
Hellos | Number of received Hello packets (from up to 16) |
Expires [s] | Time until reception of another expected Hello packet from neighbor |
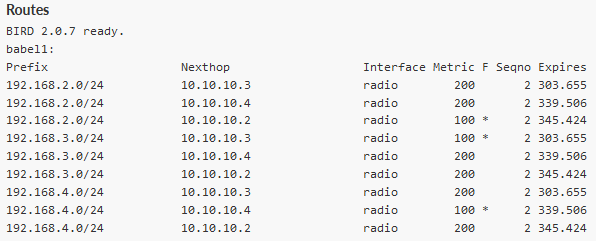
A list of all routes from all neighbors. It may even consist “loops” for routes which are not currently used, but once the protocol switches to them, loops are solved and “fixed”. Or in other words, such routes are are not considered as “candidates”.
Prefix | Range of destination IP addresses for a particular rule |
Nexthop | Next-hop address |
Metric | Current cost to the destination |
F | * for currently active rule, + for feasible next candidate for active rule |
Seqno | Update packet sequence number which announced the rule |
Expires [s] | Time until the rule expires |
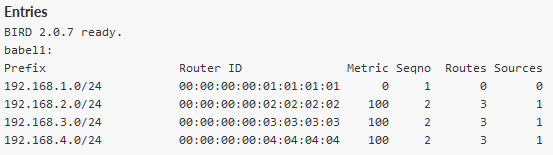
Prefix | Prefix of routed address range |
Router ID | Router ID – first 4 Bytes either zeros, or randomized. Second 4 Bytes equal to Router ID set in the configuration |
Metric | Current cost to the destination |
Seqno | Number of various routing rules for particular prefix/subnet |
Routes | Time until the rule expires |
Sources | Number of various routers which export a particular prefix to Babel network |
The table consist of advanced and detailed information of all routes from Babel table.
Now, check the remote unit’s IP accessibility. Go to the DIAGNOSTICS – Tools – ICMP ping menu.
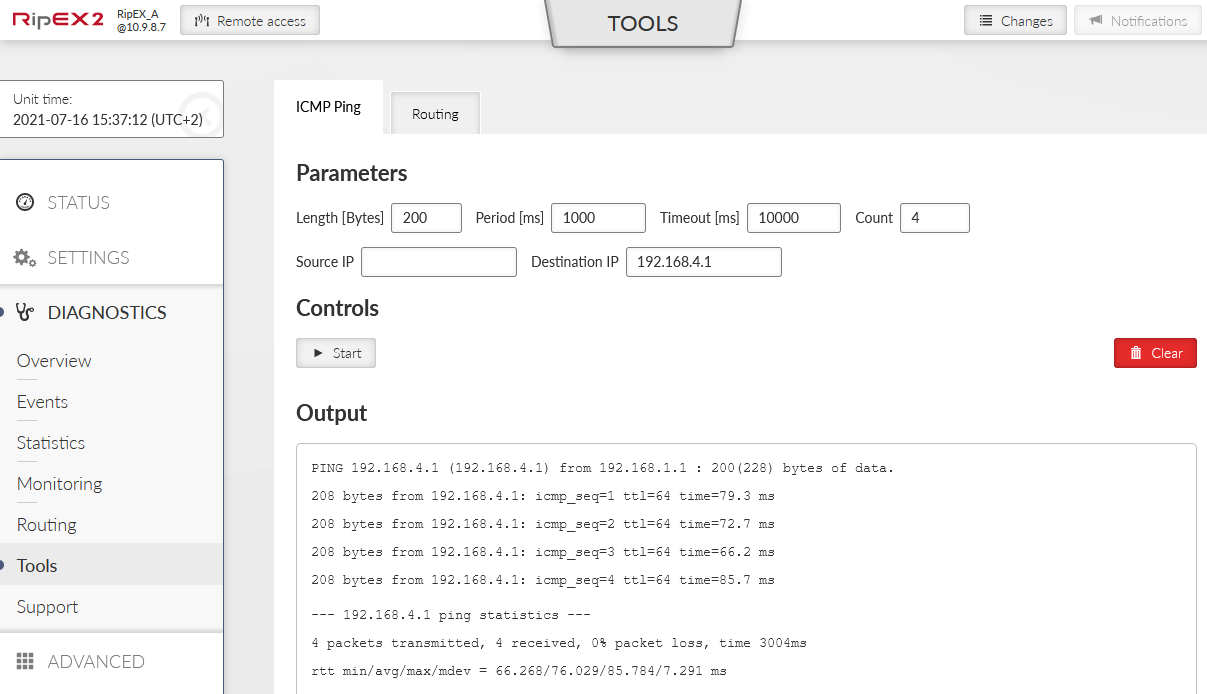
Fill in the Destination IP field with required IP (try all remote LAN IPs). Check if it gets through. If not, check the Routing diagnostics for available routes.
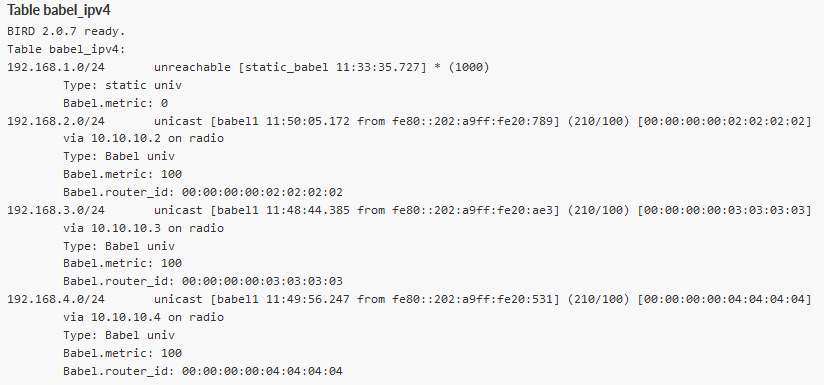
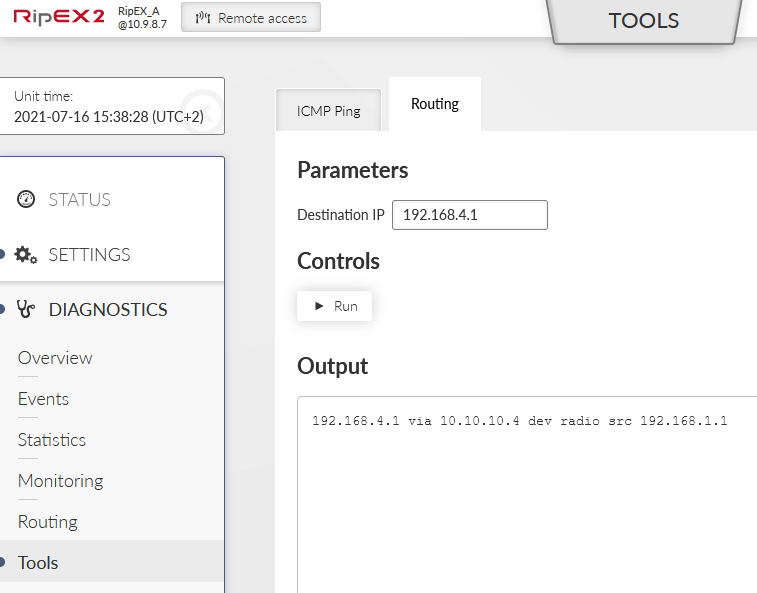
You can also check what route is used for particular destination in another panel “Routing”.
You can debug issues further in Statistics and/or Monitoring menus.