SNMPv1&v2c and v3 are supported by RipEX. Both can be configured separately for the SNMP agent and for SNMP notifications (traps and informs).
The communication is operated on standard UDP ports 161 (SNMP agent) and 162 (notifications).
RipEX supports read-only regime only, i.e., it is not possible to “set” values via SNMPSET commands.
SNMPv3 security is solved by a combination of USM (User-based Security Model) and VACM (View Access Control Model). SNMPv3 can be configured with or without Encryption (DES, AES) and Authentication (MD5, SHA) methods.
When using SNMP over radio channel, we recommend setting RipEX to the Router mode. From the point of radio network, SNMP is typically a standalone application sharing the radio channel with others. Thus, it causes collisions, which are automatically resolved by the radio channel protocol in the Flexible Router protocol, or handled optimally in the Base Driven Router protocol (no collisions at all). The radio channel uses no anti-collision protocol in the Bridge mode, meaning two competing applications can only be run at a great risk of collisions and with the knowledge that packets from both applications may be irretrievably lost.
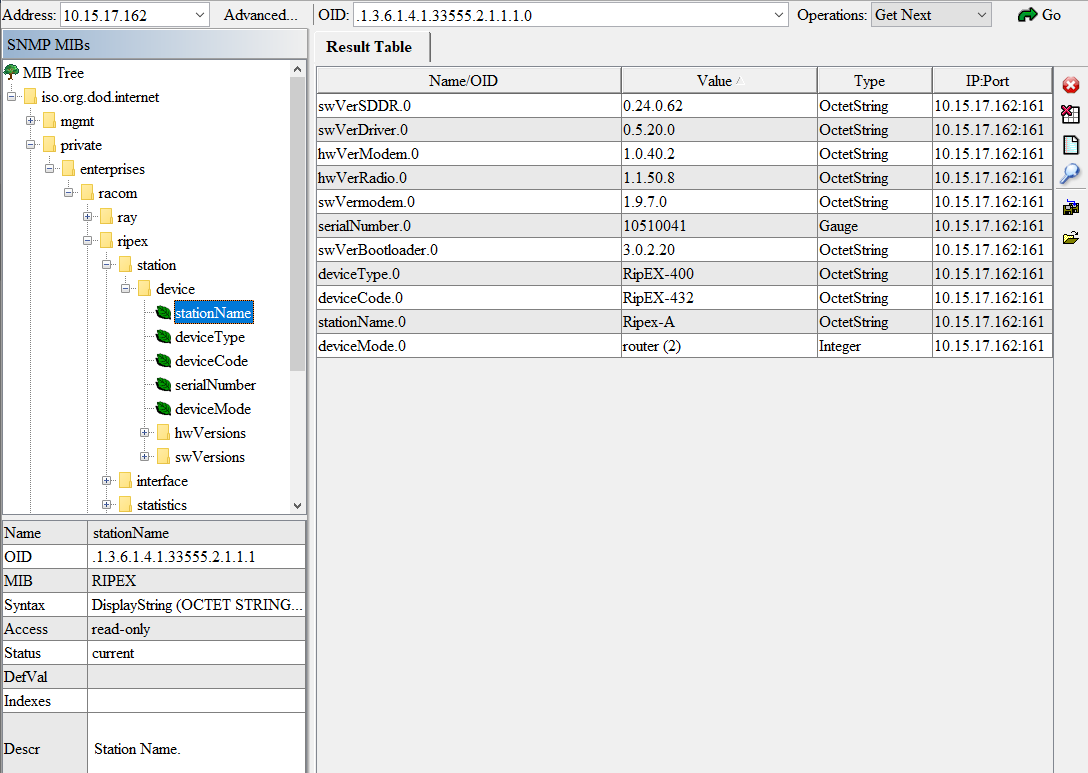
MIB can be read via any text editor, but it might be better to browse it (see the notification’s variable bindings, OID’s unit, descriptions, OID tree, getting values from RipEX units, receiving and testing notifications, etc.) in some special SNMP browser such as MIBBrowser from iReasoning. The following section explains some details about RipEX MIB for firmware version 1.9.7.0. MIB consists of “revision history” information so you can quickly find out what has been changed.
| Note | |
|---|---|
CSV file containing all proprietary RipEX OIDs can be sent upon request, or exported from MIBBrowser software. |
The RipEX MIB module complies with the Severity level 3 validation.
Supported MIBs and its OIDs:
Values from general MIBs such as SNMPv2-MIB, IF-MIB, IP-MIB, …
Proprietary MIB – RACOM-RipEX
Reading configuration parameters
Reading operation statistics (interfaces, …)
Backup routes status
Local and Remote watched values
Sending traps/informs (thresholds are configurable)
RipEX MIB utilizes custom types declaration so that SNMP reply is numeric, but each number corresponds to a particular meaning. E.g., Alarm states:
-1 unknown
0 inactive
1 active
Make sure your NMS is configured to translate numeric values to their meaning correctly (Value mapping in Zabbix).
Some of the returned values are in decimal notations. E.g., temperature returned as 39500 means 39.5. If a particular value requires it, it also has a predefined unit such as degrees of Celsius, Volts, decibels, percent, … Again, make sure you utilize your NMS with correct unit.
Current MIB can always be downloaded from RACOM website together with Zabbix templates.
SNMP is primarily designed for Ethernet networks, where generally, bandwidth capacity is not an issue. By contrast, radio bandwidth capacity is very limited and RipEX mostly works over the radio channel. For this reason, special care is recommended while configuring NMS. If badly configured, NMS can take a significant portion of the network capacity or can even overload the network completely.
It is important to realize that getting all RACOM specific OIDs from a single RipEX with one neighbouring unit can be approximately 48 kilobytes using SNMPv2. With encrypted and authenticated SNMPv3, this data volume can be doubled.
| Note | |
|---|---|
Number of values which can be obtained from each RipEX highly depends on number of neighbouring units and configured features (Protocols on RS232/Terminal servers, …). |
We recommend to query most of the values from units connected via Ethernet and query only carefully selected OIDs over the radio channel and not all possible data. Set SNMP query time intervals in your NMS as long as possible. The shortest recommended interval ranges from several minutes to tens of minutes.
It is also recommended to utilize SNMP BULK requests which significantly reduce amount of data being exchanged between RipEX and NMS, because it is possible to query multiple OIDs within a single packet, as well as reply to such multiple requests within just one SNMP reply packet.
| Note | |
|---|---|
There are many Network Management Systems available on the market. Whichever you choose, keep in mind the described limitations. E.g., never use NMS, which can download only the entire remote device MIB and not single OIDs. |
If you wish to monitor many watched values (VSWR, Temperature, UCC, …) from remote stations connected over the radio channel and you have a star topology network, you can improve bandwidth efficiency by reading OID values only from the Master (Repeater) RipEX station.
The advantage of the above is that the watched values from remote stations are broadcast in regular intervals (by default, 2 hours) and saved in the Master (Repeater) RipEX. These values from neighbouring stations have their own OID’s and can be downloaded from the Master (Repeater) RipEX.
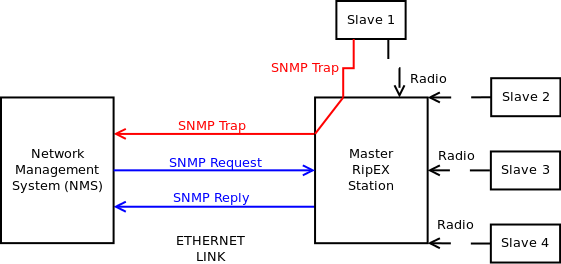
In the picture below – Master RipEX station periodically obtains watched values from its neighbouring Slave stations. Whenever the NMS requests any value mentioned, the reply is sent only from the Master station (over Ethernet) saving radio bandwidth. SNMP uses radio link only for sending SNMP Traps from any Slave to the NMS.
| Note | |
|---|---|
The diagram is simplified – there are no flows for SNMPv3 PDUs, neither Inform’s Acknowledgments. |
| Note | |
|---|---|
In such a case, watched values from neighbouring stations are displayed as part of the Master (Repeater) station. |
Indexes for remote watched values are dynamic. This is the reason, Zabbix (or another) NMS must utilize dynamic indexes together with Discovery rules. Discovery rules are also necessary other tables.
Tables requiring Discovery:
Remote watched values
Average and last radio statistics for each neighbouring unit
RSS [dBm], DQ – updated with every received packet (weighted average values based on last several minutes) – e.g., possible NMS update interval can be 5 minutes
Temperature [°C], RF power [W], TX lost [%], Voltage [V], VSWR – updated every 2 hours by default
Neighbouring IP address and total number of heard packets
Statistics – Radio
Neighbouring IP address
Packet and Byte counters – RX and TX
Data error, duplicate, lost, rejected, repeated counters
Backup paths
Peer IP and symbolic name
Alternative path – currently used gateway and its priority and state
Typical mechanism in static RipEX network is to run Discovery procedure once and then just query values based on found indexes until there is any change in the network topology. In such situation, it is required that this Discovery procedure updates all the indexes – i.e., adds new lines/indexes and removes those which are no longer supported.
It is more difficult with remote watched values, because the order and thus, indexes, can vary every “log save period” set in RipEX (24 hours by default). You need to run the discovery rule on regular basis so that watched values are not mixed within multiple neighbouring units.
Dynamic indexes are used to match a particular neighbour IP address and use a correct index afterwards. This is implemented in Zabbix NMS and a solution can differ in other NMS.
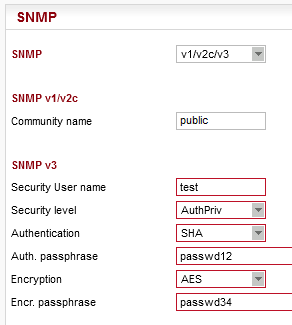
Basic SNMP parameters are described in RipEX user manual and can be configured in SETTINGS – Device – SNMP menu. The following section highlights some important parameters or explains something in more details.
Make sure that your NMS supports Authentication and Encryption algorithms you choose in RipEX.
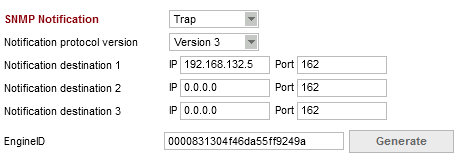
Another not very common option is “Engine ID”. This option is valid for SNMPv3 notifications only. This Engine ID for notifications conforms to RFC1910.
Example of generated Engine ID for SNMPv3 notifications: 80 008313 04 f46da55ff9249a
80 – engine ID must start with standard identification
008313 – enterprise OID – 33555 – RACOM s.r.o.
04 – Engine ID is assembled according to user defined string
f4 6d a5 5f f9 24 9a – HEX string from configuration
The differentiated part of the Engine ID can be entered as HEX characters or generated.
| Note | |
|---|---|
Every SNMPv3 enabled device within a network must have a unique Engine ID. This message ID used for SNMPv3 requests and replies is not configurable, conforms to RFC3411, and it is dynamically chosen (does not depend on any ETH MAC address). |
Current EngineID can be checked by capturing the SNMP data in Wireshark. It can also be obtained by SNMP request for .1.3.6.1.6.3.10.2.1.1 (not the one for SNMPv3 notifications).
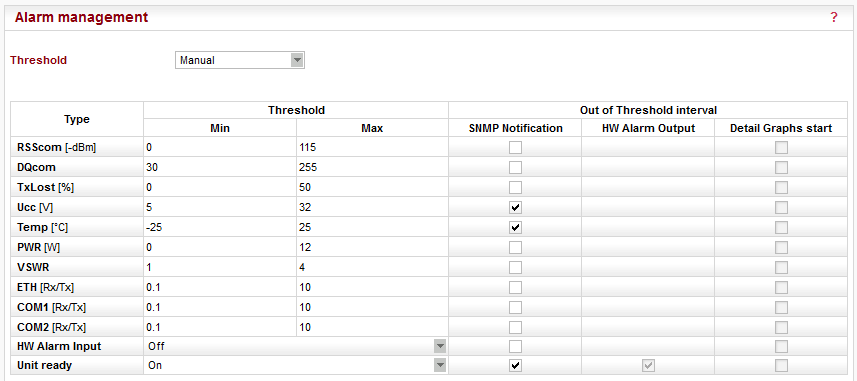
Notifications are being sent based on Alarm Management setup. Select Type of Event for which you want notifications to be sent in SETTINGS – Device – Alarm management menu. Check the particular check-box “SNMP notification”.
Thresholds are fully configurable.
The traps/informs are sent whenever any of the following watched values are beyond their threshold ranges and whenever the value falls back within the corresponding range. Each trap can either be in the alarm state or in the OK state.
RSS (Received Signal Strength) – one general threshold for all neighbours
DQ (Data Quality) – one general threshold for all neighbours
TX Lost [%] (The probability of a transmitted frame being lost)
UCC (Power voltage [V])
Temperature [C]
RF Power [W]
VSWR (Voltage Standing Wave Ratio, 1.0 = the best ratio, 1.0 – 1.8 = acceptable ratio, > 2.5 = indicates a serious problem in antenna or feeder)
Ethernet RX/TX Packets ratio (Ratio between received and sent packets over Ethernet)
COM1/2 RX/TX Packets ratio (Ratio between received and sent packets over COM ports)
HW Alarm input
Hot-Standby (SNMP trap containing active station identity – sent by the active station)
Backup paths system (Backup path state and Alternative path state changes)
Unit ready (the hardware alarm output or the SNMP trap indicates that the RipEX radio is ready to operate)
Nomadic remote device is offline (A notification to indicate that Nomadic remote device is offline/online; i.e., status of connection to Nomadic base)
| Note | |
|---|---|
Watched values broadcasting period can be set in Settings – Device – Neighbours&Statistics menu. If you set it to 0, you completely disable remote watched values. Feel free to change it as required, but keep in mind that setting this value too low might send too much of broadcast traffic to the radio channel. Setting this value too high might result in situation in which remote watched values are not useful. |
