This description is valid for the communication units MR400, MR160, MC100, MG100, MR900. The sw Walrus and Morce work similarly like these units.
Immediately after starting, the Setr.exe application tries to establish connection to a MORSE node. Then the MORSE main menu appears.
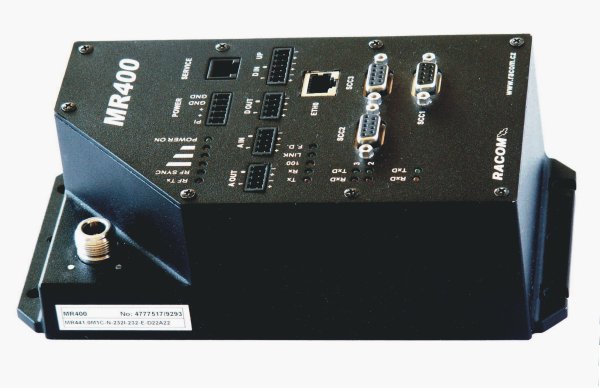
There is a MR400 unit. Connector on the panel is used for the service access by a terminal software. The connector wiring is described in MR400 Service Manual.
MORSE main menu:

(H)W   (U)nit (R)adio
(N)odes  s(D)r   (B)c
(S)CC   R(F)C   (E)th
(A)rt   r(T)ab  (c)nf
(m)isc  NA(G)

(s)ervice      d(i)ag
(p)ath        (?)help

(o)ld cnf menu

(q)uit
Meaning of menu components
| (H)W | HW data (written during production) |
| (U)nit | general parameters applicable to whole CU |
| (R)adio | parameters of the radio part |
| (N)odes | node parameters |
| s(D)r | semidynamic routing, in development |
| (B)c | broadcast routing for all nodes |
| (S)CC | serial communication channels |
| R(F)C | radio frequency channels |
| (E)TH | Ethernet channel |
| (A)rt | address resolution tables |
| r(T)ab | routing tables (store and forward retransmission) |
| (c)nf | general configuration services |
| (m)isc | miscellaneous services for special cases |
| NA(G) | network agent, commun. channel without physical output |
| (s)ervice | unit diagnostic tools |
| d(i)ag | network diagnostic tools (logs, tests, monitoring) |
| (p)ath | path packet editor |
| (?)help | help for shell commands |
| (o)ld cnf | menus for obsolete services and configurations (for units with version 3.52 and older) |
Each of the letters in parentheses represents one submenu. To choose one of them, type the respective letter and press the Enter key. When the submenu appears, carry out the next choice. It is necessary to distinguish between small and capital letters.
It is possible to return to the main menu from any level of the menu using the escape key, or Q Enter. By selecting option q Enter, which is contained in each menu, you step back by one menu level.
It is possible to return to the main menu from any level of the menu using the escape key, or Q Enter. The choice q Enter, which is contained in each menu, accomplish one menu level step back.
Parameters are entered by typing the appropriate letter, immediately followed by the desired parameter value. If the parameter is entered with only a letter, a short prompter to this edited parameter appears.
A sample example:
In the Main menu choose U Edit, thus the
submenu (U)nit
Communication unit:
(e)dit
rmt de(f)ault  rmt (r)ead  rmt (w)rite
(q)uit
>>
Next e Enter
get  UNIT 0 O.K.
>>
The get operation was successfully finished – the set of unit configuration parameters has been received by Setr.exe and stored in a temporary buffer. Press Enter (To see parameters values)
Communication unit:
service (d)est:00000000 (N):0
(U)cc limit:130 * 0.1V  (h)yst.:2 * 0.1V
(s)tatus:0000 (P)SWD:OFF (L)OGW:OFF (M)INP:OFF
(l)og period:86400
Time (Z)one for DST:EU Time zone DI(F)F:3600sec
            obsolete(<605) Time (z)one:69136sec
Summer time (all to zero - off):
start (1)month:3 (2)day:27
end   (3)month:10 (4)day:30
Time sync:
 (i)n:0 Sr(c):00000000 (p)eriod:0
(O)ut:0 ds(t):00000000 p(e)riod:0
P(A) dir:0000 dat(a):0000
P(B) dir:0000 dat(b):0000
Power saving:
alar(m) time:0s m(o)de:0000
(R)adio pll recovery:OFF
de(f)ault (r)ead (w)rite
(I)nit (S)ync
(q)uit
>>
For example the item DIF(F):3600sec shows how many
seconds the unit must add to GMT to get local time. If you need to
change this parameter from 1 hour to 2 hours, type: F
Enter. A short prompt appears:
(q)uit
write new seconds to get localtime from GMT:
Write new count of seconds 7200 Enter and add Enter for displaying:
Communication unit:
service (d)est:00000000 (N):0
(U)cc limit:130 * 0.1V  (h)yst.:2 * 0.1V
(s)tatus:0000 (P)SWD:OFF (L)OGW:OFF (M)INP:OFF
(l)og period:86400
Time (Z)one for DST:EU Time zone DI(F)F:7200sec
            obsolete(<605) Time (z)one:72736sec
Summer time (all to zero - off):
start (1)month:3 (2)day:27
end   (3)month:10 (4)day:30
Time sync:
 (i)n:0 Sr(c):00000000 (p)eriod:0
(O)ut:0 ds(t):00000000 p(e)riod:0
P(A) dir:0000 dat(a):0000
P(B) dir:0000 dat(b):0000
Power saving:
alar(m) time:0s m(o)de:0000
(R)adio pll recovery:OFF
de(f)ault (r)ead (w)rite
(I)nit (S)ync
(q)uit
>>
To put a new set of parameters into the RAM memory in CU type I Enter:
Init values
Are you sure? (Y/N)
>>
To affirm this, press Enter (the same as Y Enter)
put   UNIT 0 O.K.
>>
The put operation was successfully finished,
press Enter for displaying the menu…
To move faster through the menu it is possible to write string
commands, for example Ue Enter Enter written from the
main menu jumps directly to the menu (U)nit (e)dit
Configurable parameters of the CU are divided into independent groups called configuration structures. A separate submenu exists for each structure type (there can be more configuration structures of the same type, e.g. five structures of Node parameters in the MR25). Within an CU, each configuration structure can be found in three different representations:
working parameters stored in RAM
These parameters are the working ones, so any change immediately influences the CU operations. When the CU power supply is switched off, or the CU software is restarted due to any reason, the RAM parameters are lost.
initial parameters stored in SRAM memory
The SRAM memory keeps its content even without a power supply, so these parameter sets are used for long-term storage of the CU configuration. The SRAM configuration structures are copied to RAM structures during an CU software restart.
default (backup) parameters stored within the software code
These are read-only parameter sets, used as a basis for the CU setup, or as a “last resort”, when both RAM and FLASH parameters are destroyed.
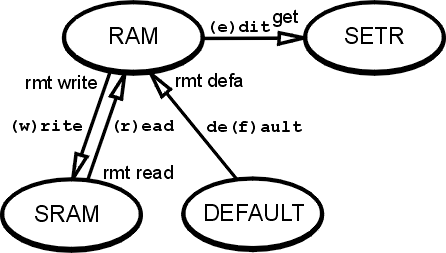
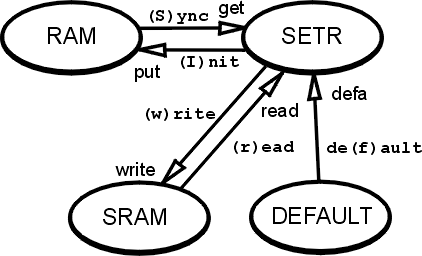
Program Setr.exe configuration menus provide two basic levels, from where configuration services can be executed. Commands (r)ead, (w)rite, de(f)ault, (I)nit, (S)ync and (e)dit , some of them existing in both menu levels, call these services. A configuration service deals only with the structure (or the group of structures) appropriate to the submenu from which it has been invoked.
In the said pictures, RAM, SRAM and DEFAULT represent the respective configuration structures within the CU and SETR stands for the temporary buffer in Setr.exe application. The content of this buffer can be displayed on the Setr.exe screen, and individual parameters can be edited in respective parameter submenus.
To see which menu command calls which service and which
configuration structure it deals with, please check the said pictures.
The words (w)rite, (r)ead, de(f)ault, (S)ync, (I)nit, (e)dit
represents the commands executed in the Setr.exe.
The above mentioned rules are valid for the individual configuration structures. When we need to put the complete CU into it’s original state, we can use the submenu Configuration, see the chapture Chapter 14, Menu (c)nf.
When issuing a configuration command (i.e. (I)nit,
(S)ync, (e)dit, (r)ead, (w)rite or
de(f)ault), always wait for the get (put, write...)
service O.K. response. If nothing comes in due time, repeat the
command. As the edit command moves you to the next menu level even
without receiving the get service O.K. response, you can
use (S)ync to repeat this command.
While working with a remote CU, do not use the ESC (q)
Enter Enter sequence instead of the Init
command. If the put service O.K. response fails
to appear, you need to stay in the same menu level to be able to repeat
the command with the same content of the temporary buffer.
Always think twice before issuing the (I)nit or (w)rite command to a remote CU …