OpenVPN is a virtual private network (VPN) system that allows to create secure encrypted point-to-multipoint connections in routed (TUN) or bridged (TAP) modes. Up to four instances (clients and/or servers) can be used simultaneously in one unit. Each server is capable of establishing connections with several tens of clients.
OpenVPN allows peers to authenticate to each other using pre-shared secret keys and certificates. An OpenVPN server is capable to release an authentication certificate for every client, using signatures and certificate authority (certificates can be generated / uploaded in the SETTINGS > Security > Credentials menu).
A time synchronization of individual units is required for proper OpenVPN function.
All the configuration parameters are explained within the manual. The application notes will describe you several use-cases and step-by-step configurations, including screenshots and basic explanations. Eventually, OpenVPN debugging is explained.
| Note | |
|---|---|
All the M!DGE3 or RipEX2 units run 2.1.1.0 firmware or newer. |
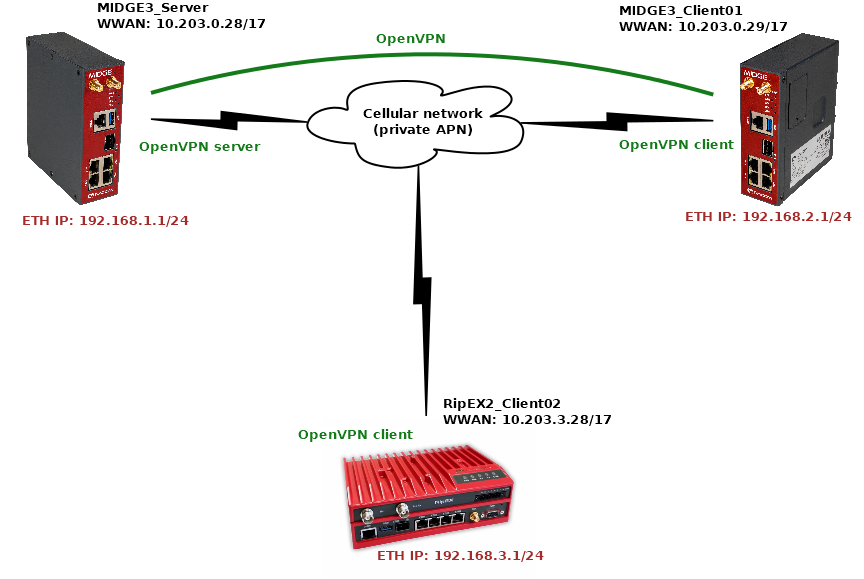
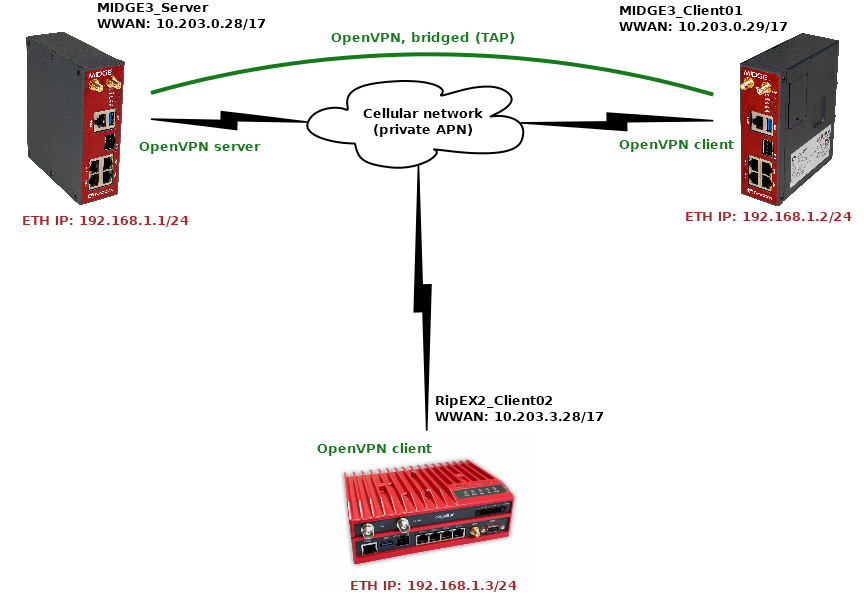
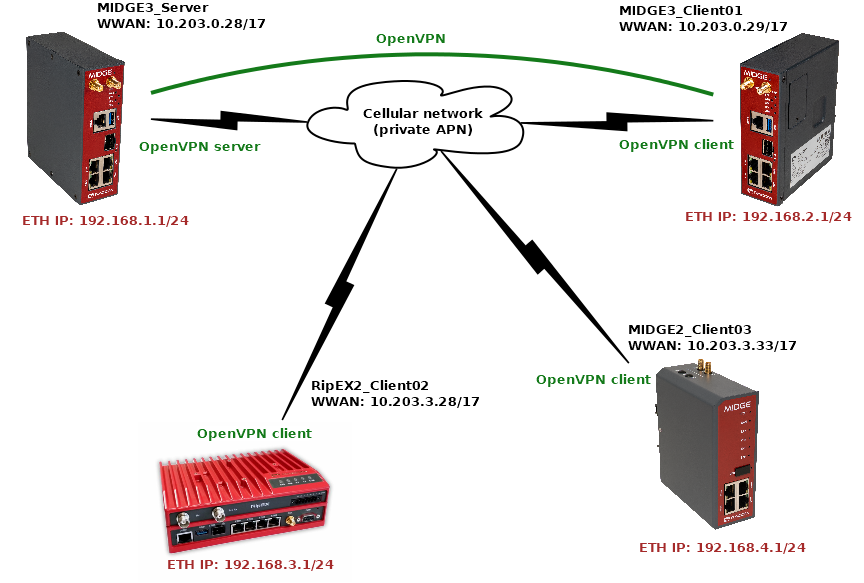
The topology depicts one OpenVPN server and two OpenVPN clients. M!DGE3 and RipEX2 share the same GUI and are configured exactly the same way. RipEX2 in the diagram is equipped with the LTE extension so it can be connected both to the cellular and radio networks.
The 1st example shows a configuration in which all the units utilize different LAN subnets, i.e., interconnecting them via one shared and secured OpenVPN network to build one secure end-to-end routed network.
The cellular APN is a private APN with specified IP addresses within 10.203.0.0/17. Each device can “see” (ping) each other, but cannot access public Internet. While testing or configuring your scenario, you need to edit all the 10.203.0.0/17 IP addresses to suit your topology.
| Note | |
|---|---|
Keep in mind the connections via the cellular network require some kind of VPN or at least NAPT so that packets can go LAN2LAN. Adding just static routing rules would end by discarding such traffic being discarded in operator’s network. |
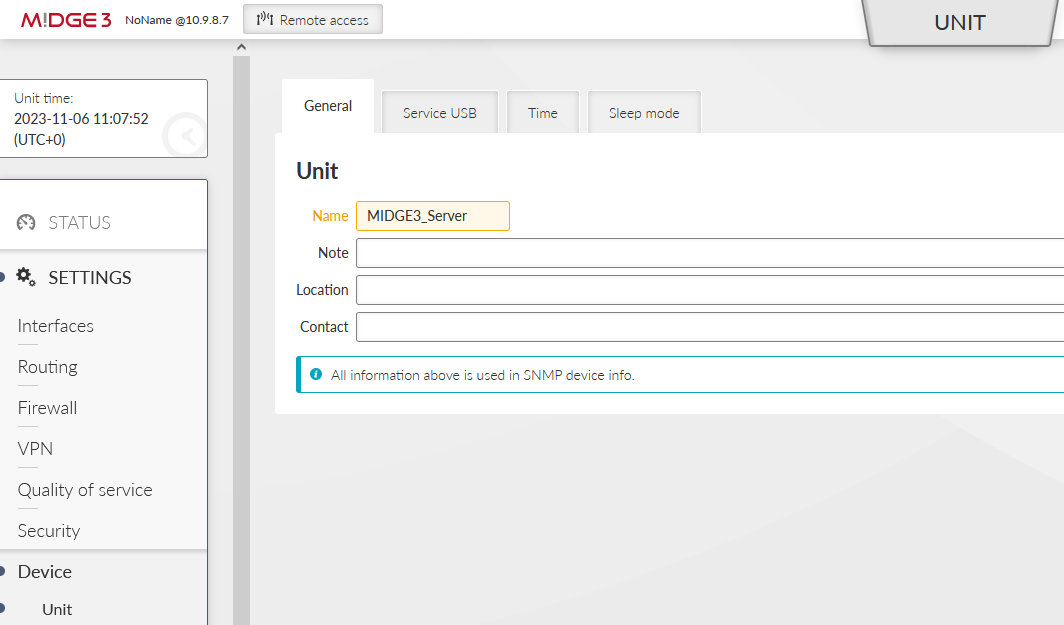
MIDGE3_Server will be set as the OpenVPN server. Set the Unit name “MIDGE3_Server” in the SETTINGS > Device > Unit menu.
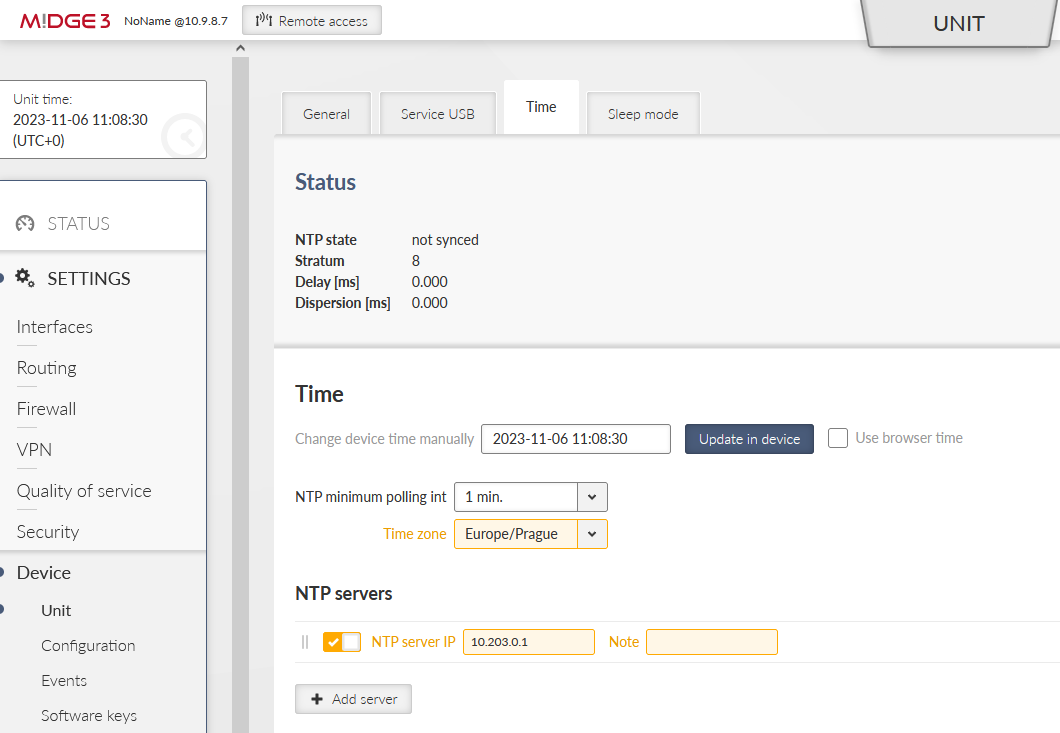
Make sure to have correct and the same time in all units. OpenVPN works with certificates and their validation times so the correct time sync is required.
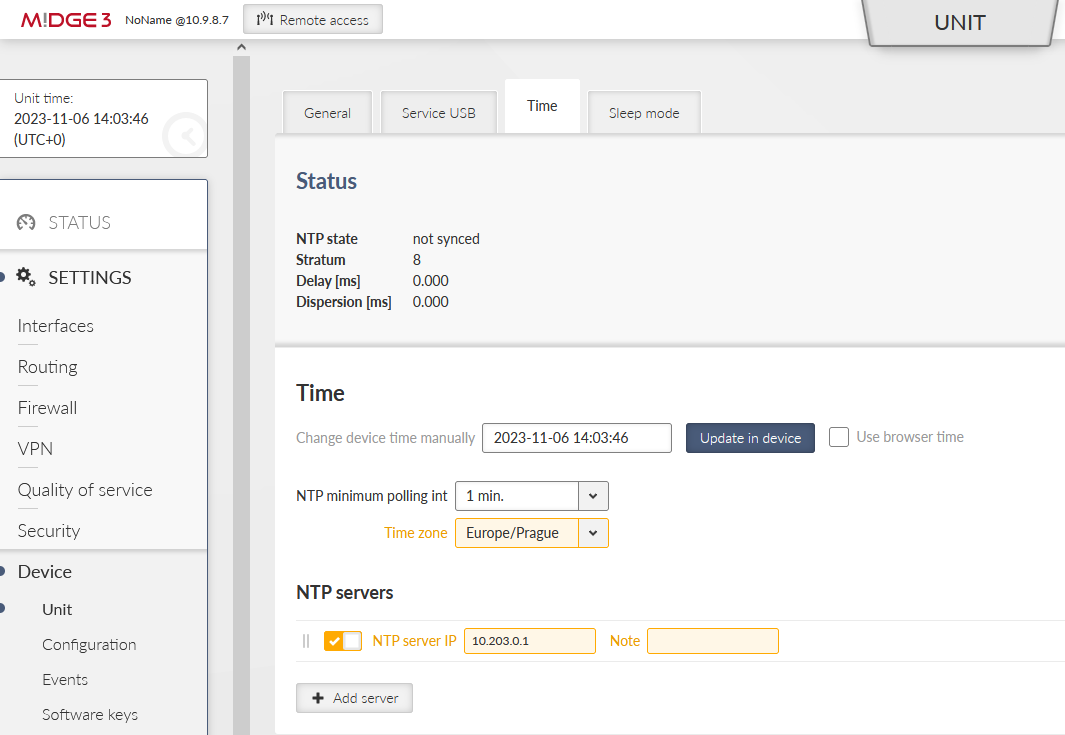
Set a correct Time zone (Europe/Prague) and NTP server (10.203.0.1) in the SETTINGS > Device > Unit > Time menu. Even if you do not have a working NTP server in your network, at least manually set a correct time, because each M!DGE3 and RipEX2 are equipped with the RTC and should be able to keep the proper time over the years even without the NTP server. NTP server is a recommended solution though – consider one unit within the network to be equipped with GPS – such unit would provide precise time to the rest of the network.
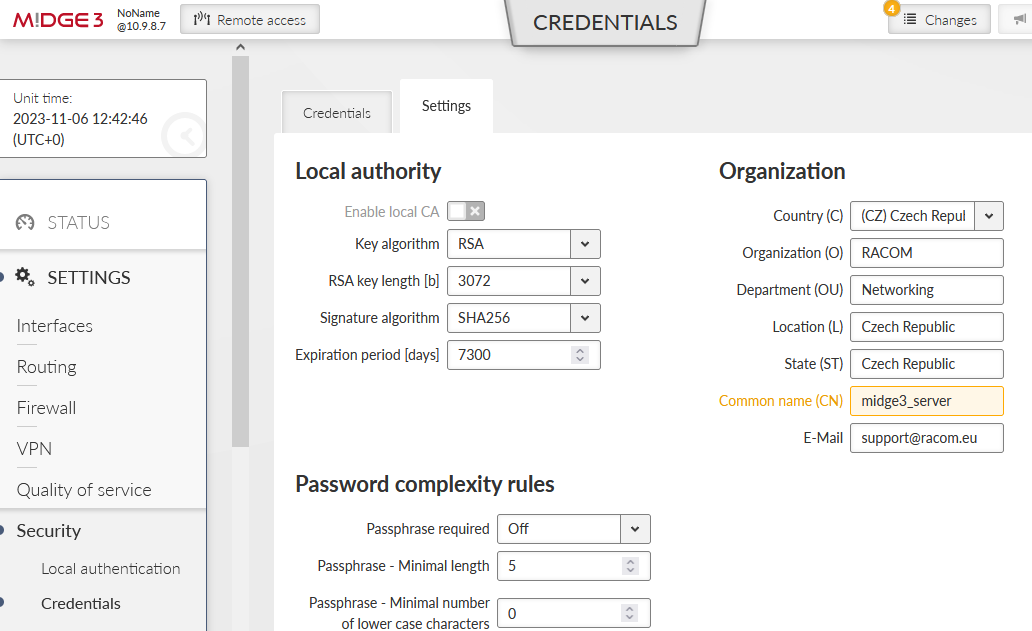
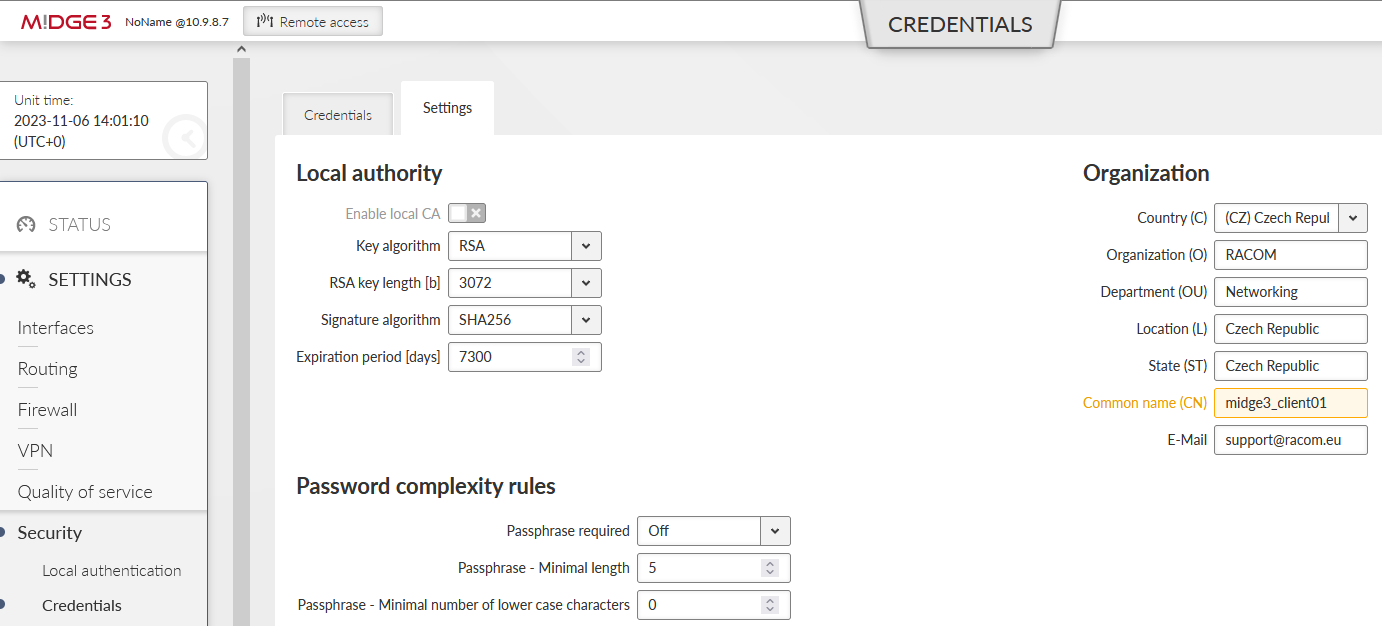
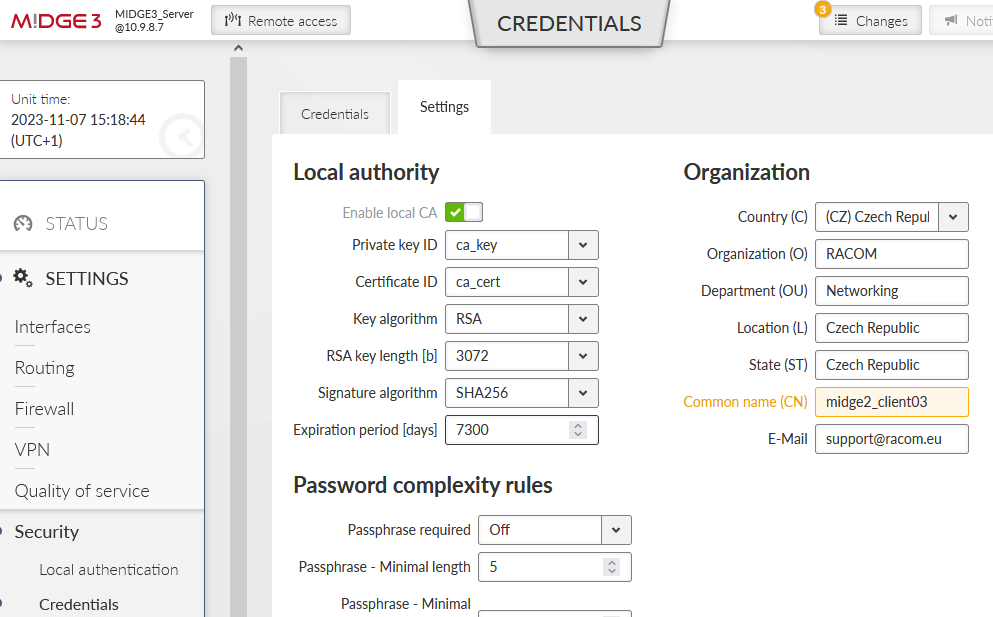
Go to the SETTINGS > Security > Credentials > Settings menu and configure a Common Name for our MIDGE3_Server – “midge3_server”. CNs are very important for proper OpenVPN certificates.
All the units are in the Factory settings so we need to configure proper Ethernet and Cellular interfaces and also Routing.
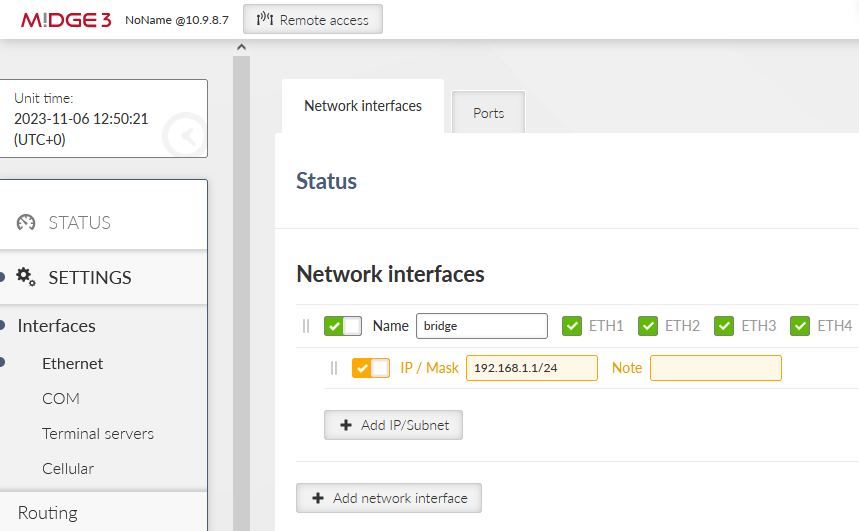
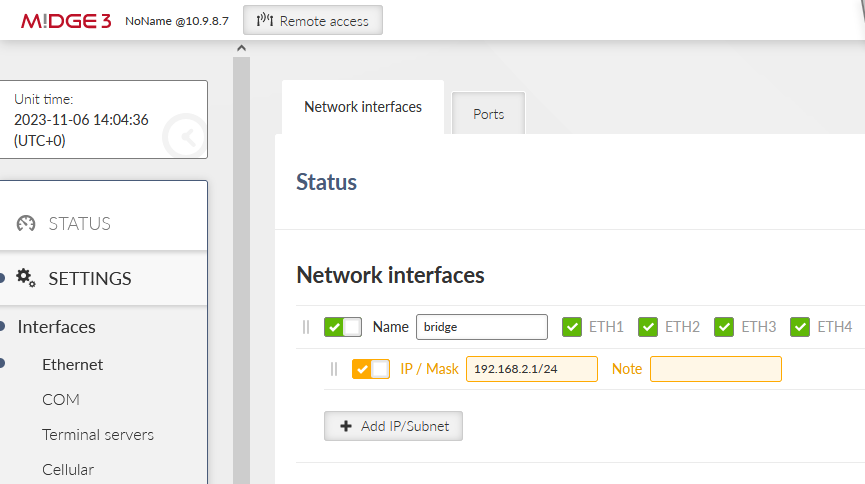
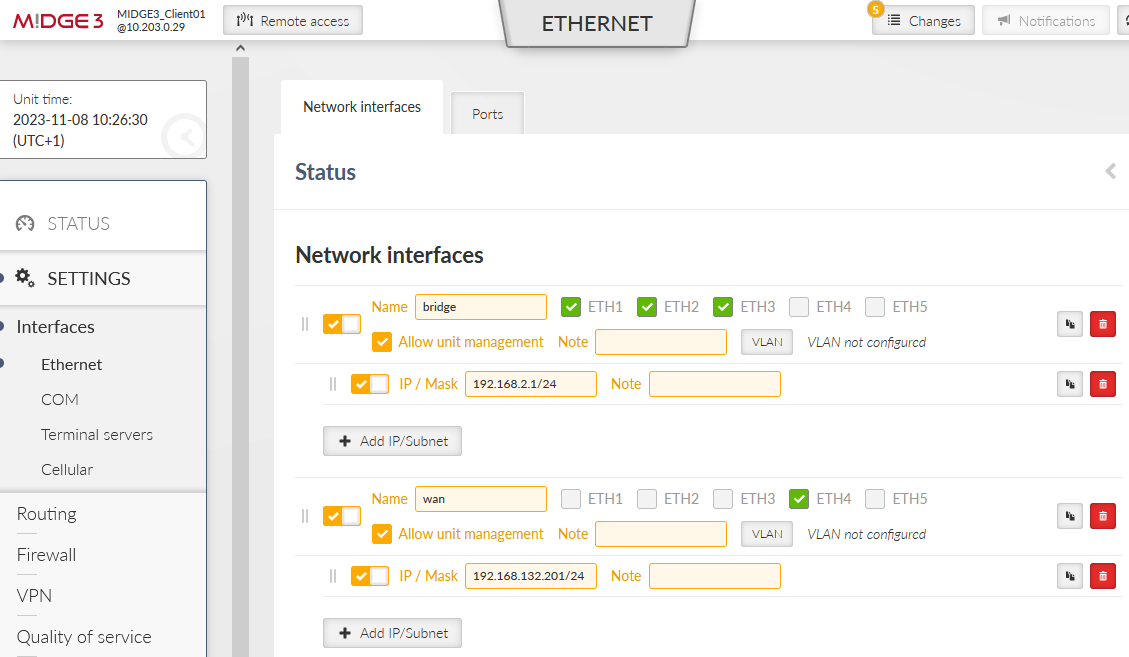
Go to the SETTINGS > Interfaces > Ethernet > Network interfaces menu. Set the IP of the ‘bridge’ interface to be 192.168.1.1/24.
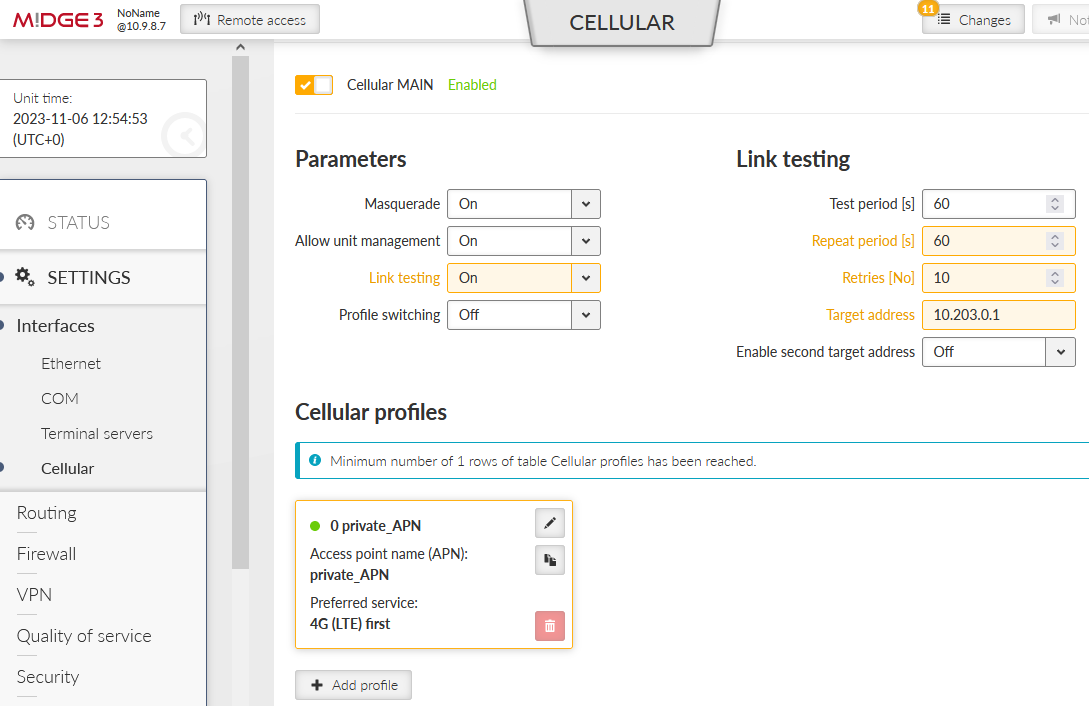
Go to the SETTINGS > Interfaces > Cellular menu. Set the interface to suit your APN setup (APN name, credentials, MTU, …). We also suggest setting the “Link testing” option so that M!DGE3 periodically pings a defined IP address via the cellular interface. If the ping is not working correctly, the cellular connection is restarted (which may help in particular situations).
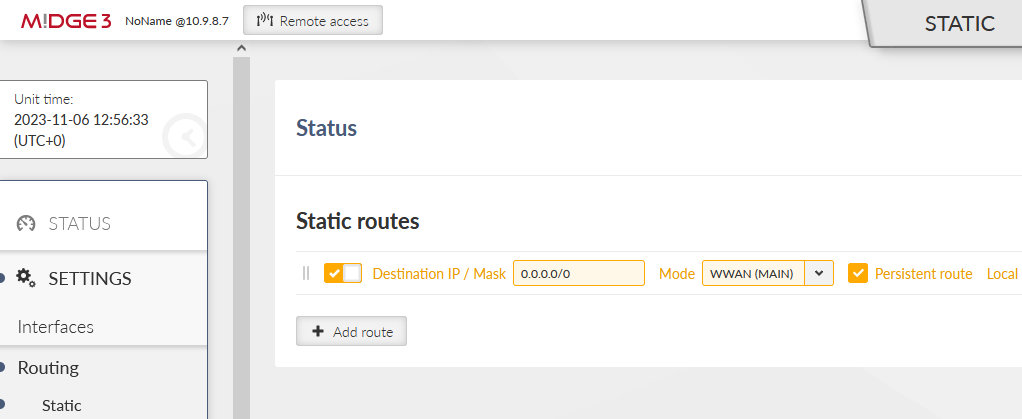
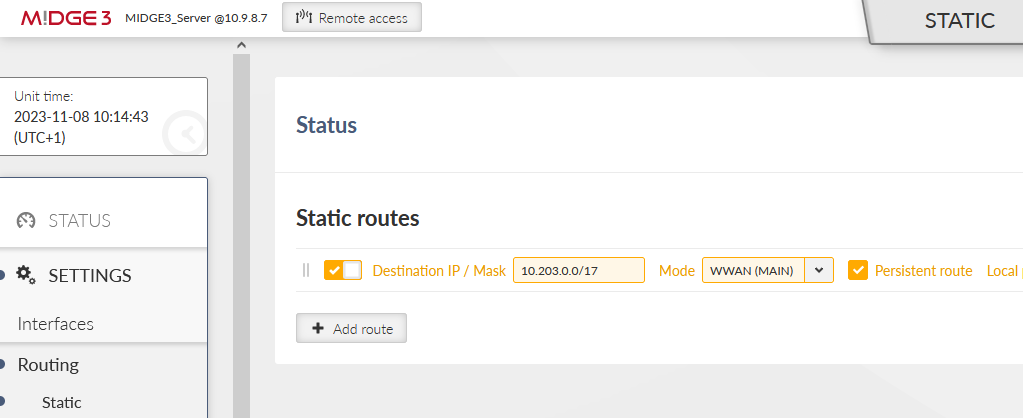
Go to the SETTINGS > Routing > Static menu and add one static route. The Destination should either be the APN subnet, or a complete default gateway (0.0.0.0/0). Set the Mode to “WWAN (MAIN)”.
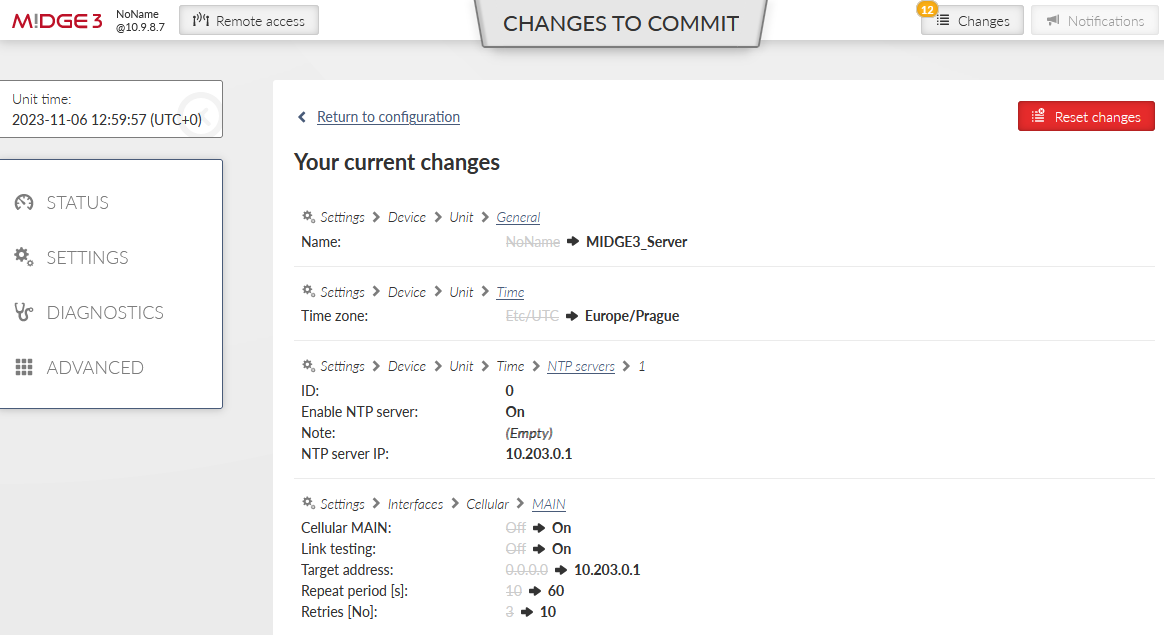
Save the changes now. OpenVPN configuration follows.
Go back to the SETTINGS > Security > Credentials menu. Click on the “Generate credential” button. Select “Certificate key (PRI)” option to generate a private key. This private key is going to be a private key of our Local CA (Certification Authority). Let’s name it “ca_key”.
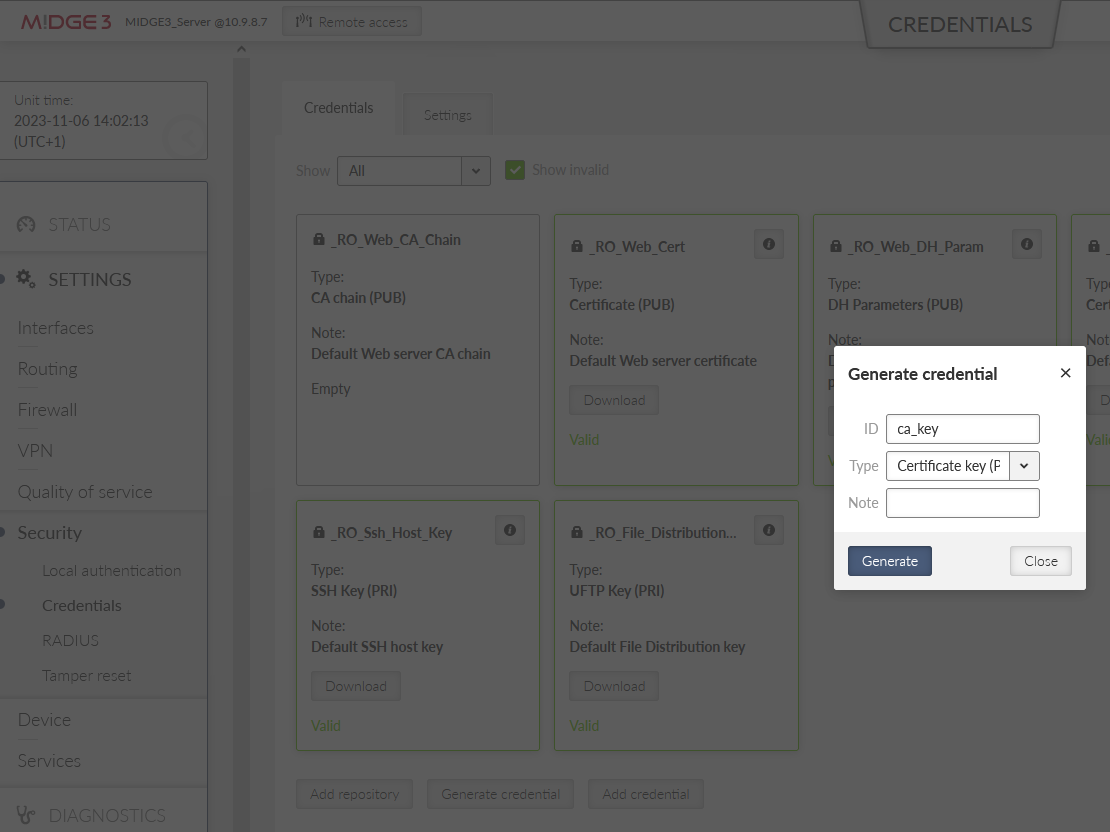
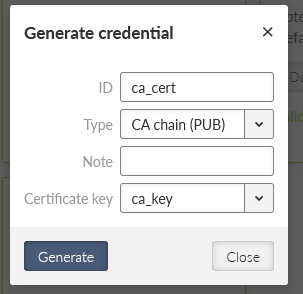
Once completed, create the CA’s public certificate by clicking on the Generate credential button again. Set the ID to be “ca_cert” and the Type “CA chain (PUB)”.
Go to the “Settings” tab within the same menu and enable this MIDGE3_Server to be a local CA and specify created key & certificate.
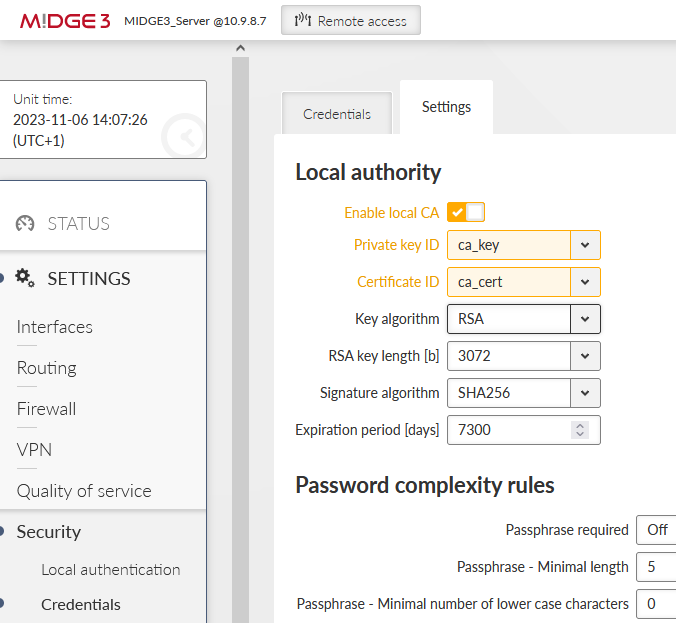
Save the changes.
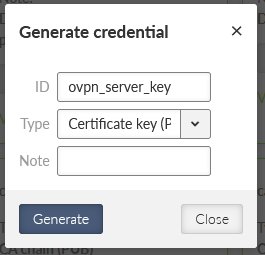
From now on, we can use MIDGE3_Server as a trusted source for generating and signing keys for OpenVPN server and clients. Go back to the “Credentials” tab and generate another private key, now for the MIDGE3_Master again, but for the OpenVPN server itself (not the CA).
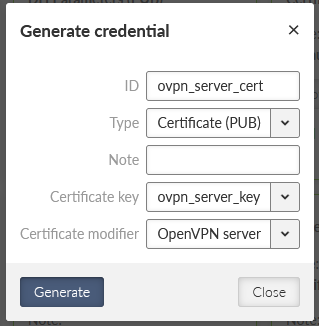
Generate a new OpenVPN server certificate. Set
ID to “ovpn_server_cert”
Type to “Certificate (PUB)”
Certificate key to our generated key “ovpn_server_key”
and Certificate modifier to “OpenVPN server” – this is not mandatory, but it improves the VPN tunnel security – primarily it protects any client to mimic it is a server (strict roles for each certificate usage – server, or client).
These two files with the “ca_cert” are enough for the OpenVPN server. We can still improve a security by additional TLS Protection – either “TLS auth” or “TLS Crypt”. TLS Auth helps against port scanning, UDP floods or DoS. TLS Crypt does the same, and adds some additional protection against sniffing certificate attributes or OpenVPN presence.
We will configure the TLS-Auth option. Generate a new shared key with ID equal to “ta_key”. Select a type to be “OpenVPN TLS Protection key (PRI)”.

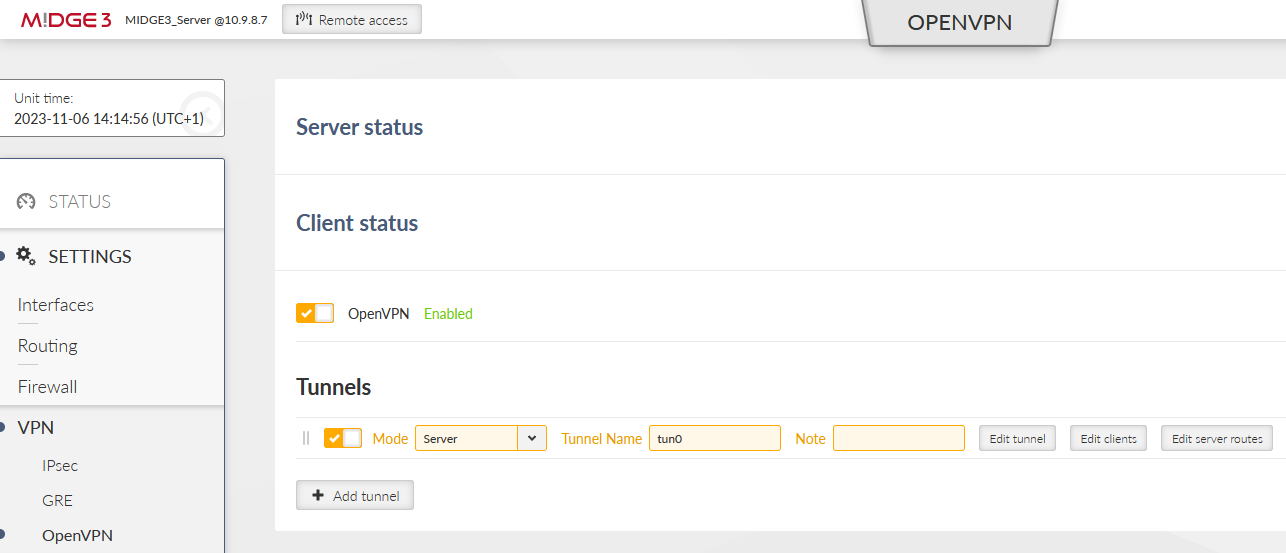
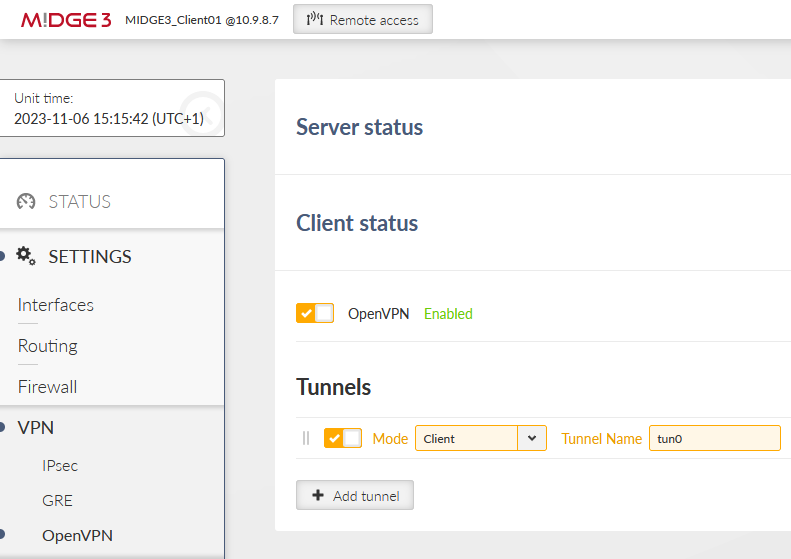
All the files for the OpenVPN server are ready. Go to the SETTINGS > VPN > OpenVPN menu. Enable OpenVPN service and click on the “Add tunnel” button. Select a mode to be a “server”.
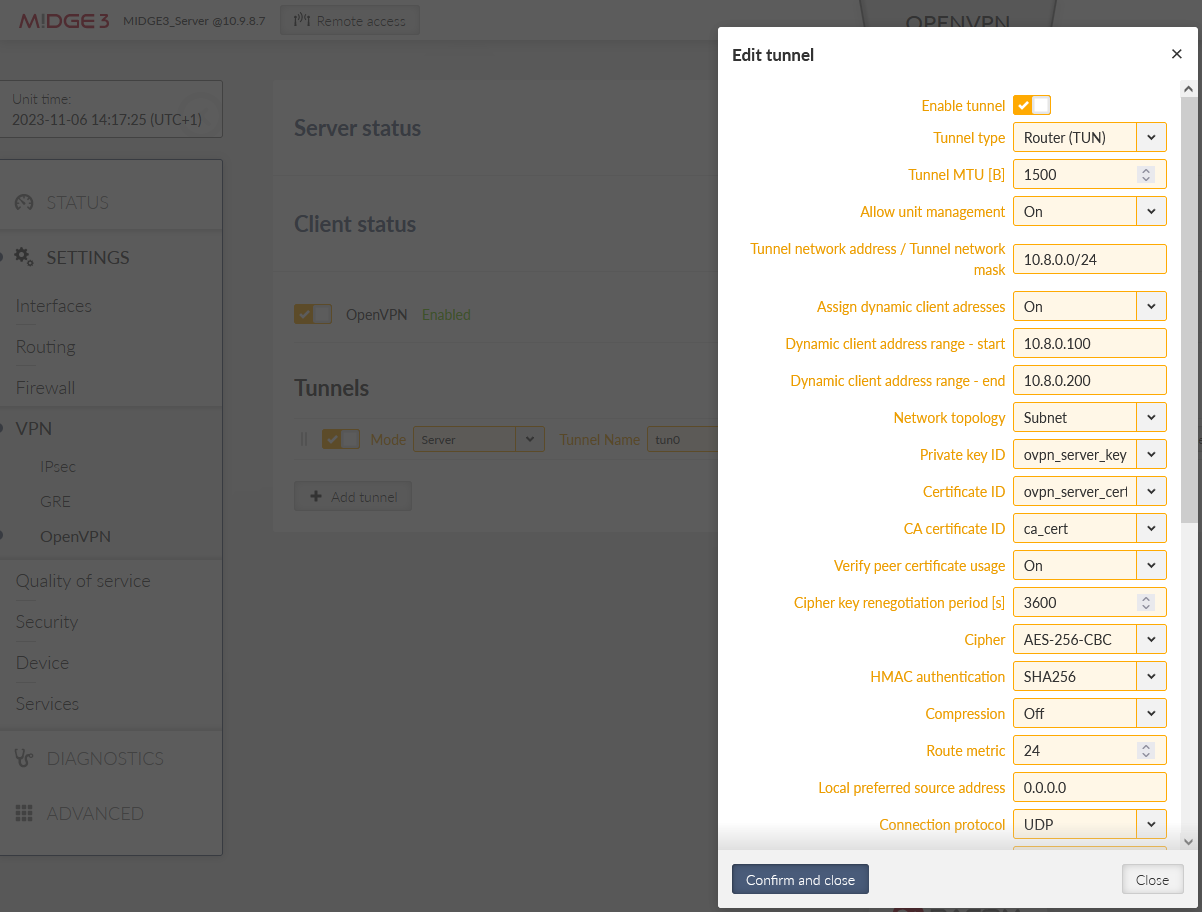
Open the “Edit tunnel” menu. Select the required tunnel parameters. We leave all in defaults, except:
Assign dynamic client addresses | “On” |
Private key ID | “ovpn_server_key” |
Certificate ID | “ovpn_server_cert” |
CA certificate ID | “ca_cert” |
Cipher | “AES-256-CBC” |
HMAC authentication | “SHA256” |
DH parameters ID | “_RO_Web_DH_Param” |
Enhanced TLS protection | “On” |
TLS protection shared key ID | “ta_key” |
Confirm the settings.
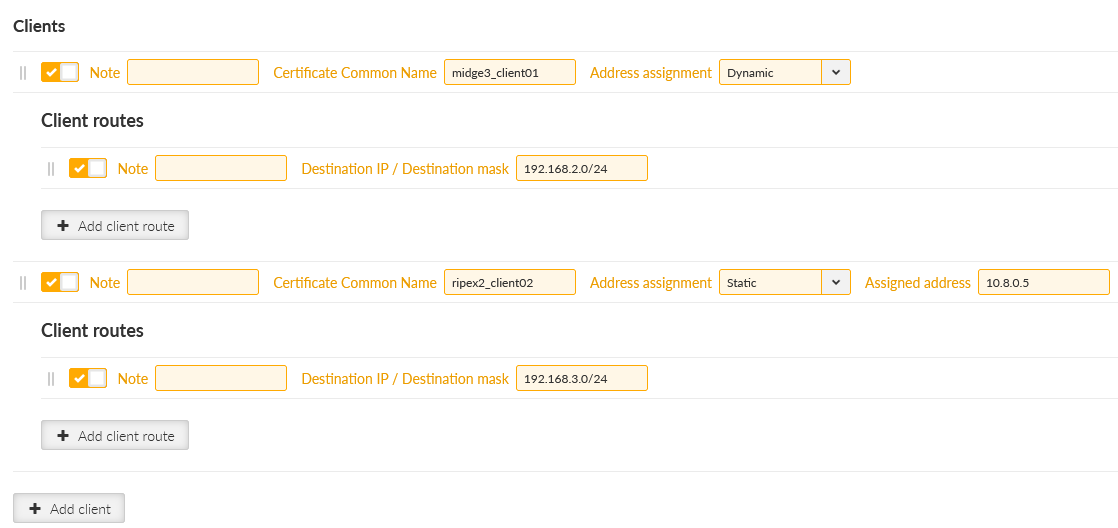
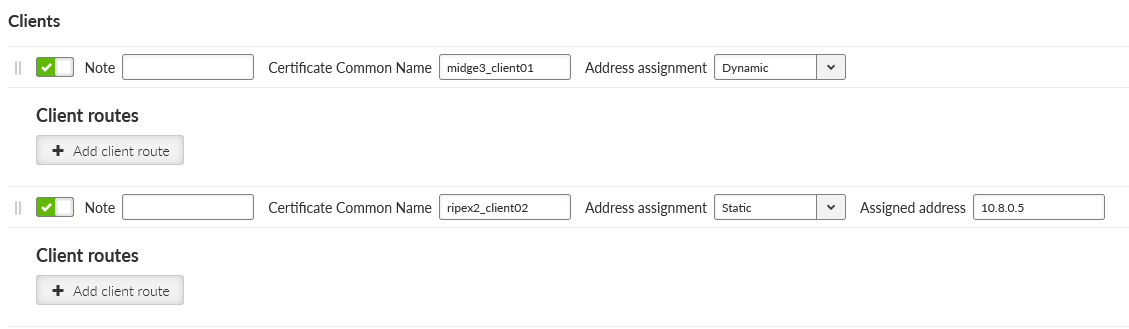
Click on the “Edit clients” button. Add two clients, set the 1st client:
Certificate Common Name | midge3_client01 |
Address assignment | Dynamic (within 10.8.0.100 – 200 address range) |
Client routes | 192.168.2.0/24 |
And 2nd client:
Certificate Common Name | ripex2_client02 |
Address assignment | 10.8.0.5 |
Client routes | 192.168.3.0/24 |
The configured routes are particular client’s LANs which are then propagated to the Server and to each Client for direct client-to-client communication.
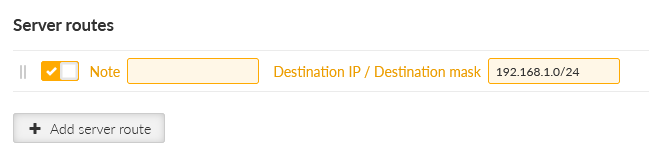
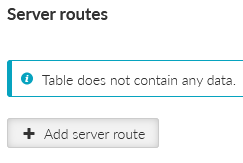
Close the window and click on the “Edit server routes” button. Configure a network 192.168.1.0/24 to be pushed to connected clients. This range is the Server’s LAN segment.
Apply all the changes.
Once completed, the OpenVPN server is ready, but we still need to configure both clients and generate/upload keys&certificates.
First of all, we need correct credentials (keys and certificates) for both the clients. We generate them via two different ways.
For the 1st client (midge3_client01), we will generate all in the server. Then, we will download them to our PC and upload them to the MIDGE3_Client01’s credentials.
For the 2nd client (ripex2_client02), we will generate them in the client itself, and we use our MIDGE3_Server CA to sign the generated CSR (Certificate Signing Request) – so it creates a valid certificate without a ripex_client02’s private key being shared/exposed. This procedure is more secure.
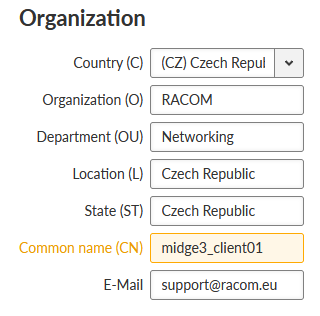
For now, stay in the MIDGE3_Server menu and go to the SETTINGS > Security > Credentials > Settings menu. Change the Organization Common Name (CN) to “midge3_client01”. Apply the changes.
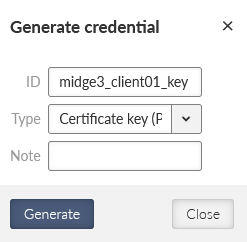
Now, we can generate correct files for MIDGE3_Client01. Go back to the Credentials menu and generate a private key for MIDGE3_Client01’s OpenVPN. The ID is “midge3_client01_key”.
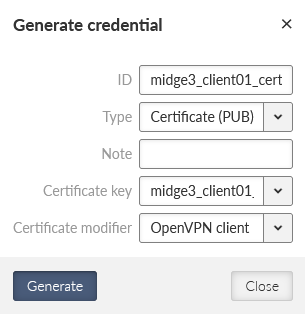
Generate a valid MIDGE3_Client01’s certificate for OpenVPN using the newly generated key. The ID is “midge3_client01_cert”, Type is “Certificate (PUB)”, Certificate key must be our “midge3_client01_key” and because we check the Extended Key Usage of the certificate, select the “OpenVPN client” modifier.
Download required files for the 1st client (MIDGE3_Client01):
ca_cert | CA certificate |
midge3_client01_cert | client’s certificate |
midge3_client01_key | client’s private key |
ta_key | TLS Protection key (TLS-Auth) |
You can either download them encrypted (using a strong password) or unencrypted. Select proper names if not fully satisfied with automatic file names.
Change the MIDGE3_Server Common name back to “midge3_server” and save the changes.
Login to the MIDGE3_Client01 unit and go to the SETTINGS > Security > Credentials > Settings menu. You can change the Common name to “midge3_client01”, even though it is not necessary.
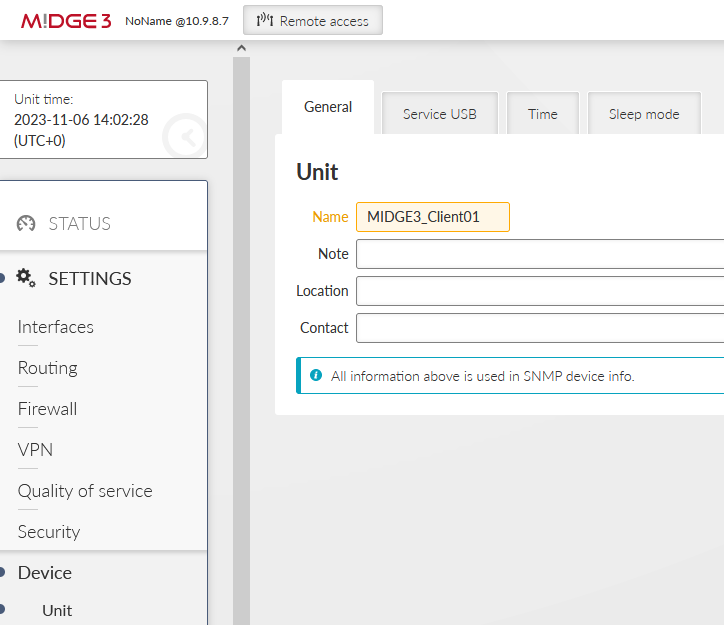
Set the unit name to MIDGE3_Client01.
Configure the Time zone and NTP server to suit your environment.
Go to the SETTINGS > Interfaces > Ethernet and set the LAN IP to 192.168.2.1/24.
Enable and configure the SETTINGS > Interfaces > Cellular interface to suit your APN. Continue with adding the default GW via WWAN (MAIN).

Save and apply all the changes.
Go to the SETTINGS > Security > Credentials menu and add all four downloaded keys/certificates. You need to import each with a correct “Type”.
CA cert ID | ca_cert, Type: CA chain (PUB) |
Client’s certificate ID | midge3_client01_cert, Type: Certificate (PUB) |
Client’s key ID | midge3_client01_key, Type: Certificate key (PRI) |
TLS-Auth key ID | ta_key, Type: OpenVPN TLS Protection key (PRI) |
Go to the SETTINGS > VPN > OpenVPN menu. Enable the service and add the tunnel (Mode: Client).
Edit the tunnel to match the Server’s settings. Keep all parameters in defaults, except:
Private key ID | midge3_client01_key |
Certificate ID | midge3_client01_cert |
CA certificate ID | ca_cert |
Cipher | AES_256_CBC |
HMAC authentication | SHA256 |
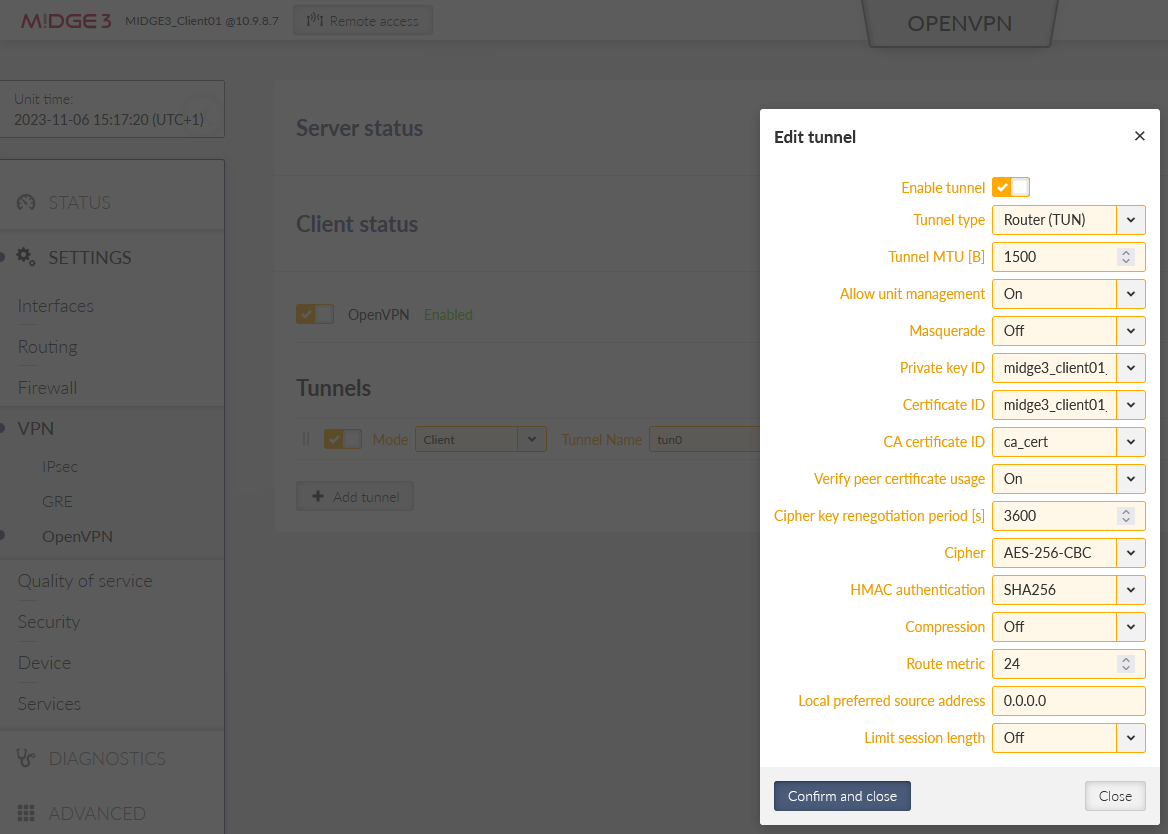
Confirm the changes.
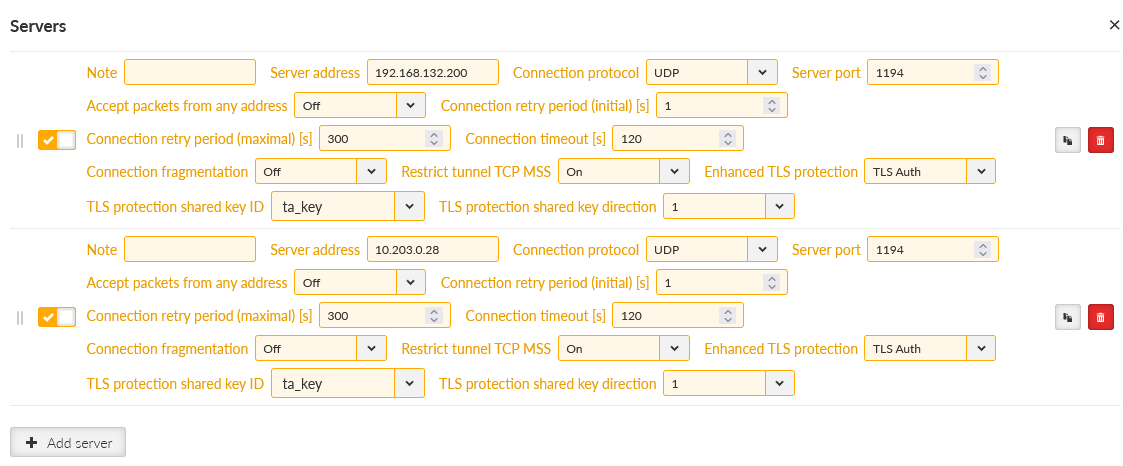
Click on the “Edit servers” button and add one server. Fill in
Server address | 10.203.0.28 |
Enhanced TLS Protection | TLS Auth |
TLS Protection shared key ID | ta_key |
| Note | |
|---|---|
Your server address can be different, suit the setting to your APN. |
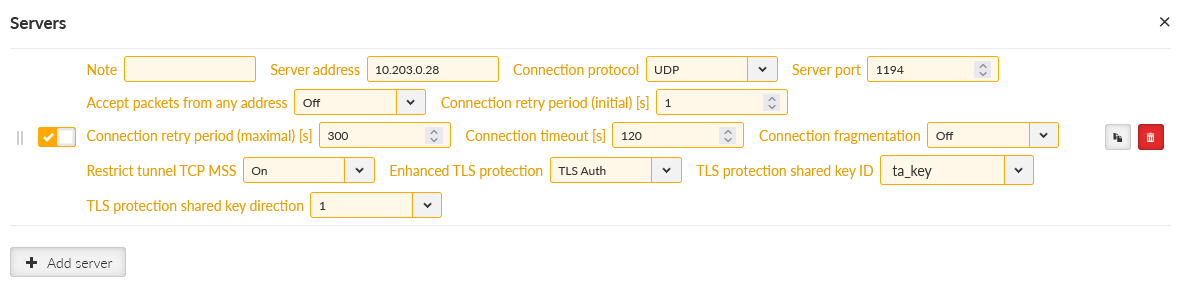
Apply the changes.
You can check if this OpenVPN client has connected successfully, or not. If not, download a Diagnostic package and go through the OpenVPN logs to find possible reasons. You should also check all the OpenVPN parameters so that they match.
Login to the RipEX2_Client02 unit and go to the SETTINGS > Security > Credentials > Settings menu and set the Common name to be “ripex2_client02”. It is mandatory this time, because we will generate the client’s key and CSR on this unit, not in the server.
| Note | |
|---|---|
Due to multiple same steps, some of the configuration screens are not provided. |
Repeat most of the steps from the M!DGE3 unit as well.
Unit name to be RipEX2_Client02
Correct Time zone and NTP server
Ethernet bridge IP 192.168.3.1/24
Cellular settings to suit your APN with Link testing
Default (static) route, Mode: WWAN (EXT)
EXT is a must now, because setting RipEX2, not M!DGE3 device
Apply the changes.
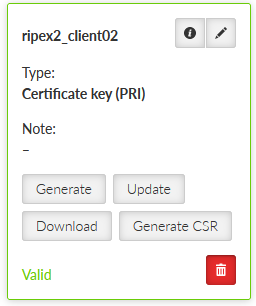
Go back to the SETTINGS > Security > Credentials menu. Generate a private key. ID is “ripex2_client02_key”. Type is “Certificate key (PRI)”.
Generate CSR for this particular key. Click on the “Generate CSR” button located at this particular Credential window.
It downloads the CSR file into your PC. Login (locally or remotely) to MIDGE3_Server and go to the SETTINGS > Security > Credentials menu. Find the button “Sign CSR” next to the buttons with generating/uploading credentials.
Click on it and select the CSR file located in your PC. Select the Certificate modifier to be the OpenVPN client. Click on the Sign CSR button.
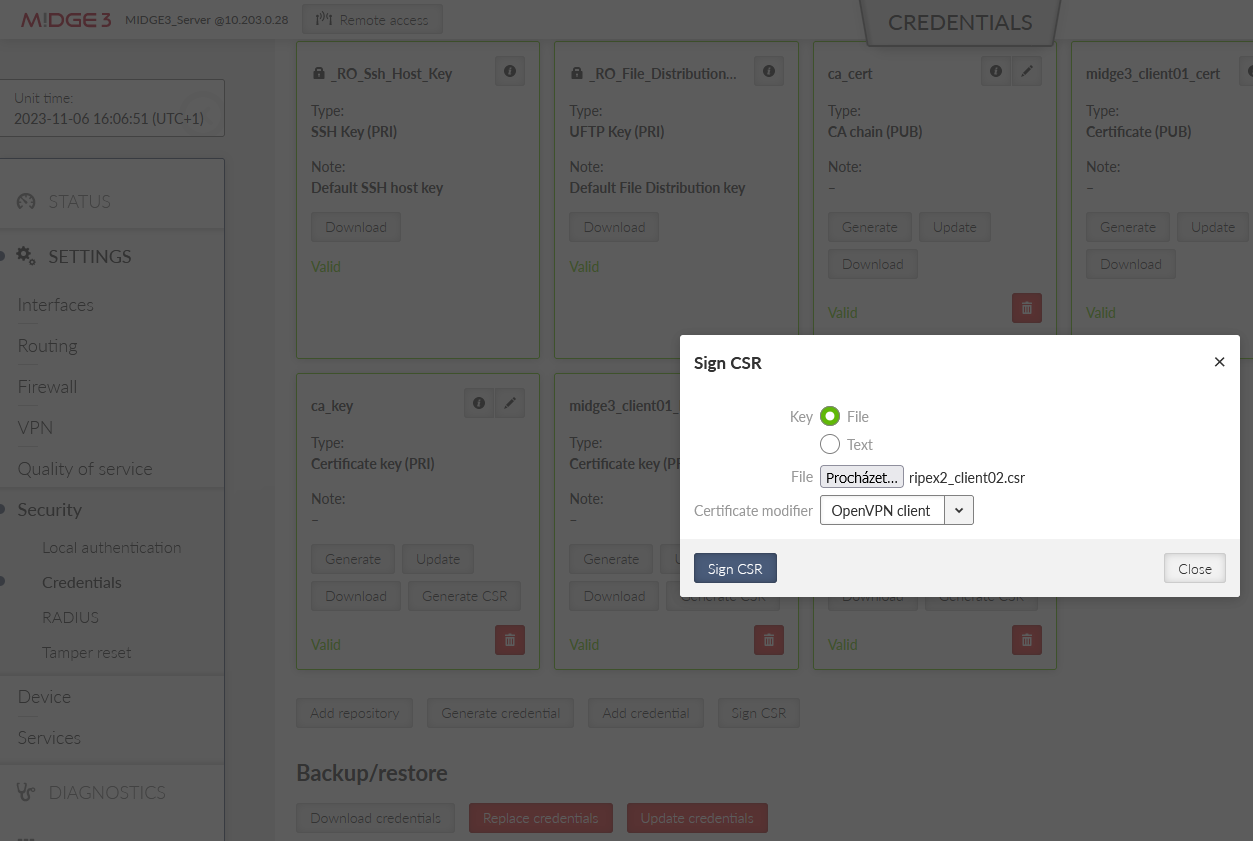
This downloads a valid certificate into your PC. Name it accordingly, e.g., “ripex2_client02_cert.crt”.
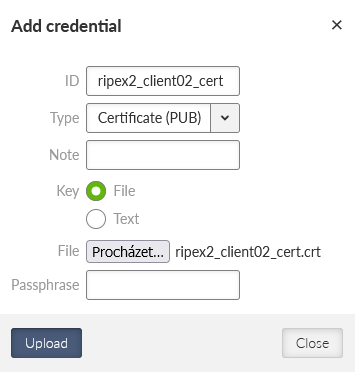
Go back to RipEX2_Client02’s web interface and add/upload this certificate. Set the ID to “ripex2_client02_cert” and Type to “Certificate (PUB)”.
Upload the CA certificate and the TLS Protection key the same way as in MIDGE3_Client01.
Go to the SETTINGS > VPN > OpenVPN menu, enable it and add one tunnel.
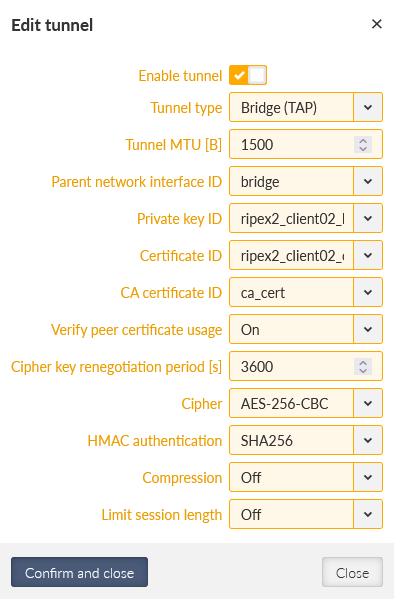
Edit the tunnel’s parameters:
Private key ID | ripex2_client02_key |
Certificate ID | ripex2_client02_cert |
CA certificate ID | ca_cert |
Cipher | AES_256_CBC |
HMAC authentication | SHA256 |
Confirm the changes.
Edit the server settings. Add one server and set its address to 10.203.0.28 (it may differ for your APN). Enable Enhanced TLS protection with the ta_key.
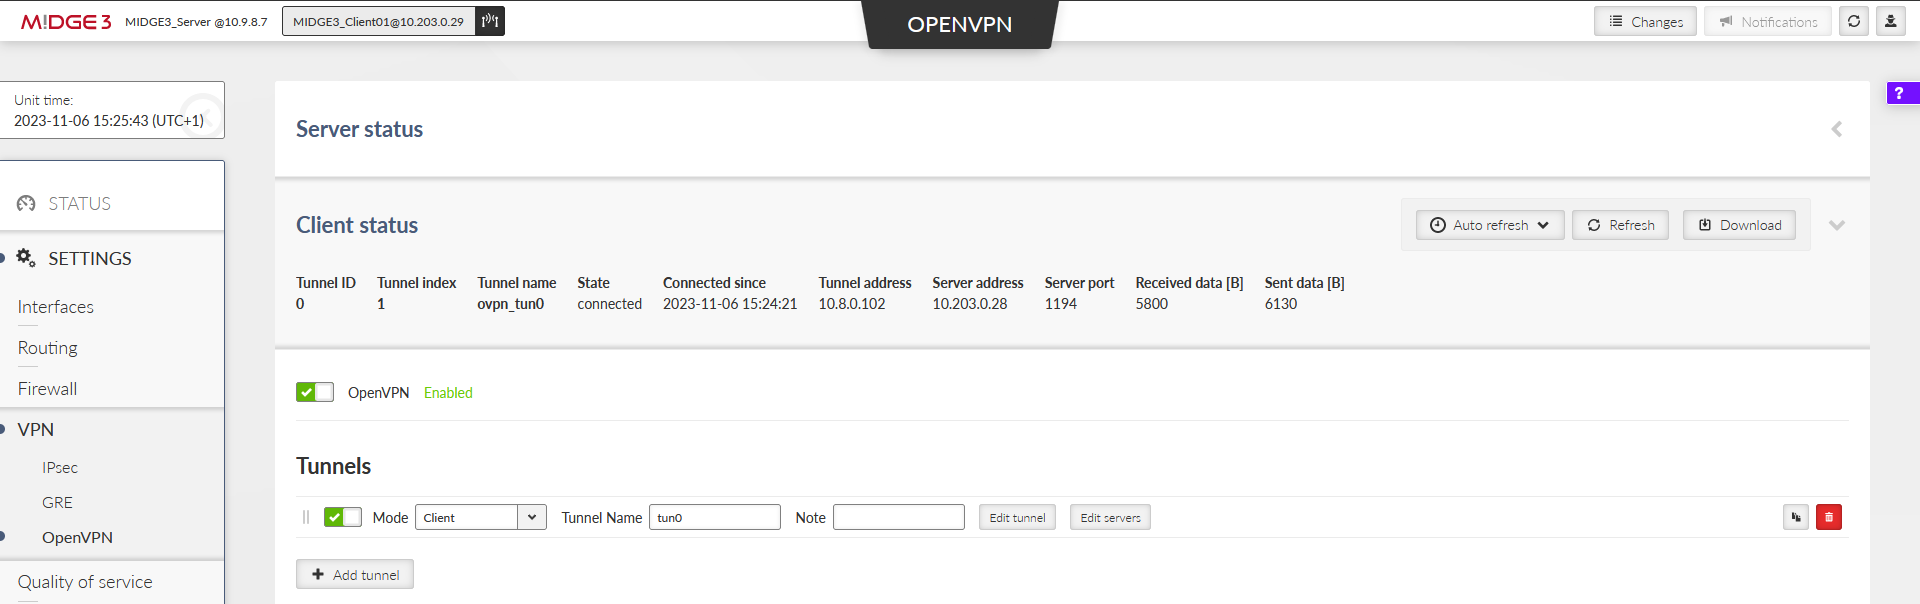
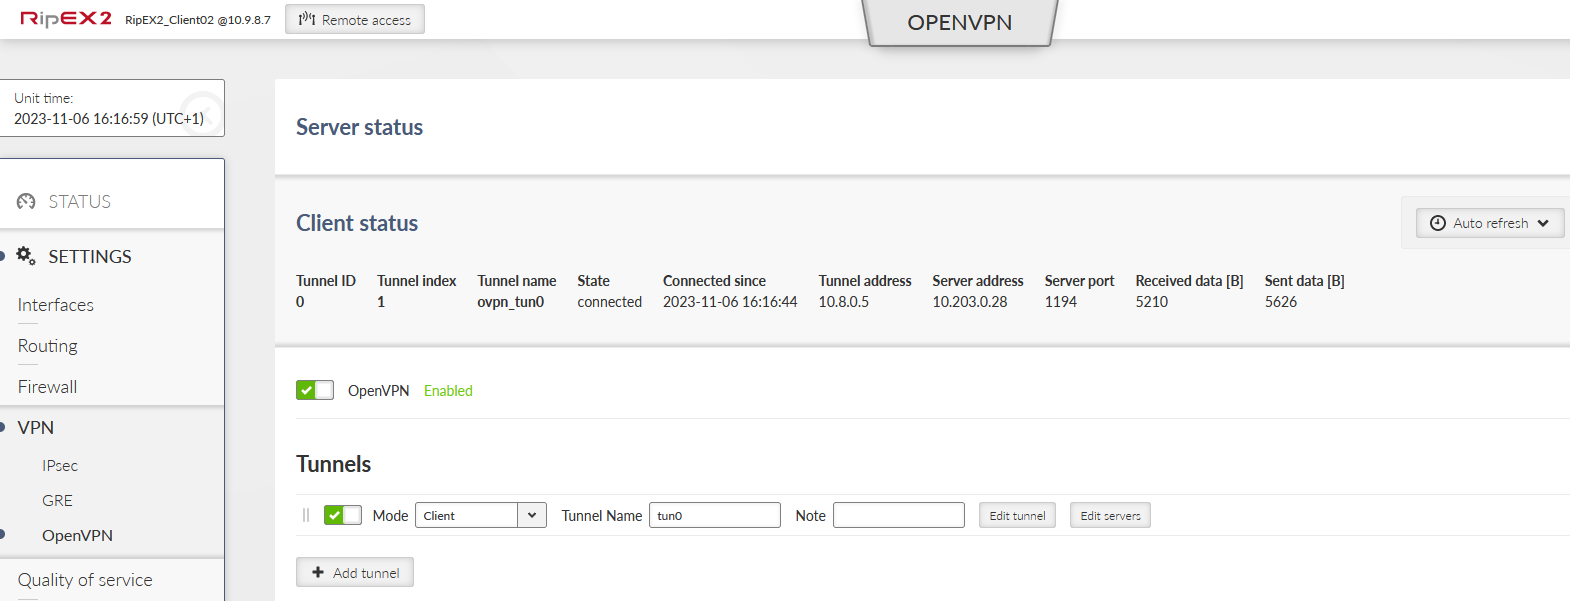
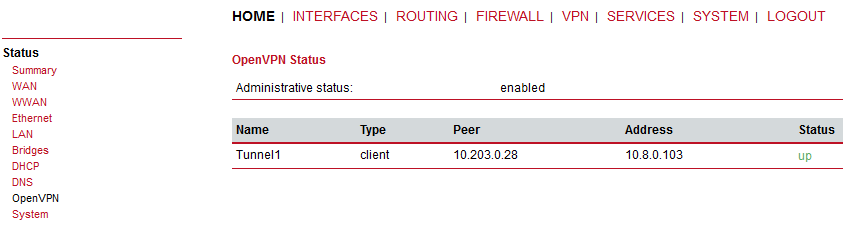
Close the window and apply all the changes. Check if the client got connected and the assigned IP address for the tunnel is 10.8.0.5.
Within the SETTINGS > VPN > OpenVPN menu, open either the Server or Client status to see the details about currently connected units.
The MIDGE3_Server Status while both the clients are connected:
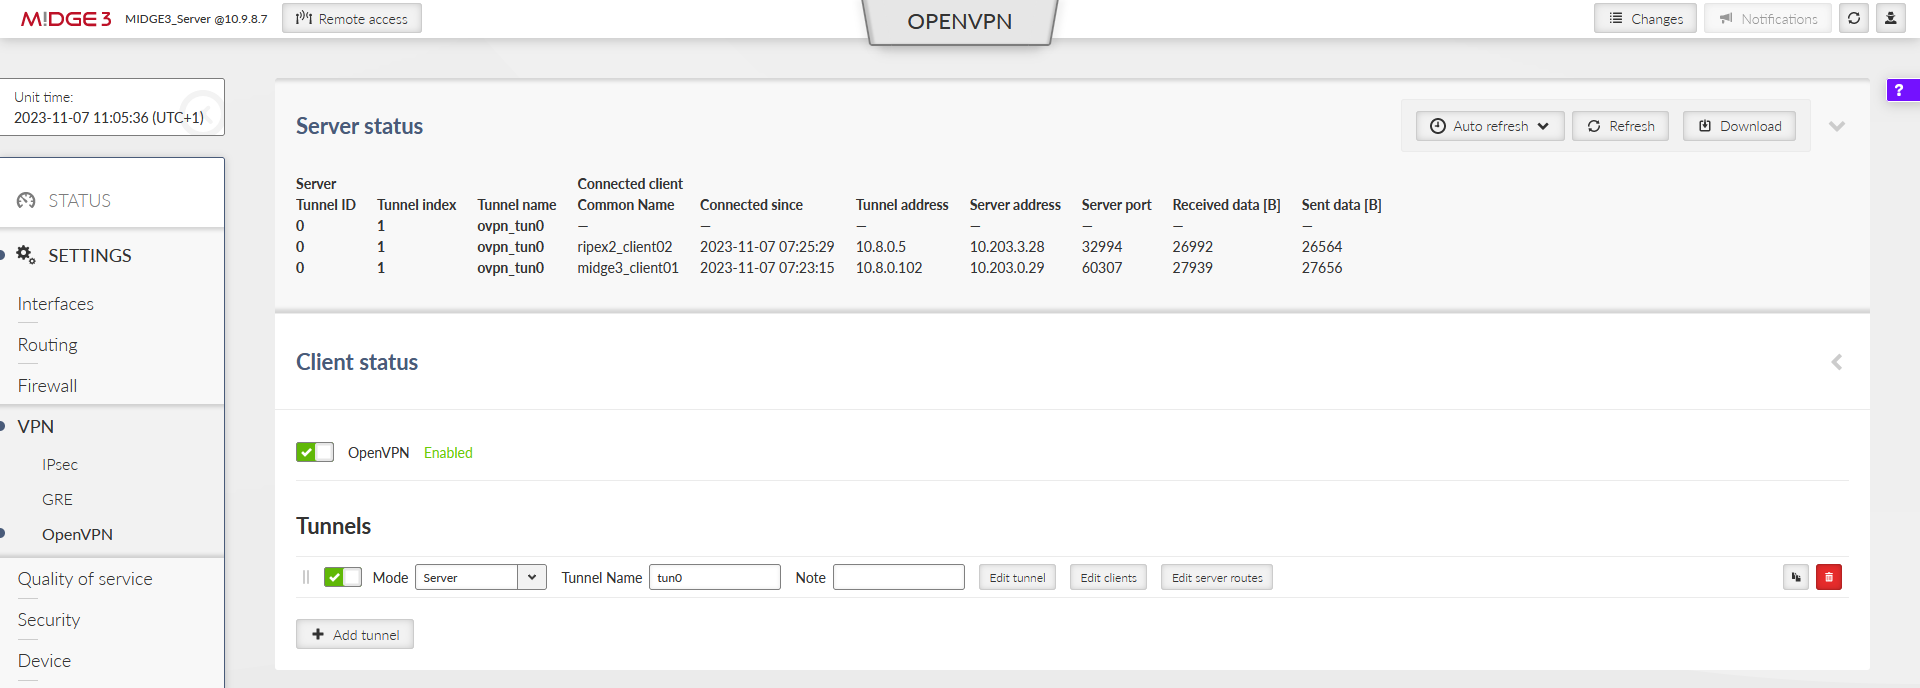
Important fields
Tunnel name | Linux interface name (useful for firewalls, NAPT, …) |
Common name | CN of the client. Especially in case only know CNs are allowed to be connected. |
Connected since | Since what date&time the client is connected. |
Tunnel address | Assigned OpenVPN tunnel IP address |
Server address | WAN IP address of the client |
In case of the Client instance, there is “State” column – it can either be connected or disconnected.
Example of a client which cannot connect
A particular client is displayed in the Status, but has no Tunnel address assigned. And it also happens that such client is deleted from the Status within several seconds and may appear again within a while, …
The particular client’s Common name is not allowed to connect to the server – add it or fix a possible typo in the list of clients.
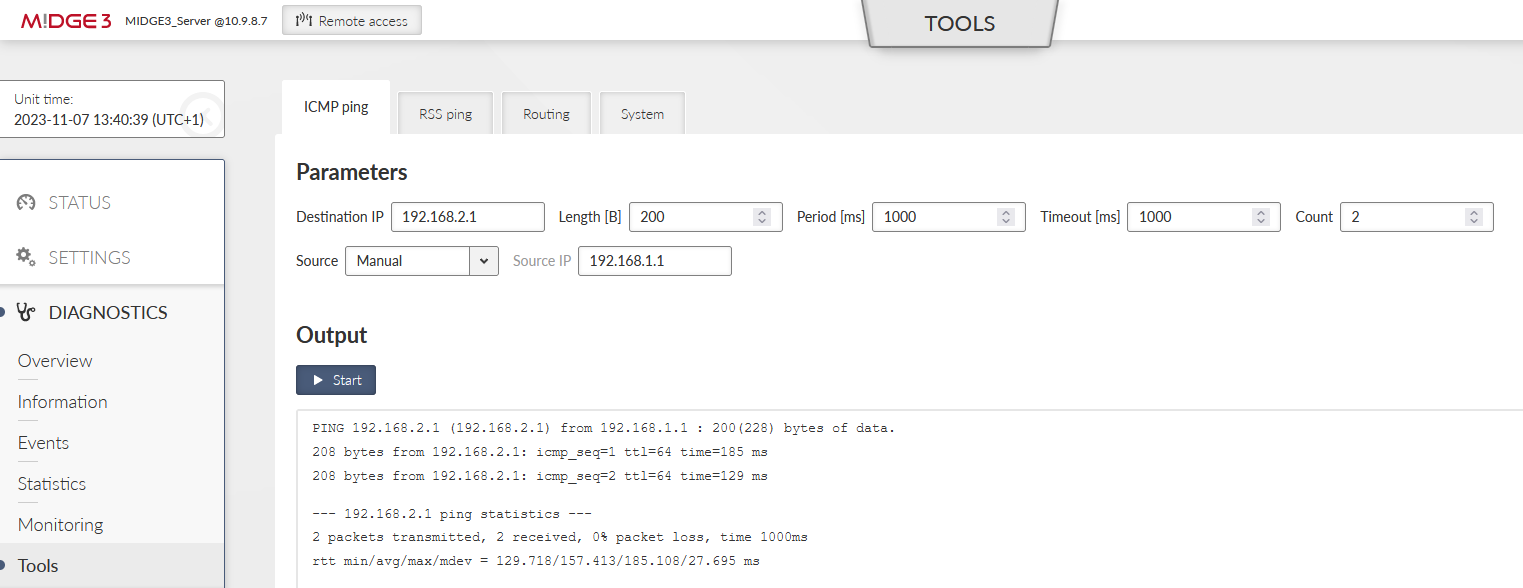
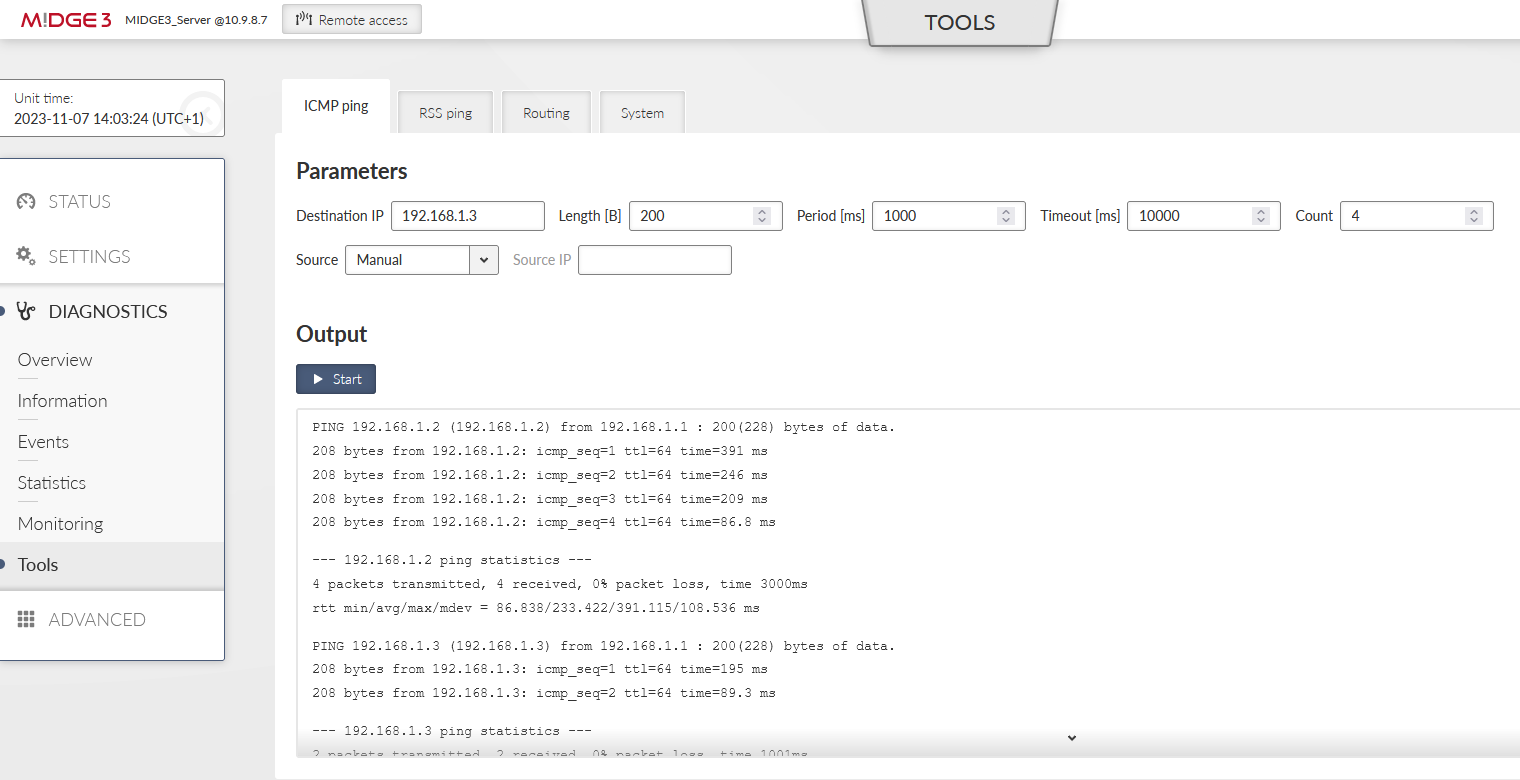
You should also try the DIAGNOSTICS > Tools > ICMP ping to check the accessibility of all LAN subnets. Either from the server to the client and back, or from client to client (it is allowed by default).
Another place to check a current state is the DIAGNOSTICS > Information > Routing menu. Within the System routing tab, you should also see the particular VPN routes – via some “ovpn_” interface.
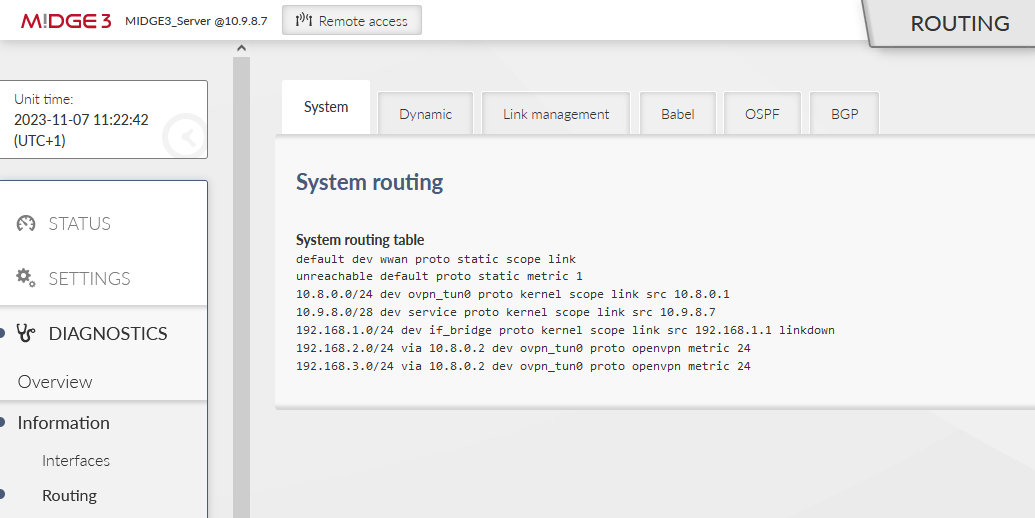
If some routing is missing, or is wrong, double check your server configuration – especially the Client and Server routes.
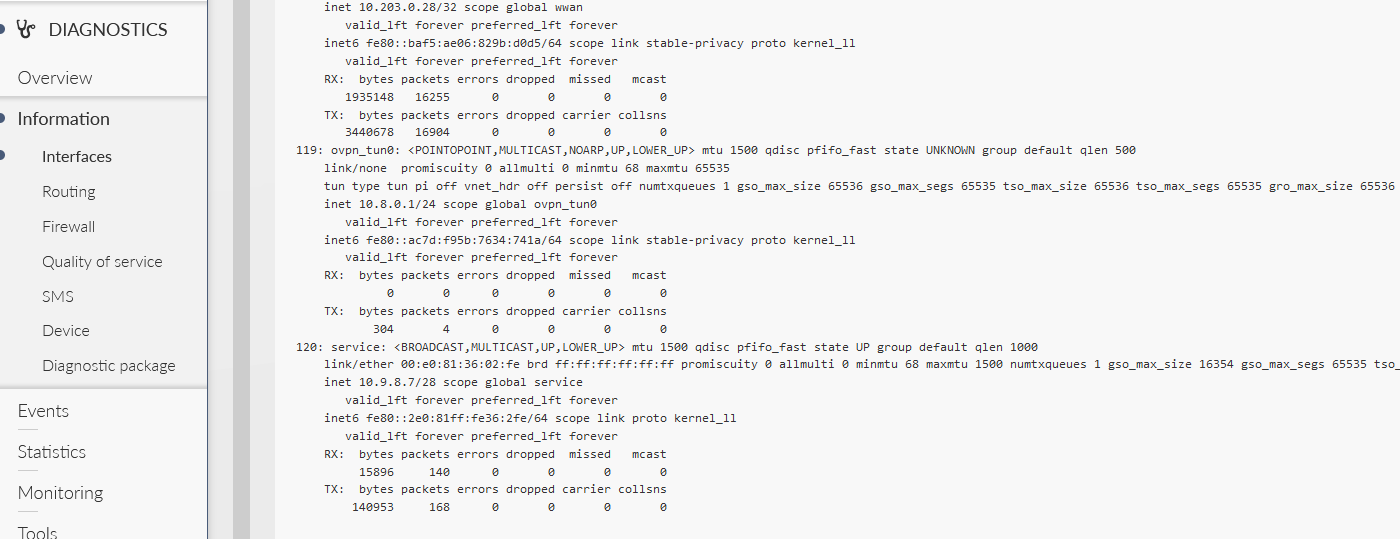
List of all interfaces can be displayed within the DIAGNOSTICS > Information > Interfaces menu. Try to find interfaces with “ovpn_” prefixes.
If you encounter any advanced connectivity/configuration issues, you can download the Diagnostic package within the DIAGNOSTICS > Information > Diagnostic package menu.
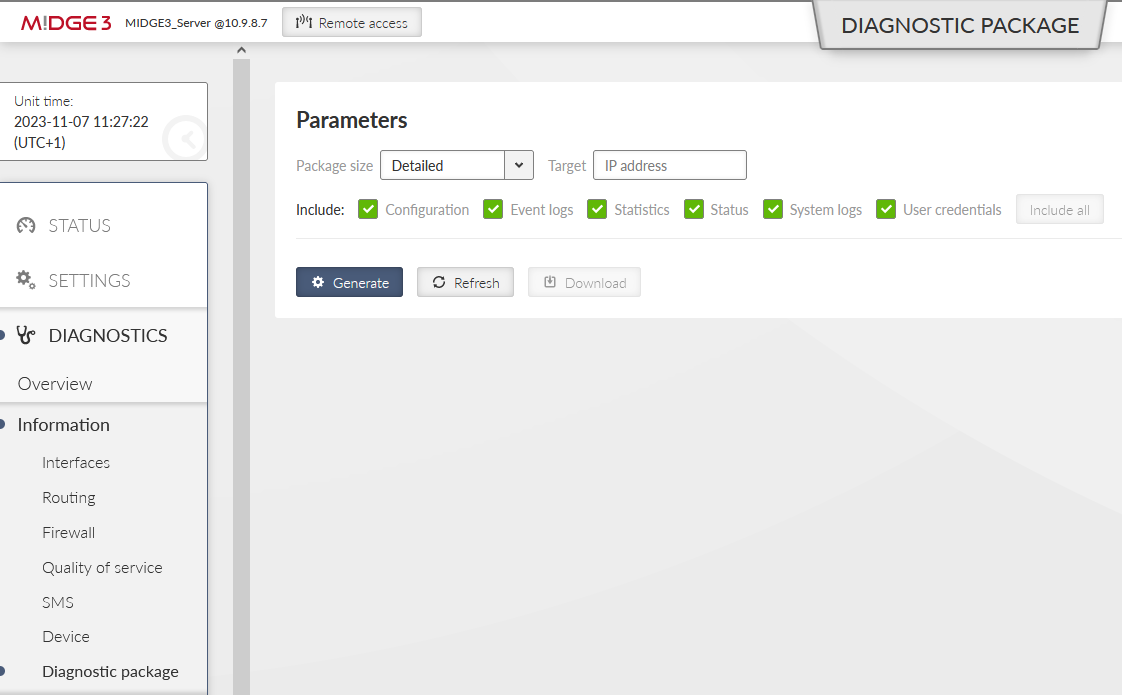
Once downloaded, you need to extract the file and open the directory with logs. Go through the OpenVPN logs and try to find any reason for issues.
More details about possible issues in Section 2, “Troubleshooting”.
One typical network type is that all the end devices are within the same subnet (e.g. 192.168.1.0/24), but require a communication to each other via the RipEX2 Radio network or M!DGE3 cellular network. This is now possible using a secured channel via OpenVPN and its option to bridge particular interfaces together so that it creates a flat L2 topology over the routed scenario.
| Note | |
|---|---|
It is possible to do it for the RipEX2 radio network operating in the Router mode as well. |
The following example is just a continuation of Section 1.1, “Routed (TUN) OpenVPN topology”. We only do the required changes to match the desired IP topology and connectivity.
We will need to
change the Network interfaces’ addresses in both the clients
change the OpenVPN configurations in all the units to match the bridged (TAP) topology
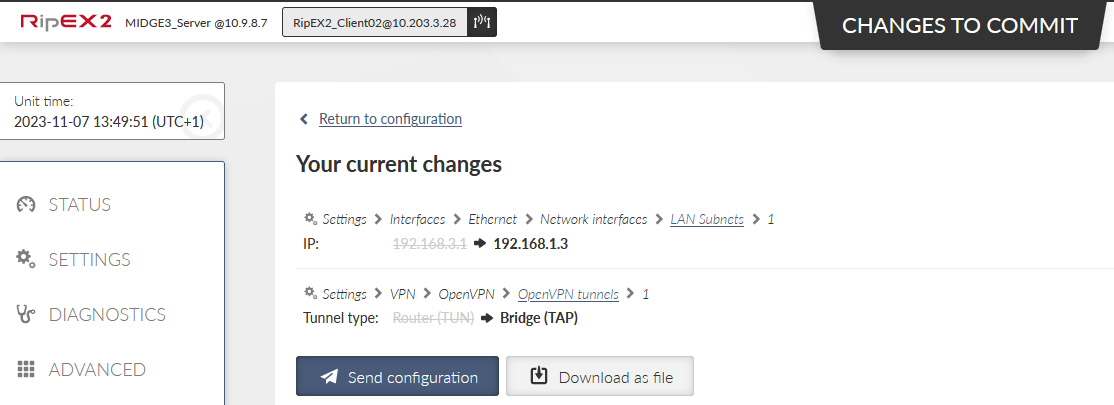
Start with the RipEX2_Client02 unit. Go to the SETTINGS > Interfaces > Ethernet. Change the IP address to 192.168.1.3/24.
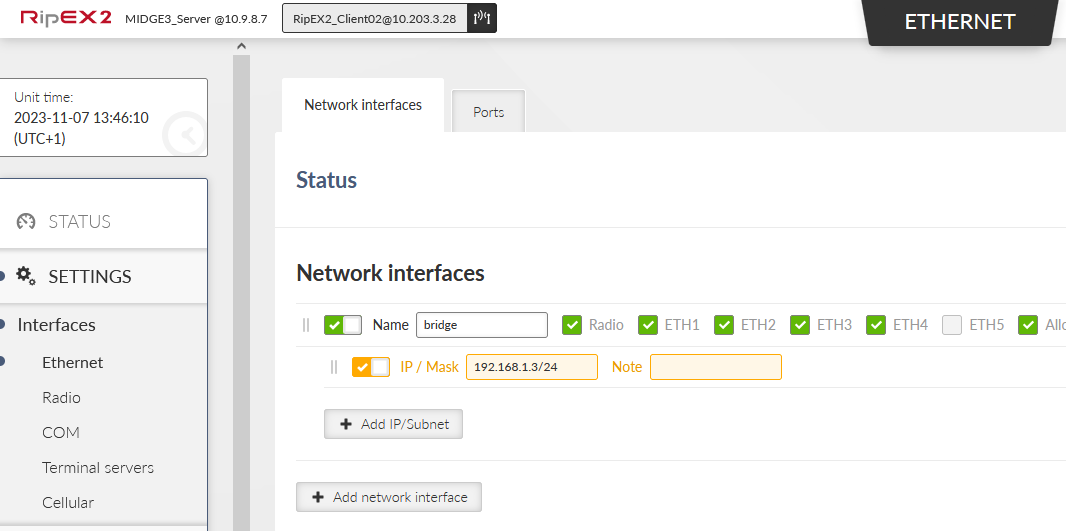
Go to the SETTINGS > VPN > OpenVPN menu and change the Type of the tunnel from Router (TUN) to Bridge (TAP). We only have one Network Interface (bridge) so the “Parent network interface ID” is automatically set to “bridge” and there is no other option. In case of multiple interfaces, select a correct one from the given list.
Apply all the changes.
| Note | |
|---|---|
Based on type of connection to the client unit, you may be disconnected now. |
Go to the MIDGE3_Client01 unit and do the similar changes
Change the Ethernet “bridge” Network interface IP to 192.168.1.2/24
Change the OpenVPN Tunnel type to Bridge (TAP)
Commit the changes as well.
Eventually, go back to the MIDGE3_Server and go to the SETTINGS > VPN > OpenVPN menu. Change the Tunnel type to Bridge (TAP) as well. Close window.
Click on the “Edit clients” button and delete both Client routes. Close the window.
Click on the “Edit server routes” button and delete the single line with 192.168.1.0/24.
Commit all the changes.
We have already explained multiple debugging/troubleshooting options. See below several hints while going through OpenVPN logs and solving connectivity issues.
OpenVPN logs are called openvpn_X and openvpn_diag_X where X is the OpenVPN tunnel ID. The 2nd log does not provide much information, it is mostly our own diagnostics with basic connected/disconnected information.
openvpn_x logs
Server: client got connected
Ciphers negotiated
Connection information
Assigning a client tunnel interface address
Reporting from the connection event script
2023-10-09T05:18:17+00:00 2023-10-09 05:18:17 10.10.1.55:54280 Control Channel: TLSv1.3, cipher TLSv1.3 TLS_AES_256_GCM_SHA384, peer certificate: 3072 bit RSA, signature: RSA-SHA256
2023-10-09T05:18:17+00:00 2023-10-09 05:18:17 10.10.1.55:54280 [Epsilon] Peer Connection Initiated with [AF_INET]10.10.1.55:54280 (via [AF_INET]10.10.1. 11%radio)
2023-10-09T05:18:17+00:00 2023-10-09 05:18:17 10.10.1.55:54280 Control Channel: TLSv1.3, cipher TLSv1.3 TLS_AES_256_GCM_SHA384, peer certificate: 3072 bit RSA, signature: RSA-SHA256
2023-10-09T05:18:17+00:00 2023-10-09 05:18:17 Epsilon/10.10.1.55:54280 MULTI_sva: pool returned IPv4=10.201.0.100, IPv6=(Not enabled)
2023-10-09T05:18:17+00:00 ===== Client Epsilon (10.10.1.55:54280) connected. =====
Server: client got disconnected
2023-10-09T11:22:16+00:00 ===== Client Epsilon (10.10.1.55:54280) disconnected. =====
Client: connection to the server finished
Going to the “Connected state”
Ciphers negotiated
2023-10-09T05:18:04+00:00 2023-10-09 05:18:04 Initialization Sequence Completed 2023-10-09T05:18:04+00:00 2023-10-09 05:18:04 MANAGEMENT: >STATE:1696828684,CONNECTED,SUCCESS,10.201.0.100,10.10.1.11,1194,,
2023-10-09T05:18:04+00:00 2023-10-09 05:18:04 Data Channel: cipher 'AES-256-GCM', peer-id: 0
Client: The server does not respond to client’s connection trials
2023-10-09T05:12:10+00:00 2023-10-09 05:12:10 read UDPv4 [EHOSTUNREACH]: No route to host (fd=4,code=148)
2023-10-09T05:12:32+00:00 2023-10-09 05:12:32 TLS Error: TLS key negotiation failed to occur within 60 seconds (check your network connectivity)
2023-10-09T05:12:32+00:00 2023-10-09 05:12:32 TLS Error: TLS handshake failed
Client authentication failure in the server:
Server:
2023-10-09T11:25:49+00:00 2023-10-09 11:25:49 10.10.1.55:40917 VERIFY ERROR: depth=1, error=self-signed certificate in certificate chain: O=RACOM, OU=Development, L=Bystrice n. P., ST=CR, C=CZ, CN=Alfa, emailAddress=sectech@racom.eu, serial=22739517585033819111443524660849504900645973455
2023-10-09T11:25:49+00:00 2023-10-09 11:25:49 10.10.1.55:40917 OpenSSL: error:0A000086:SSL routines::certificate verify failed
2023-10-09T11:25:49+00:00 2023-10-09 11:25:49 10.10.1.55:40917 TLS_ERROR: BIO read tls_read_plaintext error
2023-10-09T11:25:49+00:00 2023-10-09 11:25:49 10.10.1.55:40917 TLS Error: TLS object -> incoming plaintext read error
2023-10-09T11:25:49+00:00 2023-10-09 11:25:49 10.10.1.55:40917 TLS Error: TLS handshake failed
Client:
2023-10-09T11:26:43+00:00 2023-10-09 11:26:43 TLS Error: TLS key negotiation failed to occur within 60 seconds (check your network connectivity
2023-10-09T11:26:43+00:00 2023-10-09 11:26:43 TLS Error: TLS handshake failed
Server authentication failure in the client:
Server:
2023-10-09T11:33:26+00:00 2023-10-09 11:33:26 read UDPv4 [CMSG=8|ECONNREFUSED]: Connection refused (fd=6,code=146)
Client:
2023-10-09T11:33:44+00:00 2023-10-09 11:33:44 VERIFY ERROR: depth=1, error=self-signed certificate in certificate chain: O=RACOM, OU=Development, L=Bystrice n. P., ST=CR, C=CZ, CN=Alfa, emailAddress=sectech@racom.eu, serial=22739517585033819111443524660849504900645973455
2023-10-09T11:33:44+00:00 2023-10-09 11:33:44 OpenSSL: error:0A000086:SSL routines::certificate verify failed
2023-10-09T11:33:44+00:00 2023-10-09 11:33:44 TLS_ERROR: BIO read tls_read_plaintext error
2023-10-09T11:33:44+00:00 2023-10-09 11:33:44 TLS Error: TLS object -> incoming plaintext read error
2023-10-09T11:33:44+00:00 2023-10-09 11:33:44 TLS Error: TLS handshake failed
Server: Maximum number of connected clients exceeded:
2023-10-02T09:36:38+00:00 2023-10-02 09:36:38 10.10.1.55:32786 MULTI: new incoming connection would exceed maximum number of clients (1)
Server: The client’s connection is refused, because it is not listed within the OpenVPN clients:
2023-10-09T11:39:21+00:00 2023-10-09 11:39:21 10.10.1.55:54272 TLS Auth Error: --client-config-dir authentication failed for common name 'Epsilon' file='/var/run/openvpn/1/ccd/Epsilon'
2023-10-09T11:39:21+00:00 2023-10-09 11:39:21 10.10.1.55:54272 TLS: move_session: dest=TM_ACTIVE src=TM_INITIAL reinit_src=1
2023-10-09T11:39:21+00:00 2023-10-09 11:39:21 10.10.1.55:54272 TLS: tls_multi_process: initial untrusted session promoted to semi-trusted
2023-10-09T11:39:21+00:00 2023-10-09 11:39:21 10.10.1.55:54272 Delayed exit in 5 seconds
2023-10-09T11:39:21+00:00 2023-10-09 11:39:21 10.10.1.55:54272 SENT CONTROL [UNDEF]: 'AUTH_FAILED' (status=1)
2023-10-09T11:39:21+00:00 2023-10-09 11:39:21 10.10.1.55:54272 SENT CONTROL [Epsilon]: 'AUTH_FAILED' (status=1)
Client: The server is refused due to the Extended Key Usage (EKU) check:
2023-10-09T11:37:14+00:00 2023-10-09 11:37:14 VERIFY KU ERROR
2023-10-09T11:37:14+00:00 2023-10-09 11:37:14 OpenSSL: error:0A000086:SSL routines::certificate verify failed
2023-10-09T11:37:14+00:00 2023-10-09 11:37:14 TLS_ERROR: BIO read tls_read_plaintext error
2023-10-09T11:37:14+00:00 2023-10-09 11:37:14 TLS Error: TLS object -> incoming plaintext read error
2023-10-09T11:37:14+00:00 2023-10-09 11:37:14 TLS Error: TLS handshake failed
Link fragmentation is turned on, but the Peer has it turned off:
2023-10-02T08:05:54+00:00 2023-10-02 08:05:54 Beta/10.10.1.22:37547 IP packet with unknown IP version=0 seen
2023-10-02T08:06:05+00:00 2023-10-02 08:06:05 Beta/10.10.1.22:37547 FRAG_IN error flags=0x2a187bf3: FRAG_TEST not implemented
Server: Server has the compression enabled, but the client has it disabled:
2023-10-09T11:47:19+00:00 2023-10-09 11:47:19 Epsilon/10.10.1.55:57609 IP packet with unknown IP version=15 seen
Client: It has the compression disabled, but the server has it enabled and wants to enforce it:
2023-10-09T11:43:27+00:00 2023-10-09 11:43:27 Compression is not allowed since allow-compression is set to 'stub-only'
2023-10-09T11:43:27+00:00 2023-10-09 11:43:27 OPTIONS ERROR: server pushed compression settings that are not allowed and will result in a non-working connection. See also allow-compression in the manual.
2023-10-09T11:43:27+00:00 2023-10-09 11:43:27 ERROR: Failed to apply push options
2023-10-09T11:43:27+00:00 2023-10-09 11:43:27 Failed to open tun/tap interface
TLS Auth: The peer side uses a different key:
2023-08-08 09:33:47 Authenticate/Decrypt packet error: packet HMAC authentication failed
2023-08-08 09:33:47 TLS Error: incoming packet authentication failed from [AF_INET]10.10.1.44:47771
TLS Auth: The peer side does not have TLS-Auth enabled:
2023-08-08 09:37:38 TLS Error: cannot locate HMAC in incoming packet from [AF_INET]10.10.1.44:47878
TLS Crypt: The peer side uses a different key:
2023-08-08 11:17:33 tls-crypt unwrap error: packet authentication failed
2023-08-08 11:17:33 TLS Error: tls-crypt unwrapping failed from [AF_INET]10.10.1.44:56203
TLS Crypt: The peer side does not have TLS-Crypt enabled:
2023-08-08 11:18:34 tls-crypt unwrap error: packet too short
2023-08-08 11:18:34 TLS Error: tls-crypt unwrapping failed from [AF_INET]10.10.1.44:59311
M!DGE3/RipEX2 devices support so called Events.
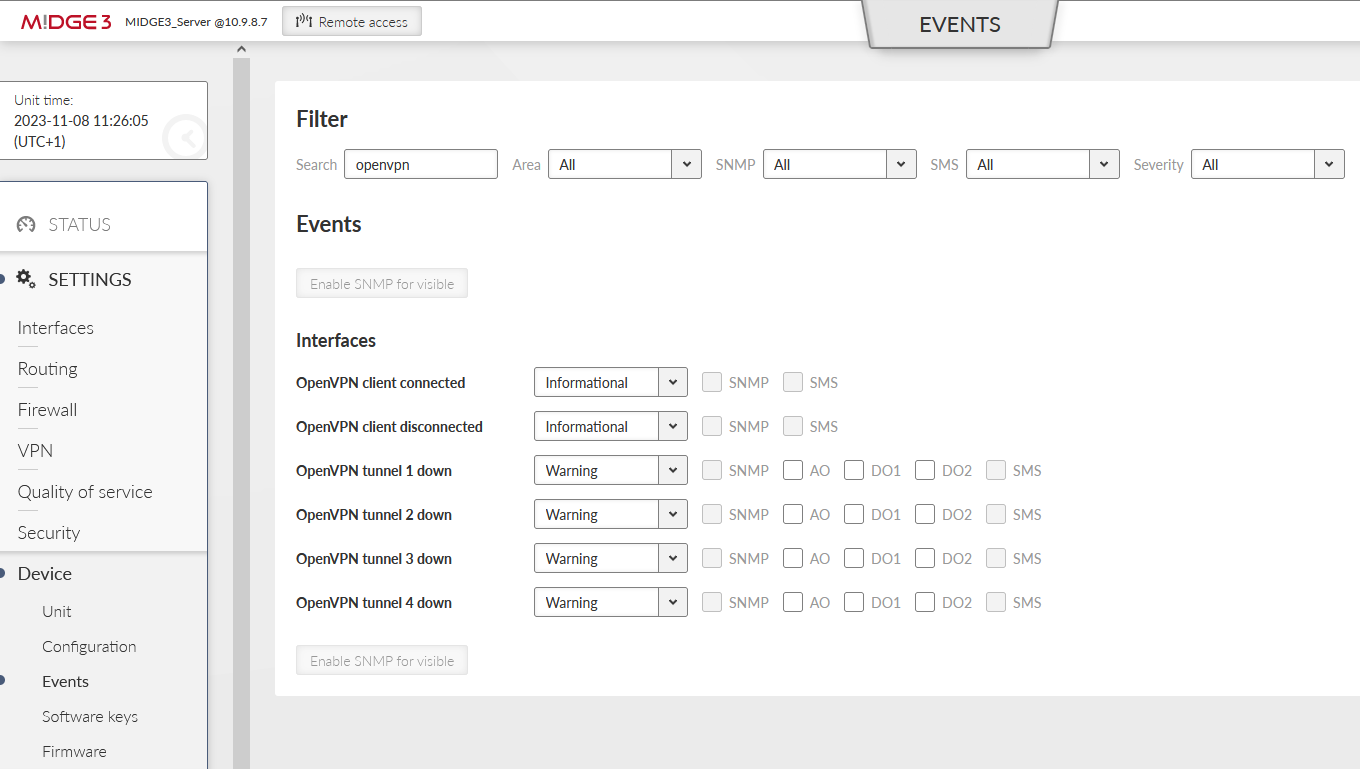
You can be notified about the clients being (dis)connected and about the tunnels being down via SNMP notifications, Alarm and Digital outputs or SMS.
You can also change the severities for particular events so it can e.g., display this important Event within the STATUS menu, or change the physical SYS LED diode color to red.
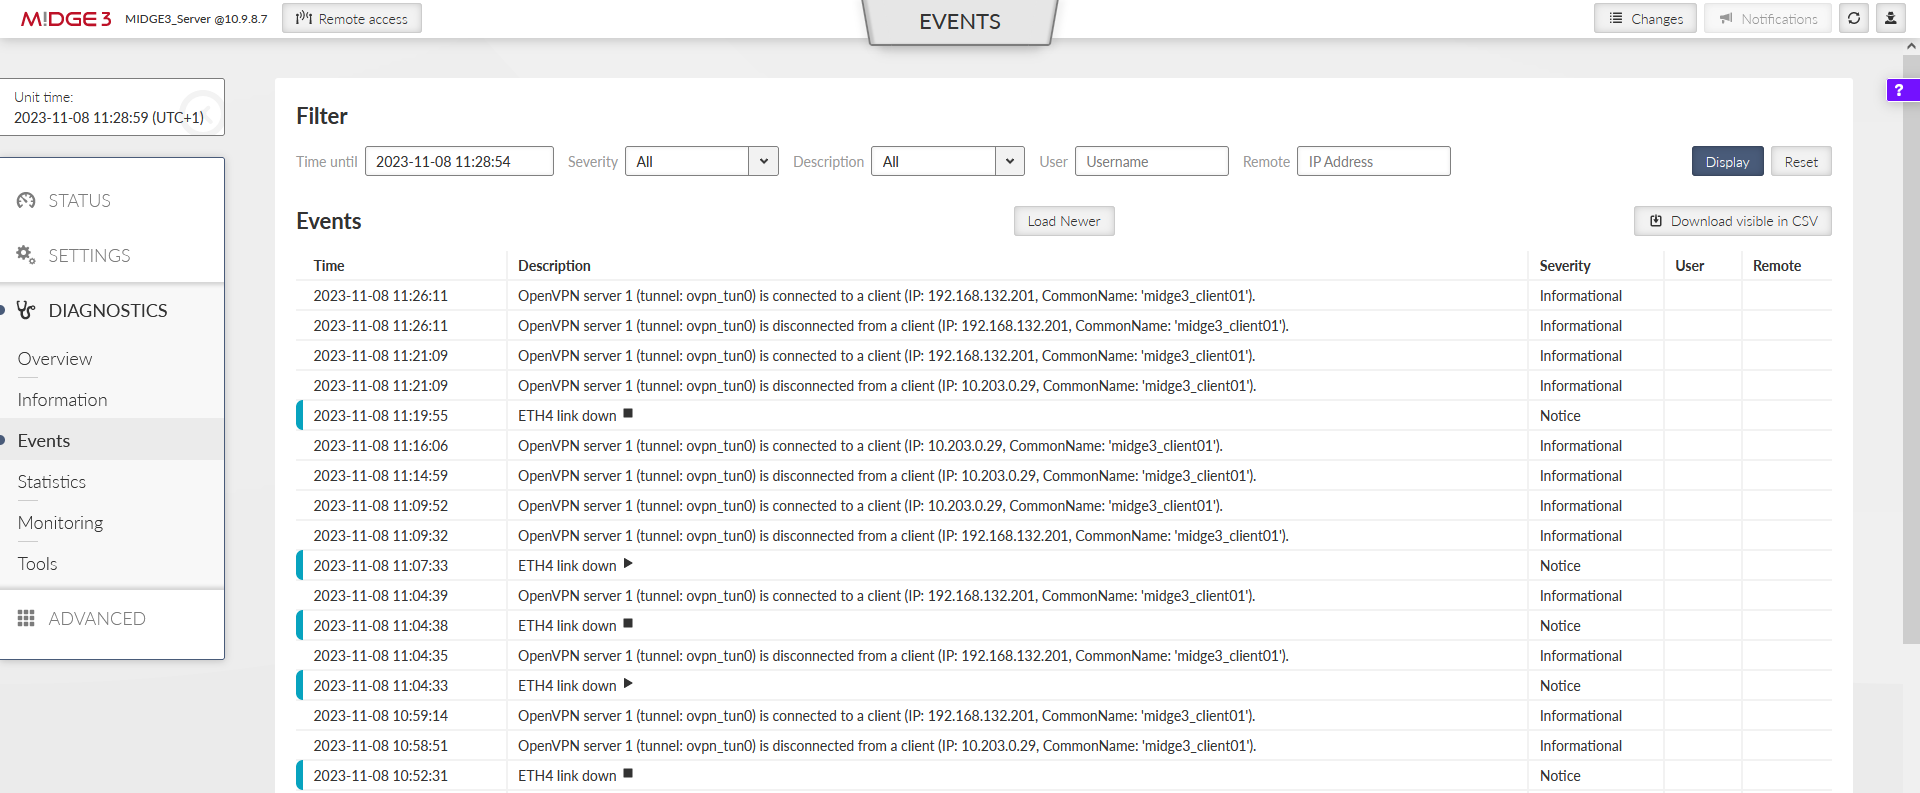
All Events can also be displayed and filtered within the DIAGNOSTICS > Events menu. Read more information about the Events in the manual.
OpenVPN is a well-known protocol and is compatible with any other OpenVPN enabled device, including older M!DGE2 cellular router.
You can do both, adding M!DGE2 into the existing M!DGE3/RipEX2 network or adding M!DGE3/RipEX2 to the existing M!DGE2 network.
Just configure the correct OpenVPN parameters and upload the keys and certificates.
Keep in mind that older M!DGE2 “Expert files” are no longer supported in M!DGE3/RipEX2 units. Configure the parameters manually (based on 2.1.1.0 firmware features).
| Note | |
|---|---|
Keep the M!DGE2 software up-to-date. Check the Download section on RACOM website. |
| Note | |
|---|---|
There can be multiple ways of doing the same. Consider the following text to be just one of the options. You can choose a different approach. |
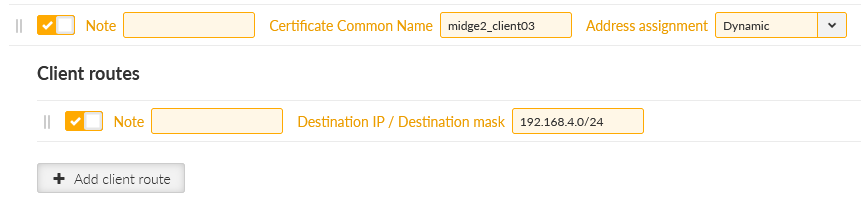
We start in the server by going to the SETTINGS > VPN > OpenVPN menu. Open the “Edit clients” menu and add a new client with a Certificate Common name equal to “midge2_client03”. Add its route to be 192.168.4.0/24.
Go to the SETTINGS > Security > Credentials > Settings menu. Change the Common name (CN) parameter to “midge2_client03” so that newly created certificate has a correct CN.
Commit the changes to the OpenVPN.
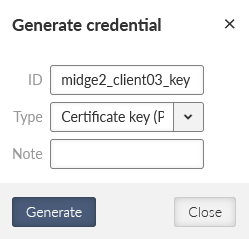
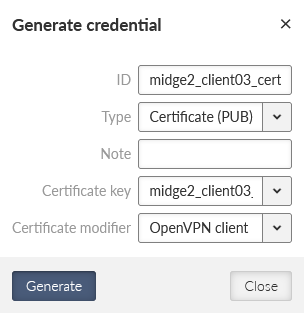
Go to the SETTINGS > Security > Credentials menu. Generate a private key and a certificate for this M!DGE2 unit.
midge2_client03_key | Certificate key (PRI) |
midge2_client03_cert | Certificate (PUB) |
Download them into your PC together with the OpenVPN TLS Protection key (PRI) “ta_key” and CA chain (PUB) “ca_cert”.
Change the MIDGE3_Server’s Common name back to “midge3_server” and commit changes.
The application note is not intended for M!DGE2 complete tutorial, but if you configure it from the factory settings, do not forget to:
set the Ethernet IP to 192.168.4.1/24 and change its DHCP address range
configure the Mobile interface correctly to suit your APN
our WWAN IP address will be 10.203.3.33/17
set the hostname to “MIDGE2_Client03”
set the correct NTP server and Time zone
set the correct Common Name (CN) within the Keys&Certificates to be “midge2_client03”
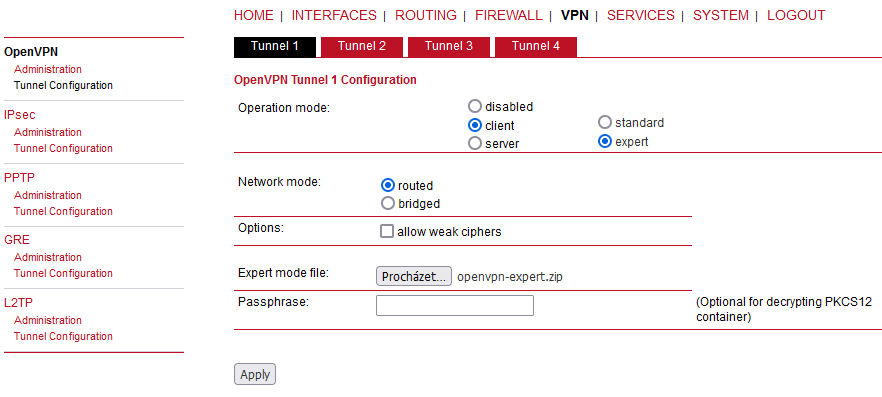
Go to the VPN > OpenVPN > Tunnel Configuration menu.
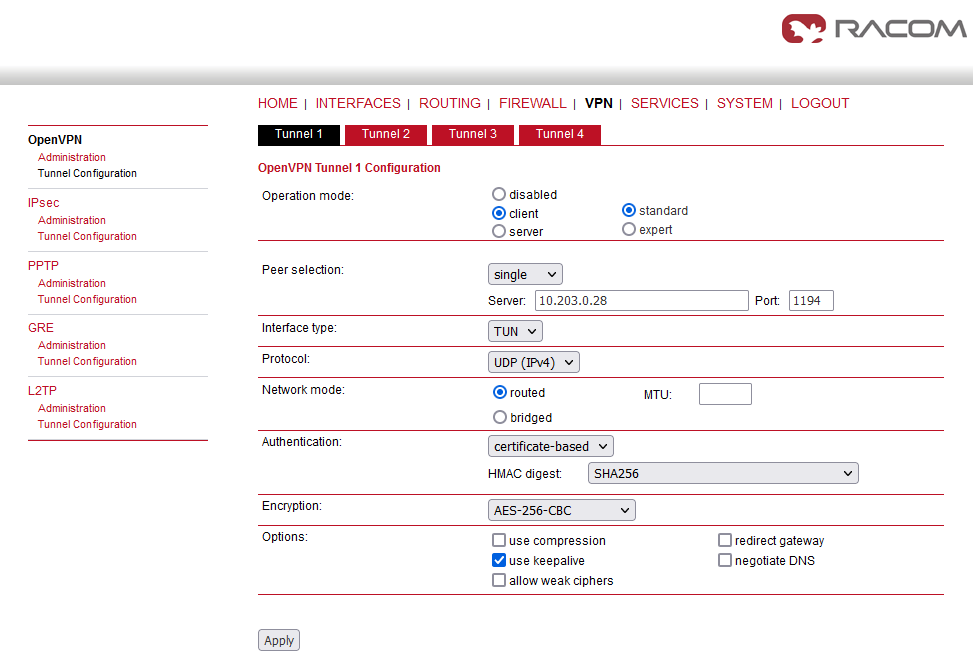
Set the Operation mode to “client”.
Set the Server IP to 10.203.0.28
Uncheck the “use compression” and “allow weak ciphers” options
Check the “use keepalive” option
Other parameters should stay in default and shall follow the server’s setup.
Apply the changes. Click on the Error message within the Authentication part of the menu.

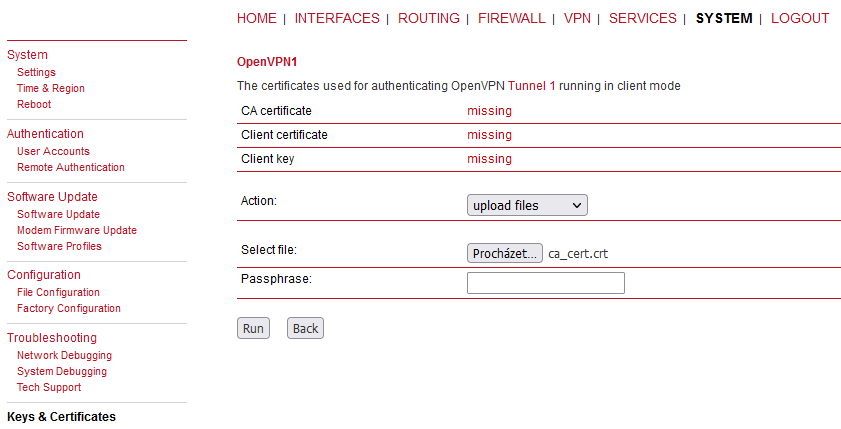
But what about the OpenVPN TLS Protection key (PRI)? (TLS-Auth, ta.key)
This is not supported within the M!DGE2 web interface, but can be done different way.
Go to the VPN > OpenVPN > Tunnel configuration and click on the Download button. Save the ZIP file to your PC and unzip it. Open the openvpn-expert.conf file using a text editor and add one new line:
tls-auth ta.key 1
A complete file should be the same, or similar to:
client
remote 10.203.0.28 1194
proto udp
verb 3
auth-retry nointeract
nobind
auth-nocache
sndbuf 0
rcvbuf 0
ipchange "/etc/openvpn/tunnel0-ipchange"
passtos
up-restart
auth-retry nointeract
remap-usr1 SIGHUP
resolv-retry infinite
persist-key
persist-tun
auth SHA256
cipher AES-256-CBC
keepalive 10 60
ca ca.crt
cert openvpn-expert.crt
key openvpn-expert.key
dev tun
tls-auth ta.key 1
Now, copy & paste the OpenVPN TLS Protection key (PRI) file to the same folder/directory with the rest of the files within the Expert file. Name it “ta.key”. Zip all the files to the openvpn-expert.zip file again.
So, the differences are:
the configuration file includes the tls-auth ta.key 1 directive
the ZIP includes the ta.key file
Go back to the MIDGE2_Client03’s web interface and VPN > OpenVPN > Tunnel Configuration menu. Erase the current OpenVPN settings.
Set the Operation mode to “client” again, but set the “expert mode” now.
Keep the “Routed” option set and uncheck the “allow weak ciphers” option. Select the updated ZIP file and apply the changes.
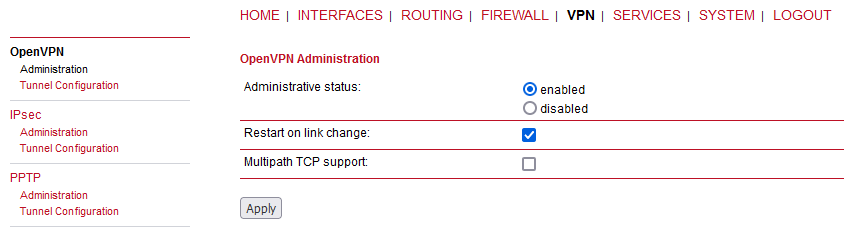
Go to the OpenVPN’s Administration menu and enable the tunnel.
Go to the HOME menu and check if the client gets connected, or not.
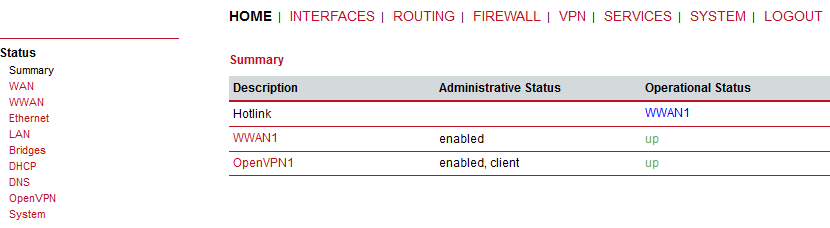
If you go to the OpenVPN details, you should e.g. see the assigned OpenVPN IP address.
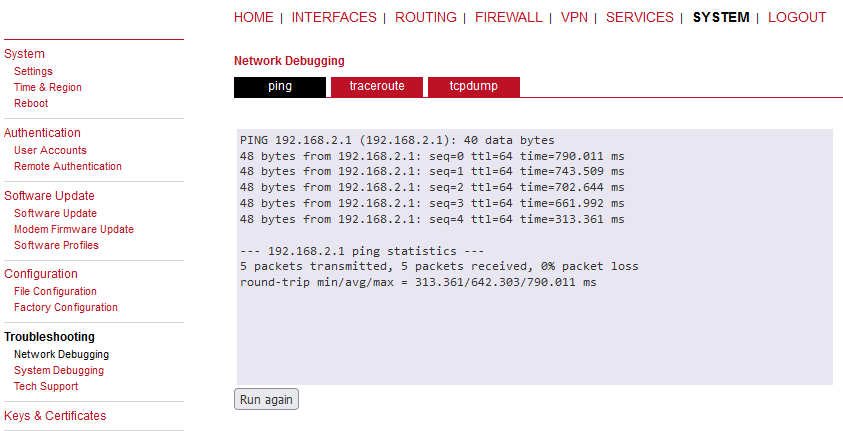
You can go to the SYSTEM > Network debugging > ping menu and try to ping 192.168.1.1 IP address of the server or 192.168.2.1 MIDGE3_Client02 IP address.
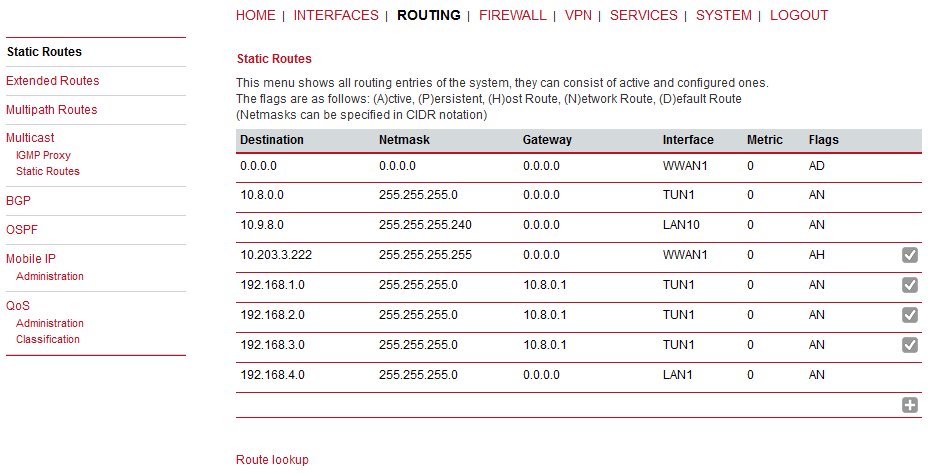
You can check the routes within the ROUTING > Static routes menu. You should see all the remote networks accessible via TUN interface.
Last, but not least, you can also download a Techsupport package and check the logs for any issues. Do it from the SYSTEM > Tech Support menu.
Logs can also be viewed online if you connect to the M!DGE2 SSH. You can also do advanced debugging directly from the Linux command line in M!DGE2.
Requirement can also be the other way. You have a working M!DGE2 network utilizing the OpenVPN connections. Now you bought M!DGE3 as well and just need to add a new client.
The application note will not show the step-by-step configuration with all the screenshots, but will help you with required steps. Most of the following steps are covered within the application note so just go through previous examples if you encounter any obstacle.
Configure your M!DGE3/RipEX2 to connect to your APN and configure all other required parameters such as NTP, Network Interfaces, Common name, …
Add a new client in your M!DGE2 server and set its network(s)
Generate valid credentials (Keys & certificates) in your M!DGE2 server (or e.g. in some external CA)
Upload/Add the client’s key, client’s certificate, CA chain and if required, the TLS-Auth/TLS-Crypt key to your M!DGE3/RipEX2
Configure your M!DGE3/RipEX2’s OpenVPN with valid credentials and correct parameters to suit your server settings
Several screenshots to help you.
| Note | |
|---|---|
You may also change the Common name of the M!DGE2 server before generating the client’s certificate even though there is no “Certificate modifier” option in M!DGE2 so the “Verify peer certificate usage“ parameter in M!DGE3/RipEX2 should probably be disabled. |
M!DGE2 OpenVPN server only supports a “Network topology” option “Net /30”. This is not configurable in clients, but is driven by the server. Just keep this in mind while interconnecting various devices within one OpenVPN network. The network is either “Net /30” or more up-to-date option “Subnet”. It cannot be combined. M!DGE2 and M!DGE3/RipEX2 support both options, but M!DGE2 cannot set it for the Server, it can only adapt to it as a client.
If you have any issues, contact our technical support at support@racom.eu.

Within this example, we will replace the M!DGE2 Master (OpenVPN server) unit by a new M!DGE3 router. We will not touch any configuration or credentials in remote OpenVPN clients. We just swap M!DGE2 by M!DGE3 in the central location.

First of all, we suggest to download complete configuration files from all the units in your network, or at least the M!DGE2 Master so you do have backup files for future needs, or in case of any issues.
Except the configuration file (within SYSTEM > File configuration menu), we also suggest to backup/download an expert file for each OpenVPN client in case of swapping any client M!DGE2 by M!DGE3 as well (VPN > OpenVPN > Client management).

Keep an eye on our server’s OpenVPN settings, because you will need to manually set matching parameters in your new M!DGE3 server.

Last, but not least, check what are the Common Names (CNs) of your clients, because they probably do not match the set names within the Client management. E.g. in our example, the 1st client, called “Client1” within the GUI management, has the CN equal to “client0”. The CN is important due to control mechanism in M!DGE3. Mark all the CNs in some document.
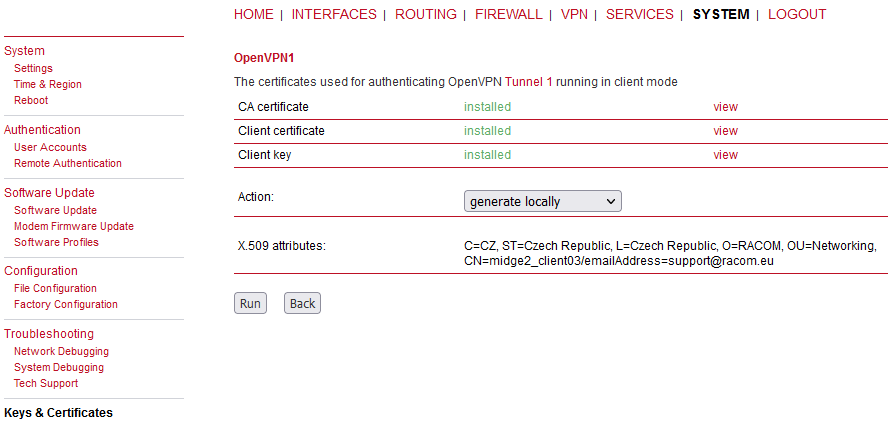
Within M!DGE2 GUI, you can find them in the SYSTEM > Keys & Certificates menu. Open the OpenVPN details there.

Open each client’s details.

Now, click on the “view” button next to the “Client certificate” line.

Mark down the correct CN – “client0” in our example. The 2nd client has “client1”.
Unzip all the downloaded files so we can import them into M!DGE3 Master (new OpenVPN server) now.
Start with upgrading the unit into the latest FW. Once completed, do the factory reset and start the configuration from the beginning.
| Note | |
|---|---|
We suggest setting the M!DGE3 Master without the antenna connected or/and without the SIM card so that your currently used M!DGE2 server operation is not broken. |
Focus on all configuration parameters to suit M!DGE2 settings. You can e.g. go through the M!DGE2 text configuration file and edit particular parameters in M!DGE3 GUI. Unfortunately, this configuration file cannot be uploaded into M!DGE3. Focus e.g. on
Ethernet/Network interfaces
Cellular (WWAN) connection incl. Supervision (Link testing)
Routing (static, dynamic)
Firewall, NAPT
Unit name
NTP time synchronization
Security (users, management ports, …)
Services (DHCP, DNS, SNMP, …)
Last, but not least, OpenVPN.
To be able to set up OpenVPN correctly, we need to upload all the credentials (Keys & certificates) required by the OpenVPN server. Do it from the SETTINGS > Security > Credentials menu.
Start with the CA certificate. Click on the “Add credential” button and select correct parameters and a correct file downloaded from the M!DGE2 Master (server) unit.

The ID can by any, but unique within the M!DGE3 settings. Important is the “Type” which must be equal to “CA chain (PUB)”. Select a correct file (usually saved as “ca.crt”) and upload the file.
Upload the server’s key now.

Upload the server’s certificate.

And finish it with DH parameters.

Now, we can go to SETTINGS > VPN > OpenVPN menu. Add a new tunnel and set its Mode to “Server”.

Focus on these parameters (and of course any other).
Tunnel type – we use a routed/TUN option in our example
Tunnel network address / Tunnel network mask – it can be the same as in the M!DGE2 settings, or it can be different – it is up to you now. It just cannot overlap with any other subnet in the network.
Assign dynamic client address – this is important, because the OpenVPN server will automatically assign VPN IPs to each client from this range. You can keep it off – in such a case, each client must be configured with “Static” address assignment (later within clients’ settings). Static and dynamic ranges cannot overlap.
Network topology – in M!DGE2, only “Net /30” option is implemented for the Server. In M!DGE3, up-to-date and modern “Subnet” option is recommended. Even the M!DGE2 clients can connect to this type as clients so we suggest using this “Subnet” topology option.
Select proper Private key ID, Certificate ID, CA certificate ID.
Turn off the “Verify peer certificate usage” if you did not use these modifiers in your network. Within M!DGE2, it was not possible to generate certificates with such modifiers, but could be imported manually from a different certificate management tools. This can often cause issues for the clients to connect with log messages incl. some “VERIFY KU ERROR” issues.
Set a correct Cipher and HMACauthentication.
Focus on “Compression” option – in M!DGE2 and older models, the compression was set to “On” by default so the data being transmitted are compressed and data usage is minimized. But using a compression can compromise data security (it can break encryption), so it is recommended to disable it (Off).

Make sure to use either UDP or TCP correctly in all the units, together with its port.
Select a correct DH parameters ID.
Usually, enable the keepalive probes.
If you utilized the TLS-Auth (ta.key), choose it within the “Enhanced TLS protection”. In such a case, you would need to add this “ta.key” file within the Credentials menu and choose it from the select box here. We also support TLS-Crypt option (higher security), but this is not supported by M!DGE2.
If you need client-to-client communication, enable the “Allow direct routing between clients” option.
Common names – in our example, we will not allow duplicate CNs and we will also allow known CNs only – they will be specified within the “Clients” configuration in the server’s settings.
There are many parameters which must match in all the routers. Double-check each parameter.
Once set, click on the “Edit clients” button and configure both M!DGE2 clients here.

There are three important parameters. The Certificate CN must match the one installed in the client (client0 and client1 in our case). We chose the Dynamic IP address assignment and we also need to specify subnets which are accessible through the particular client M!DGE2 unit.
Close this window and edit the server routes. There is just one route in our example – 192.168.1.0/24. This route is pushed to each client.

Follow your own settings, routing, diagram. This is just an example of course.
Apply all the changes.
Now, turn off the legacy M!DGE2 Master (server) router, remove its SIM card and insert it into our M!DGE3 router (while turned off as well). Swap the antenna connectors to this new M!DGE3 unit as well and turn it on (attach the power supply – focus on wiring, because different screw terminal is used and different voltage is allowed – with M!DGE3 we are on the safe side with 10-50 V, whereas M!DGE2 only had 12-24V).
If all comes up correctly, you should see both the clients connected.

If you have any connectivity issues, follow the Troubleshooting Chapter 2 within this document. You can e.g. check the OpenVPN logs within the DIAGNOSTICS > Tools > Logs menu.

You can also verify the functionality by pinging particular devices and/or seeing the Monitoring for encrypted data (UDP/1194).
In the most basic scenario, each client connects to one server defined by its parameters and its IP address. In more robust solution, we may have multiple servers due to high availability requirement, because in case of one server failure, the other one can work instead.
Another example could be that a particular M!DGE3/RipEX2 utilizes multiple WAN links and based on the active WAN (link priorities, dynamic routes, …) it can only reach one of more OpenVPN servers.
In such clients, we can configure multiple OpenVPN servers with different IPs and, if required, other parameters (Enhanced TLS protection, UDP/TCP protocol, port number, …). Priorities of the servers can be set. In normal operation and built-in OpenVPN “failover” option, once it connects to the lower priority server, it stays connected to it until there is some issue with this connectivity. In M!DGE3/RipEX2, we can define a fixed time after the currently active connection is closed and the higher priority servers can be used again.
If not already done, set up two M!DGE3 units by following the Chapter 1.1. The server can have RipEX2_Client02 configured as well, but we won’t focus on this client at all, only the MIDGE3_Client01 client.
Configure a new Network Interface within SETTINGS > Interfaces > Ethernet menu called “wan”, using ETH4 port. Set its IP address to 192.168.132.200/24.
Go to the SETTINGS > Routing > Static menu. Based on your APN settings, this may differ a lot, but we set a static route to cellular APN subnet 10.203.0.0/17 via WWAN (MAIN) persistently. We do not need to set any routes via the WAN for this scenario.
| Note | |
|---|---|
More complex solutions can require multiple static routes, and/or Link management and dynamic routing. |
Commit the changes.
Configure a new Network Interface within SETTINGS > Interfaces > Ethernet menu called “wan”, using ETH4 port. Set its IP address to 192.168.132.201/24.
Go to the SETTINGS > Routing > Static menu. Based on your APN settings, this may differ a lot, but we set a static route to cellular APN subnet 10.203.0.0/17 via WWAN (MAIN) persistently. We do not need to set any routes via the WAN for this scenario.
Go to the SETTINGS > VPN > OpenVPN menu and click on the “Edit servers” button. Add one new server with server address 192.168.132.200. Set the TLS Protection shared key ID the same way as for the 10.203.0.28 server (TLS-Auth, direction ‘1’).
Switch the priorities so the 192.168.132.200 server is on the 1st line and 10.203.0.28 is on the 2nd line.
Commit the changes.
Connect M!DGE3_Server and M!DGE3_Client01 via the Ethernet cable using the ETH4 ports!
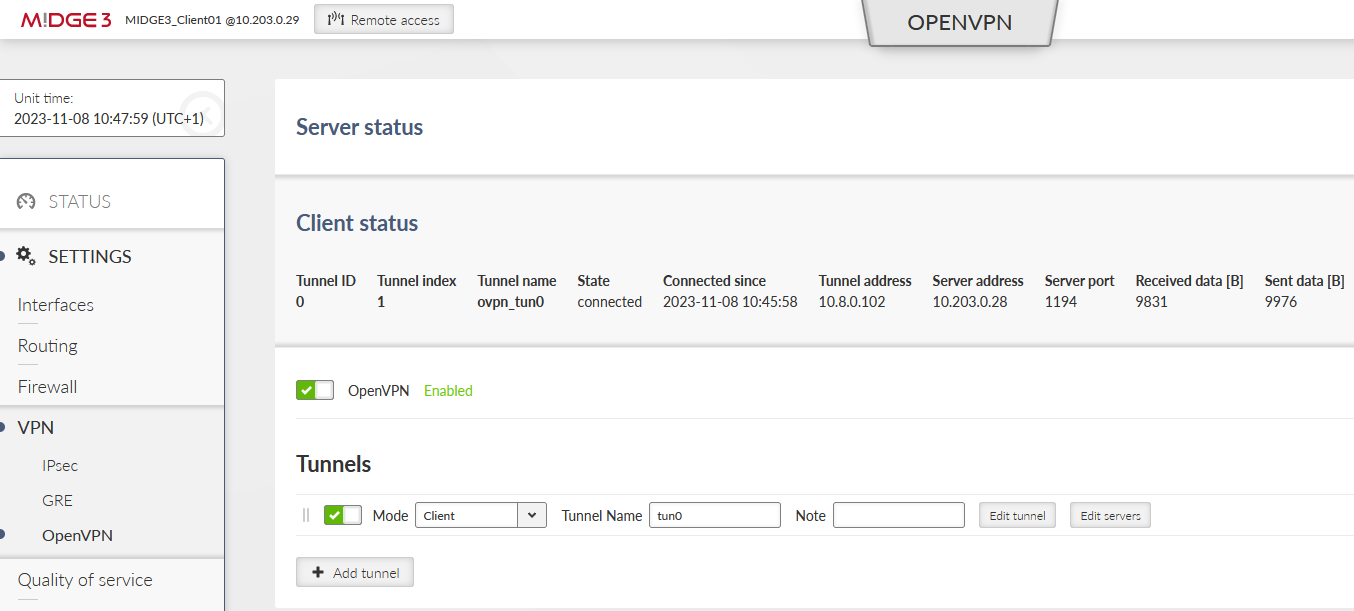
Currently, the OpenVPN tunnel should be established via the primary option. Go to the client’s OpenVPN settings and check the Status.
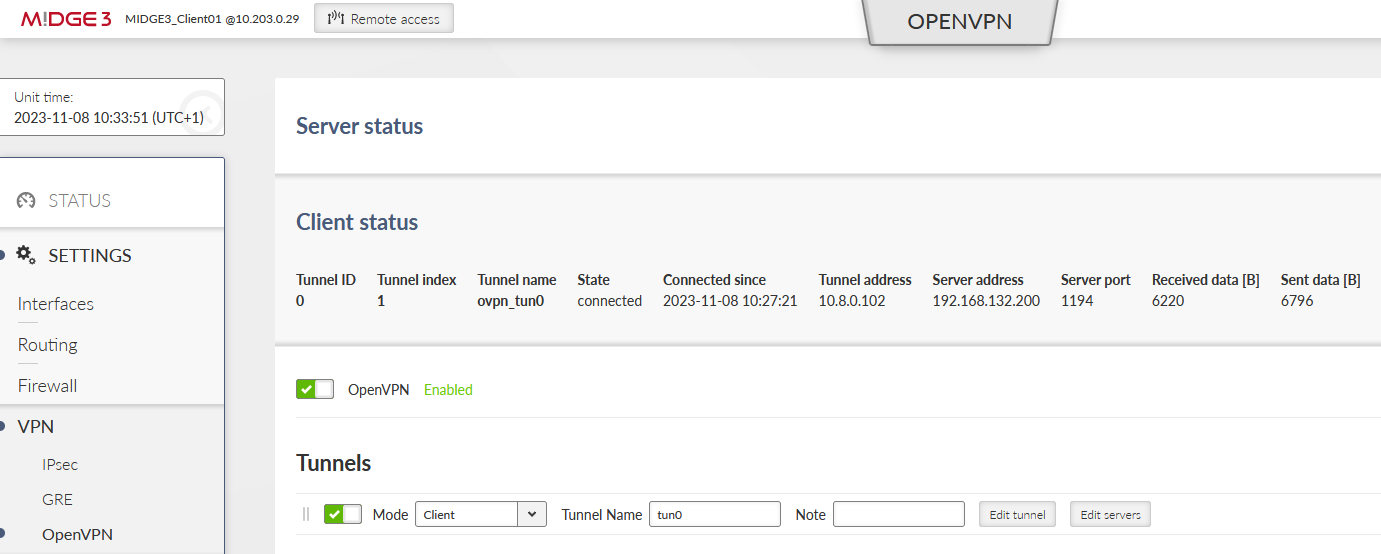
Focus on “Server address” – it should be 192.168.132.200. If not, you can reboot the unit and wait until the tunnel gets connected again.
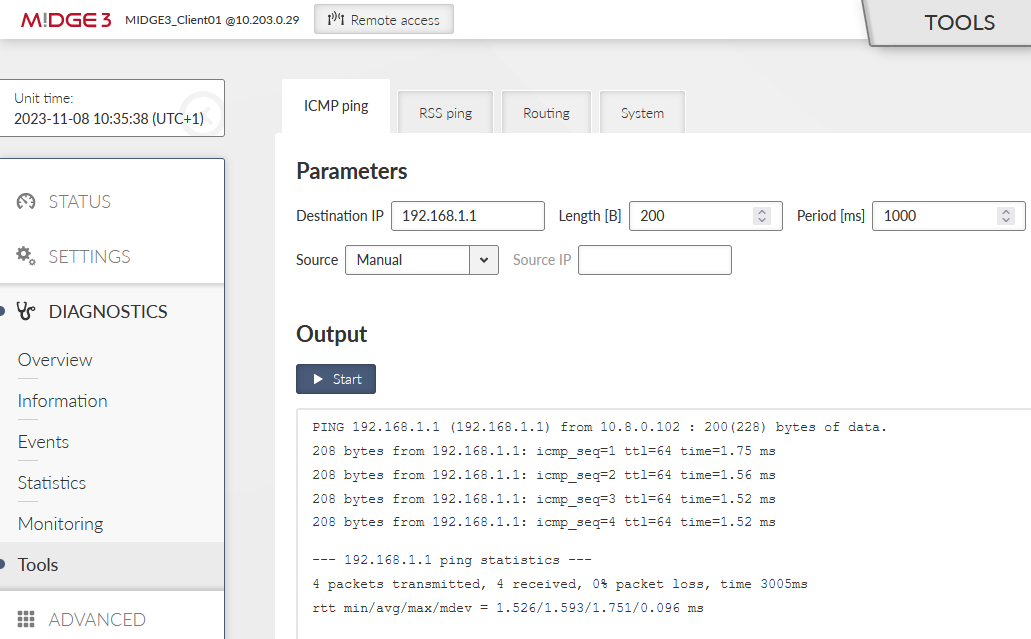
Go to the DIAGNOSTICS > Tools > ICMP ping and try to ping 192.168.1.1 from the client. It should work with a very low RTT – it is approximately 1.5 ms in our example – because it is just via the Ethernet cable.
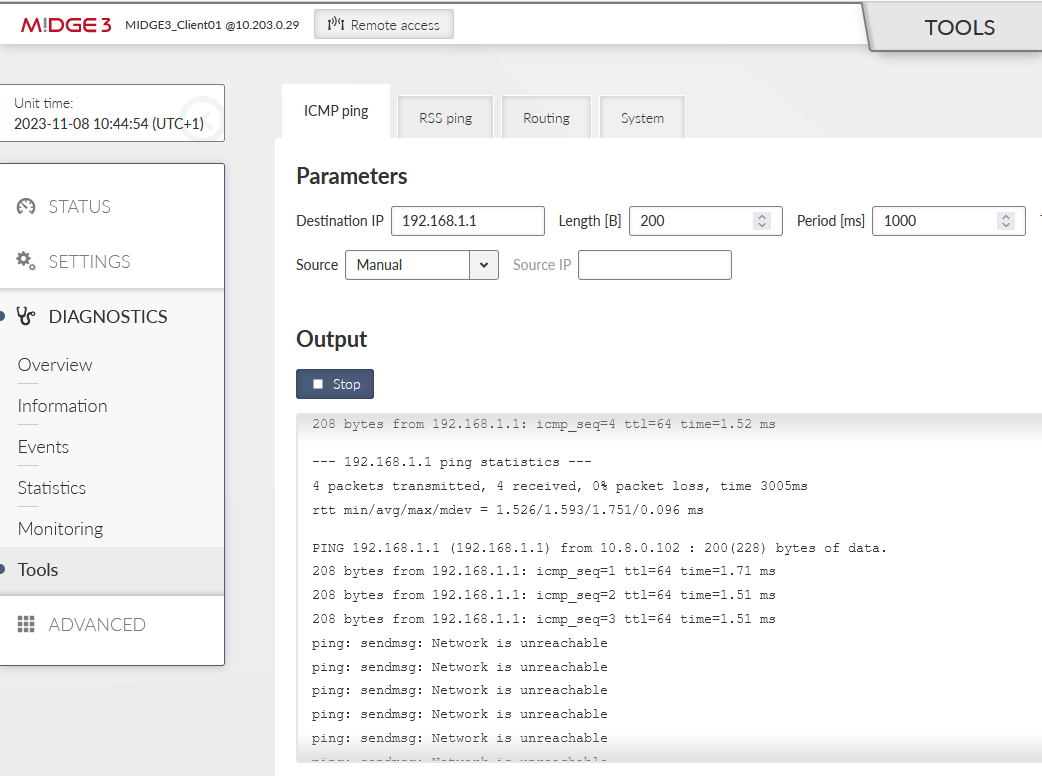
Disconnect the ETH cable between the units. The ping should start failing until the OpenVPN mechanism reconnects via the cellular network. The RTTs should be much higher compared to ETH speed.
The switchover time can differ based on Keepalives set in the OpenVPN settings.

You should also check the OpenVPN status – there should be 10.203.0.28 the Server address.
Connect the Ethernet cable again.
The OpenVPN connection does not get re-established via the primary link now, because it only goes to the primary server if the current failover/backup fails. You can either disconnect the cellular antenna, or reboot the client. Wait until it gets connected via the primary ETH link again.
If you need to check the primary (higher priorities) link, set the “Limit session length” parameter in the client’s tunnel configuration. Set the “Maximal session length” to suit your requirements. The minimum time is 5 minutes and the maximum time is 1 day.
We will set it for 5 minutes only due to testing purposes.

Commit changes.
You can do the test with the Ethernet cable again. Once the OpenVPN gets connected via the cellular network, attach the cable again. Within 5 minutes’ time, you should be re-connected via the primary Ethernet link again.
Keep in mind such settings reconnect the tunnel no matter which server is being used – so in our example, while operating via the primary Ethernet link – the VPN tunnel is still re-established every 5 minutes.
You may check the DIAGNOSTICS > Events menu.
Dynamic routing protocols (Babel, BGP and OSPF) can only be operated over OpenVPN L2. It is not possible to utilize OpenVPN L3 due to internal routing in the server. Moreover, Babel uses IPv6 link addresses which are dynamically assigned and are not routed.
Be careful not to cause routing loops – i.e. routing OpenVPN back to the OpenVPN tunnel over and over again. The protective mechanism is not implemented in OpenVPN, it’s only in IPsec.
The following text describes utilizing dynamic routing protocols Babel and BGP over OpenVPN L2 tunnel (TAP, bridged option).
The example starts from the Routed (TUN) OpenVPN topology described in Section 1.1, “Routed (TUN) OpenVPN topology”. If not yet utilized, start your configuration there.

This M!DGE3 unit is set as the OpenVPN server. One of the most important configuration parameter is one additional Network interface within the SETTINGS > Interfaces > Ethernet menu. This NI is not attached to any of the physical ETH port, but is then set in OpenVPN L2 configuration only.

We create a new Network interface (NI) called “openvpn” and its IP/mask is set to 10.10.10.1/24.
Go to the SETTINGS > VPN > OpenVPN menu and set/change the OpenVPN settings. Change the Tunnel type to Bridge (TAP) and set the Parent network interface ID to “openvpn”.

Delete client routes for both the clients.

Server routes’ table is also empty. Routing is managed by Babel dynamic routing protocol.

Last, but not least important menu is SETTINGS > Routing > Babel. Enable it and set the ID to 1.1.1.1.

Go to the Network tab and select the ‘if_openvpn’ interface. Other parameters may differ to suit your application.

Note the prefix “if_” which is always included in the real interface name of any NI within Ethernet menu.
Set the Static rule to be exported via the Babel protocol. This is the Master’s LAN subnet.

Save the changes.
It is very the same configuration as in the Master unit.
OpenVPN Ethernet interface used for L2 bridge.

Configure OpenVPN tunnel appropriately. Select the Bridge (TAP) type and set the ‘openvpn’ Parent network interface ID.

Continue within the Babel settings. Set the ID to 2.2.2.2.

Network tab is the same as in the Master unit.

The Static rule exports local LAN 192.168.2.0/24.

Save the changes.
2nd client configuration is the same as the 1st client.
Just set the correct ‘openvpn’ IP to 10.10.10.3/24 this time (SETTINGS > Interfaces > Ethernet menu).
Change the OpenVPN settings.
Local LAN is 192.168.3.0/24 – configure it within the Babel setup, set the Babel ID to 3.3.3.3
Save the changes.
Check the ROUTING RULES in all the units. E.g. the server tables:

You should see 192.168.2.0/24 and 192.168.3.0/24 to be reachable via the correct ‘openvpn’ IP address, dev ‘if_openvpn’, proto bird, metric 32.
More details within the Dynamic and/or Babel tabs:

and

Within the OpenVPN, you definitely should see both clients to be connected.

If you encounter any trouble, download the Diagnostic package, extract the status and logs and try to find out the reason for your issues. Doublecheck your configuration.

We also suggest to verify the accessibility of M!DGE3/RipEX2 units and all its local devices via ICMP ping Tool. E.g.

You may also debug some issues via Monitoring – e.g. some not encrypted traffic instead of encrypted etc.

There should be UDP/1194 data for the OpenVPN traffic.
In case you prefer or you need to use BGP instead of Babel, follow the guide below.
We start in the Server M!DGE3. Disable the Babel protocol and enable BGP.

Keep the ID 1.1.1.1. Set the local AS to be 65001.
Go the the next tab Neighbors and add both neighbours. First one:
Neighbor type: external
Neighbor AS: 65002
Neighbor IP: 10.10.10.2 (client01’s openvpn IP)
Neighbor connection: multihop
Next hop self: always
Second one:
Neighbor type: external
Neighbor AS: 65003
Neighbor IP: 10.10.10.3 (client02’s openvpn IP)
Neighbor connection: multihop
Next hop self: always

Within the Static route tab, fill in the local LAN 192.168.1.0/24.

And set the Import IGP filter for our local LAN IP.

Save the changes.
Disable Babel and enable BGP as well. Set the local AS to 65002.

Neighbors:

Details for the 1st neighbor:

Static rule to be exported is 192.168.2.0/24. Import IGP filter is our local LAN IP 192.168.2.1.
The OpenVPN implementation uses generally know protocol and thus, it is compatible with any 3rd party device, including Linux and Windows servers/clients. So e.g., you can successfully connect from your laptop to the M!DGE3/RipEX2 via OpenVPN and get a secure connection to the complete network.
Within the 2.1.1.0 firmware, there is no option to export the .conf, .ovpn, .p12 and similar OpenVPN configuration files with or without the certificates. The same is valid for importing such configuration files. All must be done manually.
If you configure the Windows/Linux client, just configure the tunnel parameters to match the server settings (cipher, HMAC authentication, protocol, …) and upload valid credentials which can be downloaded from M!DGE3/RipEX2 Credentials menu.