Setting up the IP address in the PC
For configuration of the link a suitable IP address has to be set up in the PC, for example 192.168.1.233.
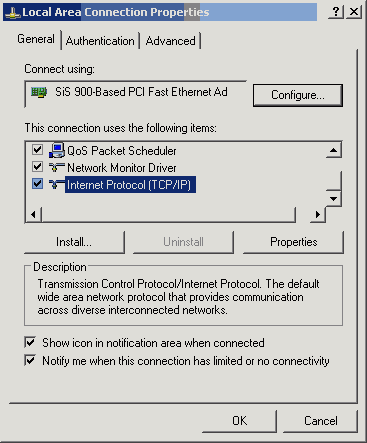
Open the Start menu, Settings, Network Connections, Local Area Connection

In the window Local Area Connection select Properties

Another window opens. Select Internet Protocol (TCP/IP) and click Properties

Another window opens
On the General tab select Use the following IP address
Enter IP Address 192.168.1.233
Set Subnet mask to 255.255.255.0
Click OK to acknowledge this window and acknowledge the previous window in the same manner
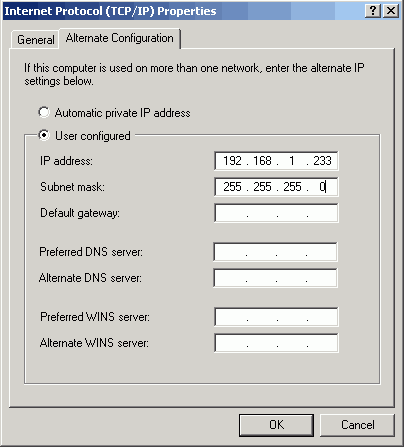
The second option is to use automatic switching. In this case on the General tab select, for example Obtain an IP address from the DHCP server automatically and address 192.168.1.233 will be seen on the Alternate configuration tab. However, this detection and subsequent switching works slower and isn’t entirely reliable.
Select tab Alternate configuration
Select User defined configuration
Enter IP Address 192.168.1.233
Set Subnet mask to 255.255.255.0

Click OK to acknowledge this window and acknowledge the previous window in the same manner
If you don’t use Windows XP then proceed according to the manual when setting up the IP address.
Checking the IP address in the PC
In Windows XP proceed in the following manner:
Open the Start menu and click Run…
Enter command cmd
Enter command ipconfig and read the PC IP address and mask:

Checking the PC – unit connection using Ping
In Windows XP send a ping as follows:
Check the connection between the PC and the unit via the Ethernet cable.
In the Start menu click Run…
Enter command cmd
Write ping 192.168.1.2 and press OK
A message appears in a window:

If no communication takes place a message appears with the text “Request timed out”.
If communication between the web browser and the unit doesn’t take place check the browser settings. The Work offline item in the File menu cannot be crossed out.