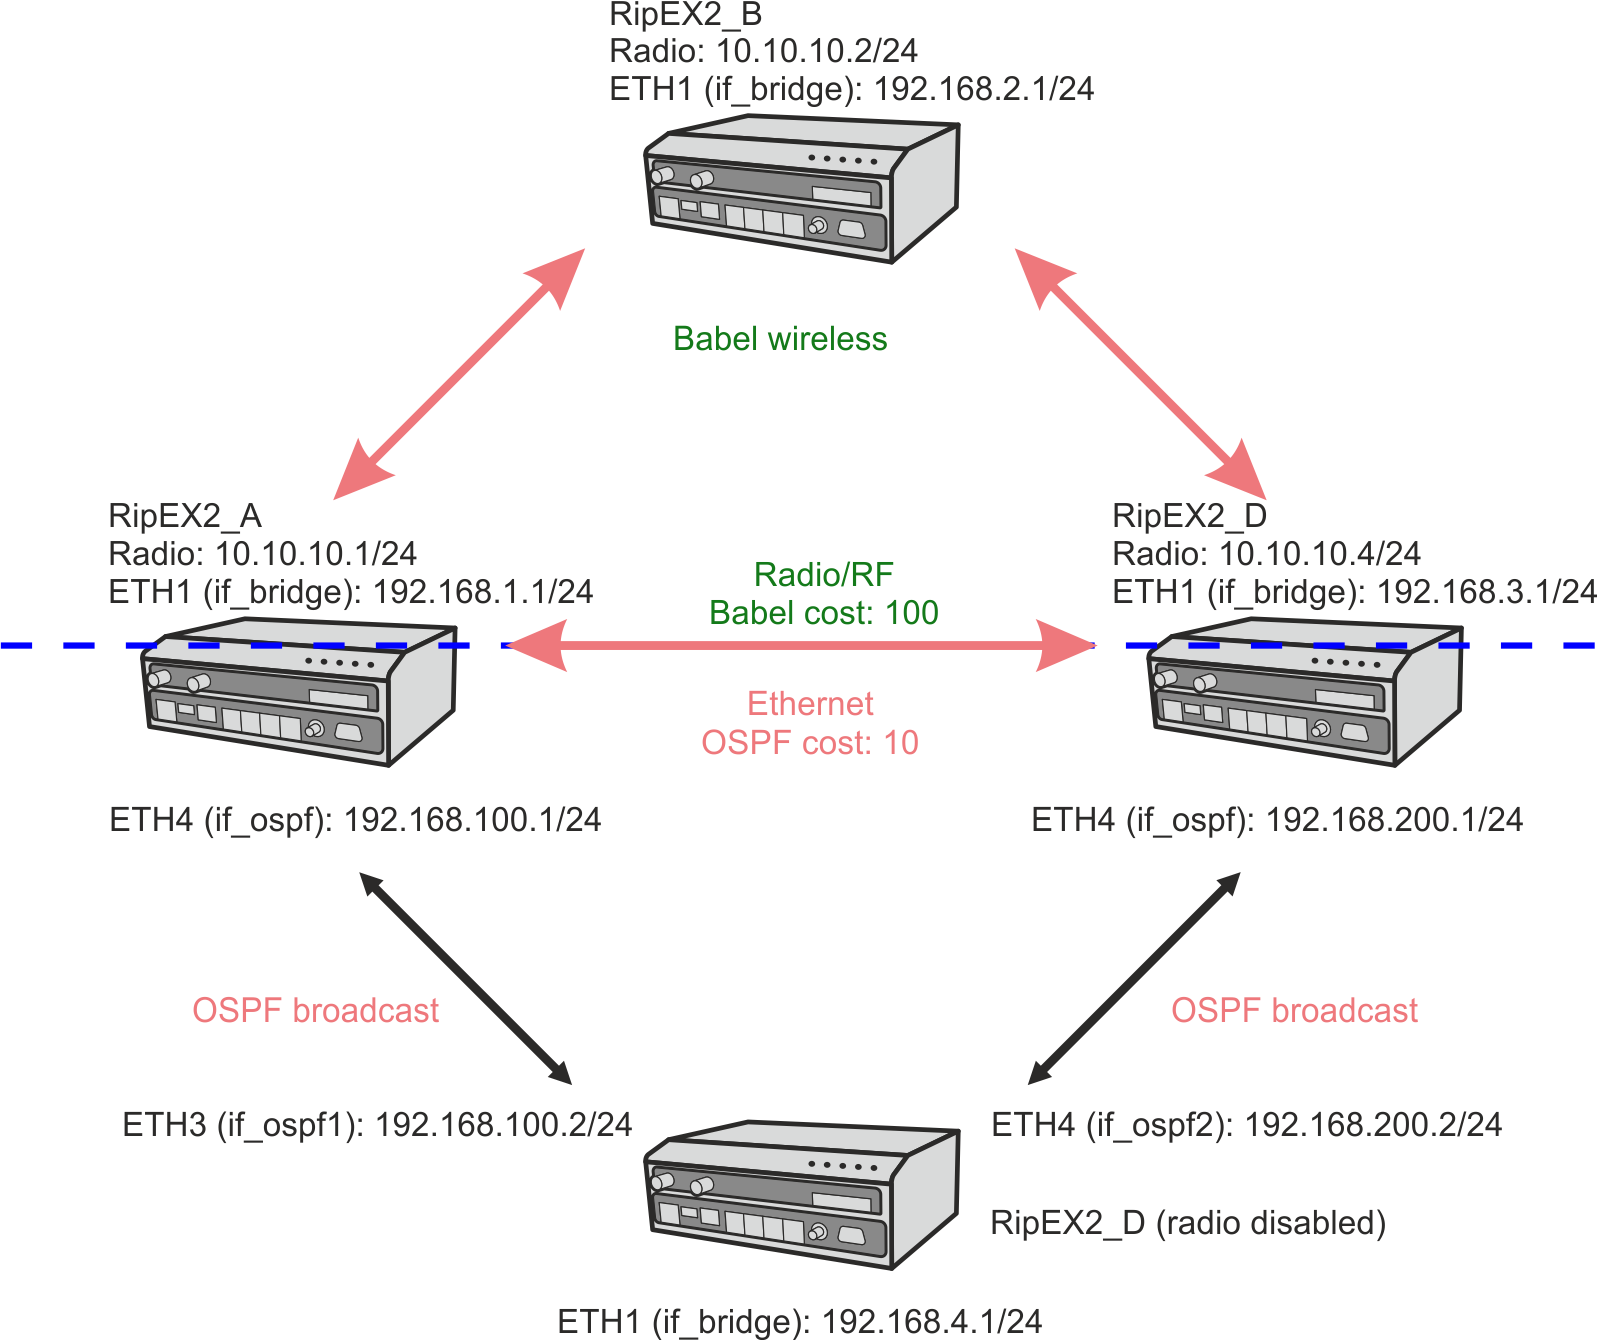
The seventh example extends the sixth one to show even more from OSPF and Babel combination. There are two ASBR routers between Babel and OSPF network segments. By default, the primary path should go over RipEX_A and a backup path is over RipEX_C.
We set the static preferences of routes to be propagated so that RipEX_A is a preferred ASBR. Routing rules are being exchanged between mentioned segments, not just default gateways.
This example continues from the sixth example and only changes are explained below.
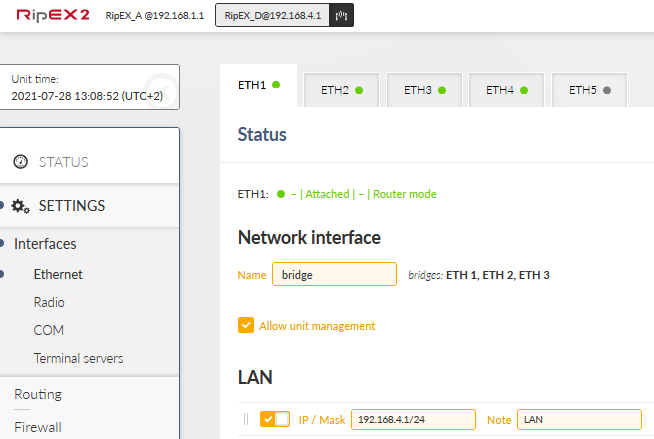
First of all, let’s divide one common bridge interface on all Ethernet ports. This is not mandatory, but shows a different approach compared to the previous example, i.e., one IP address/subnet on each individual ETH port.
To do so, go to the SETTINGS – Interfaces – Ethernet menu. Delete the 2nd subnet from the primary bridge interface.

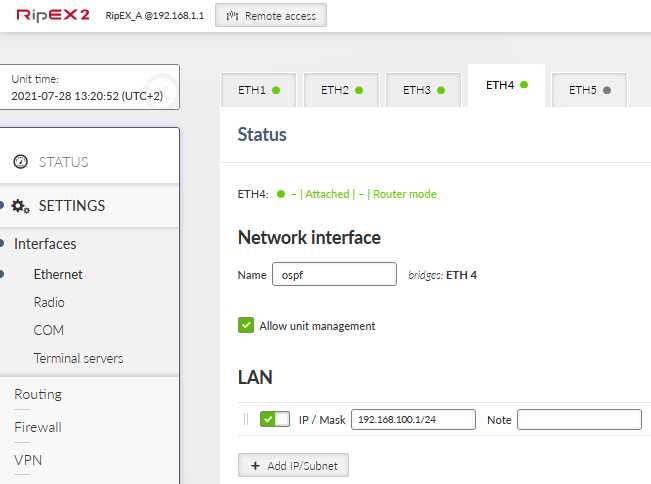
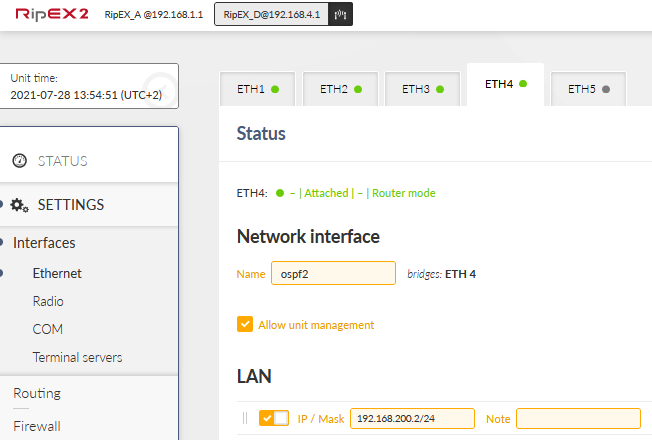
Go to the ETH4 tab. Detach it from the current bridge and add a new interface called “ospf”. Add IP/subnet equal to 192.168.100.1/24.
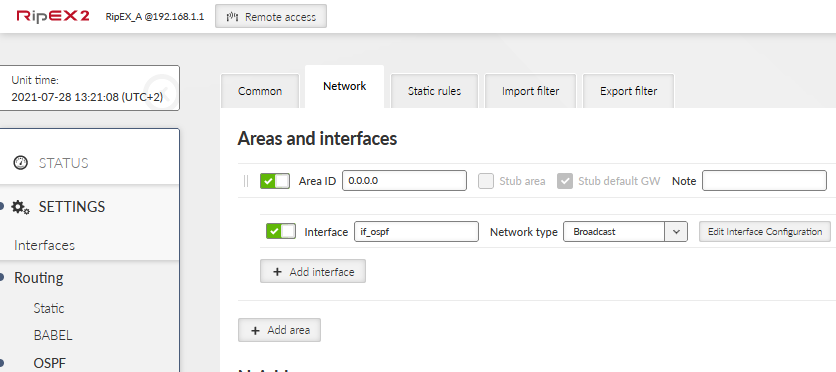
We need to change OSPF setup now. Go to the Routing – OSPF menu and select a Network tab. Change the Interface name to “if_ospf” to reflect ETH4 change and a new interface name.
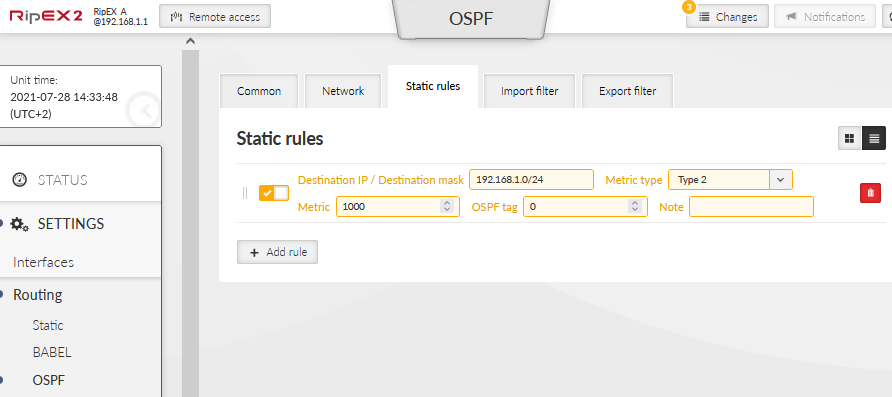
Change the tab to “Static rules”. We only keep one rule 192.168.1.0/24. Delete the default route rule, because particular routes will be propagated, not a default gateway.
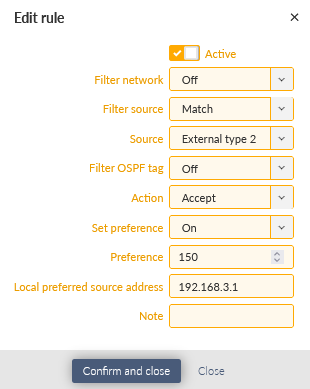
Go to the “Import filter” tab and create two rules. The first one is to import external routes (EXT2) with preference 150 (lower/worse than Babel which has 210 by default). Set the Local preferred source address to local ETH1 IP 192.168.1.1.
These are the rules which were imported from Babel to OSPF in a different ASBR. We could also use OSPF tag filter instead of source filter.
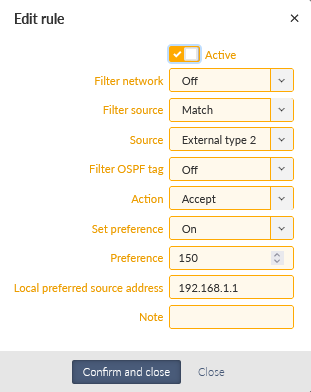
Import all other rules and set a preference to 250 (higher/better than Babel). Make sure the order of rules is met, the order is important!
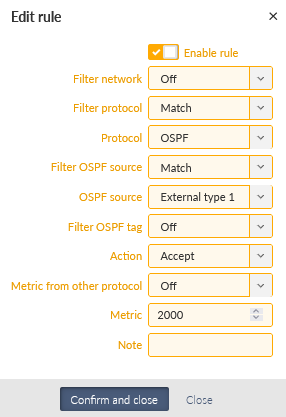
We also need to set Export filter. OSPF export filter rules define set of routing rules to be exported from the unit into the OSPF area.
Due to this rule, OSPF export rules from Babel with Metric type 2 (EXT2) and Metric equal to 1000 (RipEX_A is a preferred ASBR/router).
Now, select the Routing – Babel menu. First of all, keep only one Static rule (192.168.1.0/24, metric 0).

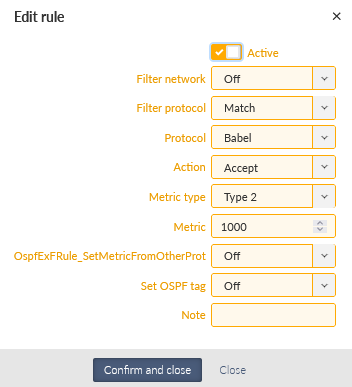
The last step in RipEX_A setup is to create a new Babel Export filter rule.
This rule exports rules from OSPF with EXT1 type and sets a metric to 1000 (preferred ASBR/router, higher number than any sum of metrics in Babel network/segment).
| Note | |
|---|---|
EXT2 rules mark rules originally from Babel network and they are not exported back. EXT1 rules mark rules from OSPF network which are forwarded to Babel. It is also possible to use OSPF tag filter – marking rules from Babel which are exported to OSPF with this tag. |
Save all the changes. RipEX_B does not require any change, continue with RipEX_C. If the remote access is not possible currently, we recommend using the management USB/ETH access.
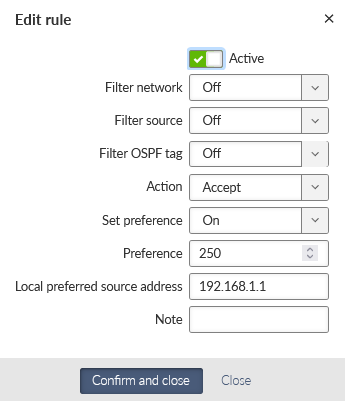
RipEX_C is a 2nd ASBR (router) on the OSPF/Babel border and is used as a backup OSPF router. Most of the required configuration steps are the same as in RipEX_A, but we make sure to set various metrics/preferences worse (so RipEX_A is a primary ASBR).
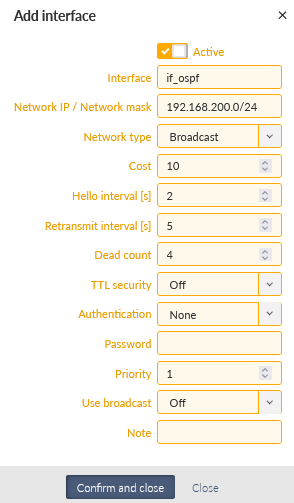
Start with detaching ETH4 port and setting its new name “ospf” and IP/Mask equal to 192.168.200.1/24. Do not forget to delete this IP from ETH1 settings.

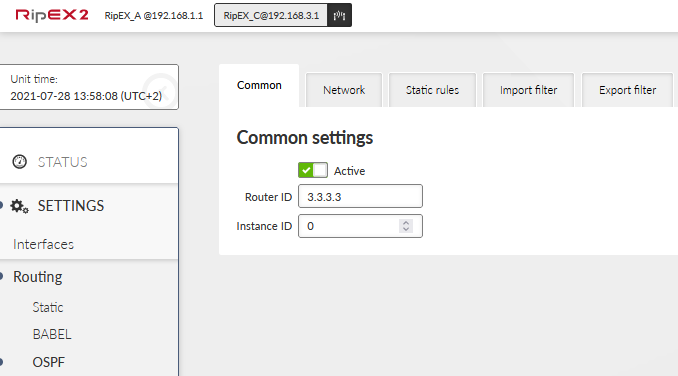
Go to the Routing – OSPF menu and activate its functionality. The Router ID is shared among all dynamic protocols so keep it 3.3.3.3.
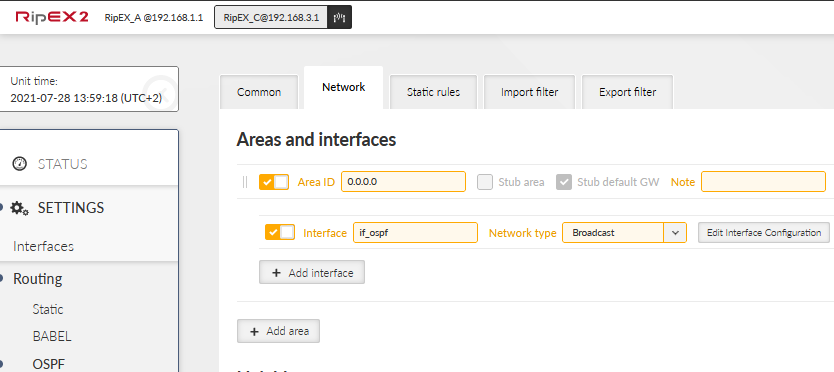
Go to next tab “Network” and create a new backbone area 0.0.0.0 with the following new interface. The interface must be named per the ETH4 name, so “if_ospf”. Set the correct network on this port 192.168.200.0/24 and decrease the Hello interval to 2 seconds, because Ethernet is a fast interface. Other parameters can stay in default values (e.g., “broadcast” type, or cost equaling 10).
After the changes, the setup should look like this:
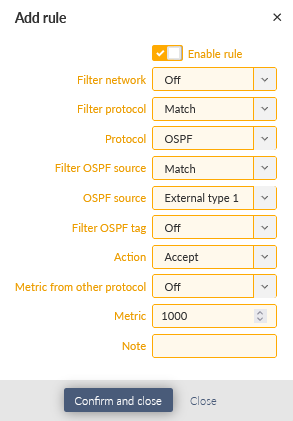
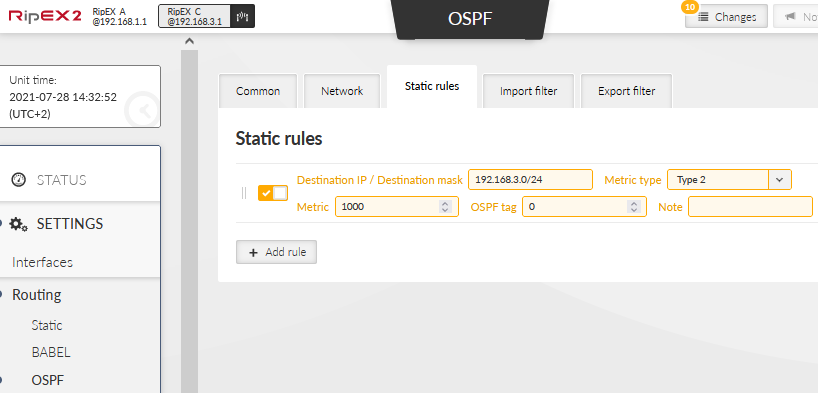
Configure “Static rules” with the local LAN IP subnet. Set the Metric type to “2” (EXT2) and its metric to 1000. We do not use “OSPF tag” parameter.
EXT2 is used because unit’s LAN is considered to be part of the Babel network.
We need to configure two Import filter rules, the same way as in RipEX_A.
The first one for rules matching EXT2 and setting the Preference to 150. Keep the order of the rules.
A 2nd rule is for other traffic and setting the Preference to 250 (higher/better than Babel).

And the last OSPF setting is Export filter rule. It is the same as in RipEX_A, but we set the Metric to be 2000 so this ASBR/Router is considered as a backup one (RipEX_A is a preferred ASBR).

Go to the Routing – Babel menu and select an Export filter tab. Add a new rule which exports rules from OSPF with EXT1 type and sets a metric to 2000 (backup router, higher than any sum of metrics in Babel network).
Save the changes and configure the last unit – RipEX_D.
Again, we need to start in Interfaces – Ethernet menu. Configure three network interfaces.
ETH1 + ETH2 | bridge – 192.168.4.1/24 |
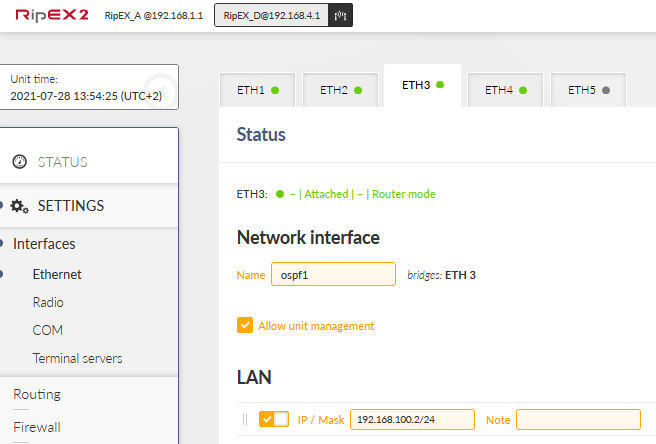
ETH3 | ospf1 – 192.168.100.2/24 |
ETH4 | ospf2 – 192.168.200.2/24 |
If not yet done, connect ETH3 port to RipEX_A ETH4; and connect ETH4 to RipEX_C ETH4.
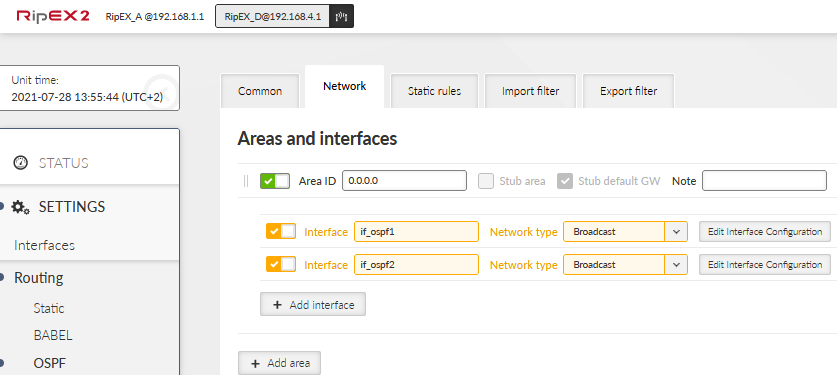
Go to the Routing – OSPF menu and go to the Network tab. Edit the 1st interface and add a 2nd interface. See the non-default values.
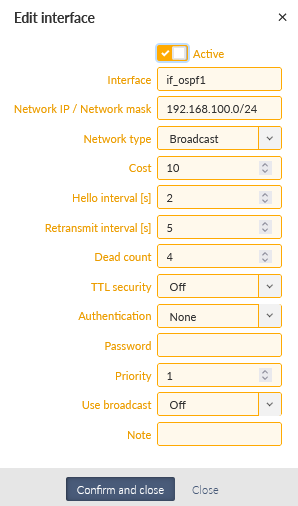
if_ospf1
Type
broadcast
Network IP/mask
192.168.100.0/24
Hello interval [s]
2
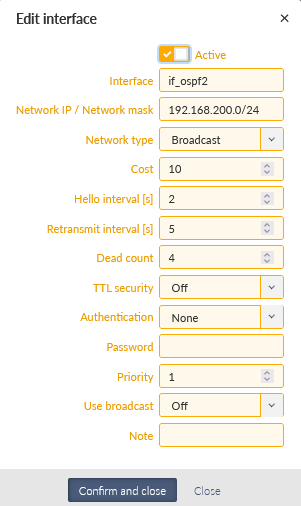
if_ospf2
Type
broadcast
Network IP/mask
192.168.200.0/24
Hello interval [s]
2
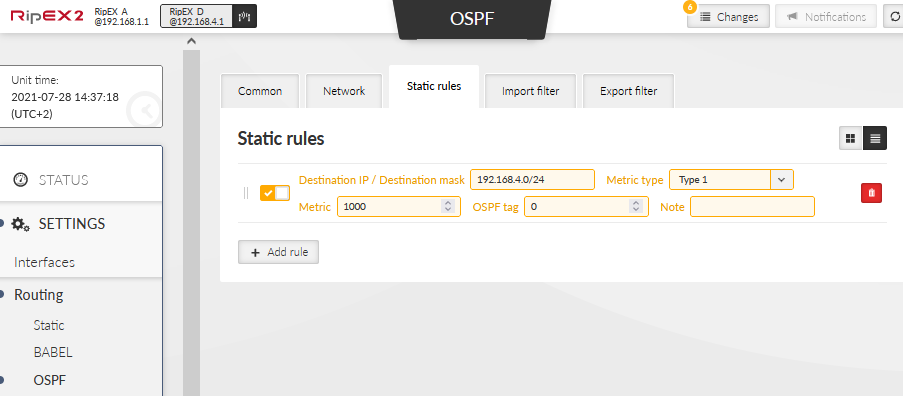
Change the tab to “Static rules” and make sure there is just one rule for 192.168.4.0/24, Type 1, Metric 1000.
There are no special changes in other OSPF tabs. Babel is not configured in RipEX_D. Save the changes. We recommend rebooting all RipEX2 units after final configuration to speed things up.
Compared to previous example, communication from RipEX_D can use either a link via RipEX_A (primary ASBR), or via RipEX_C (backup ASBR).
From the other end, RipEX_B can communicate with RipEX_D via RipEX_A (primary), or via RipEX_C (backup).
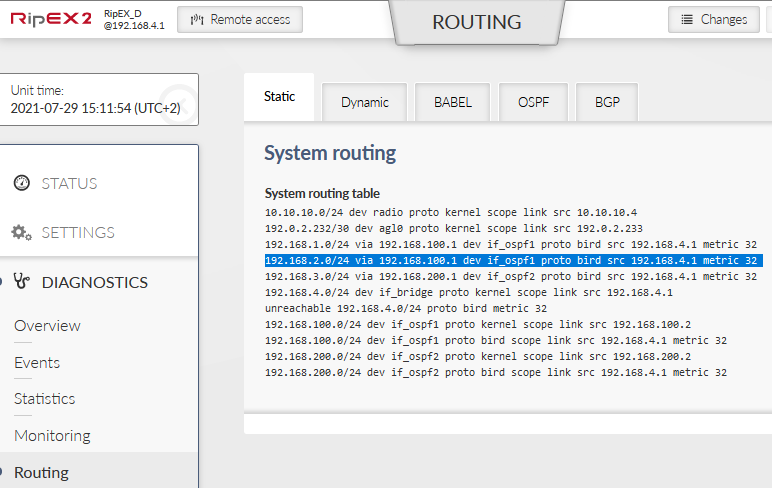
So, first of all, check the DIAGNOSTICS – Routing menu in all the units. Afterwards, check if you can reach every LAN IP addresses from each unit. Eventually, remove Ethernet cable between RipEX_A and RipEX_D and check if the communication starts via RipEX_C. Connect the cable back and check if/when it goes back to primary link. Ping can be running from RipEX_B to RipEX_D, or vice versa (for example).
You can also run ping between RipEX_A and RipEX_C – it uses the Radio link. Try to remove antennas and check if the ping starts to use an Ethernet link via RipEX_D.
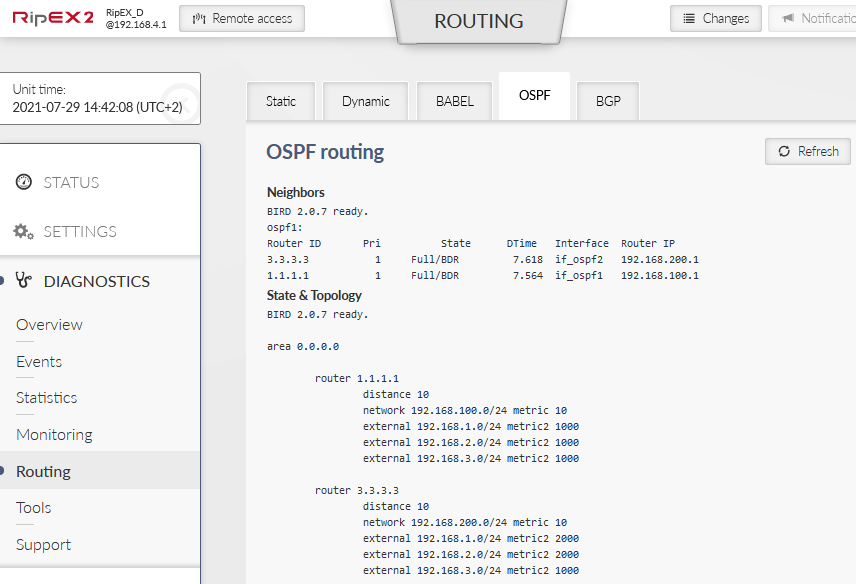
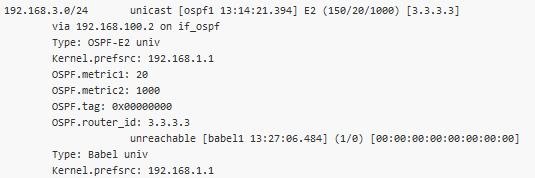
Check RipEX_D if OSPF is established successfully (State: Full) with both other RipEX2 units, Router IDs 1.1.1.1 and 3.3.3.3 with correct IP address. Note external metrics for 192.168.1.0/24 and 192.168.2.0/24, i.e., metric 1000 for routes via RipEX_A and metric 2000 for routes via RipEX_C.
Check Babel routes in RipEX_B. Especially check a route 192.168.4.0/24. If all is configured and connected physically correctly, primary link should go via RipEX_A with Metric equal to 1100. A candidate route should be routable via RipEX_C with Metric equal to 2100 (100 = one radio hop, 2000 = exported EXT2 Babel metric from RipEX_C).
If both units have correct routes, it is highly probable that routes in ASBR routers are also correct.
You can e.g., check that both routers have a route to each other primarily via Radio link and a backup link via RipEX_D (over Ethernet).
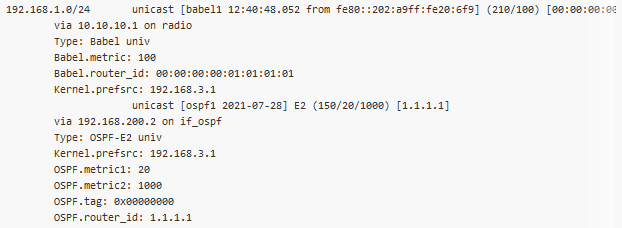
Note that Babel Preference to 192.168.1.0/24 via 10.10.10.1 is 210, whereas OSPF Preference is 150. Higher the Preference, more preferred route. The OSPF Metric1 is 20 (2× 10 for OSPF) and Metric2 is 1000 (EXT2 – i.e., it does not sum metrics on the path compared to a sum for EXT1 metrics).
Choose from what device you ping what IP addresses. We check pings from RipEX_D to
192.168.1.1
192.168.2.1
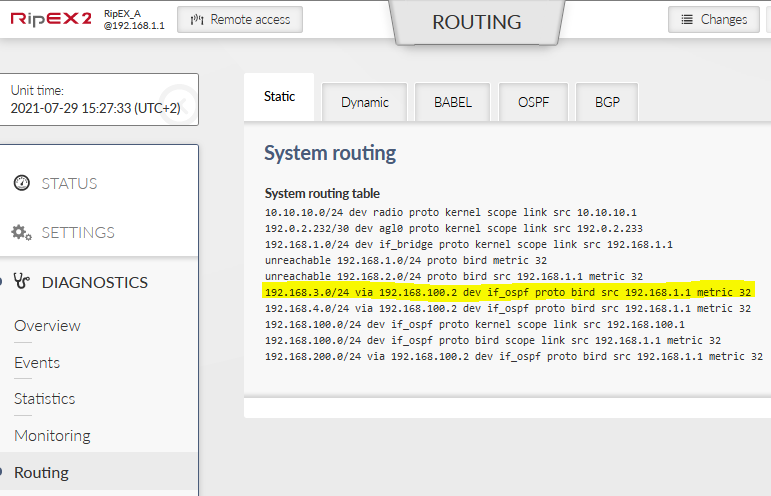
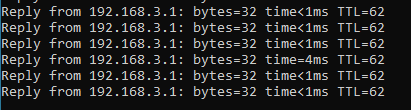
192.168.3.1
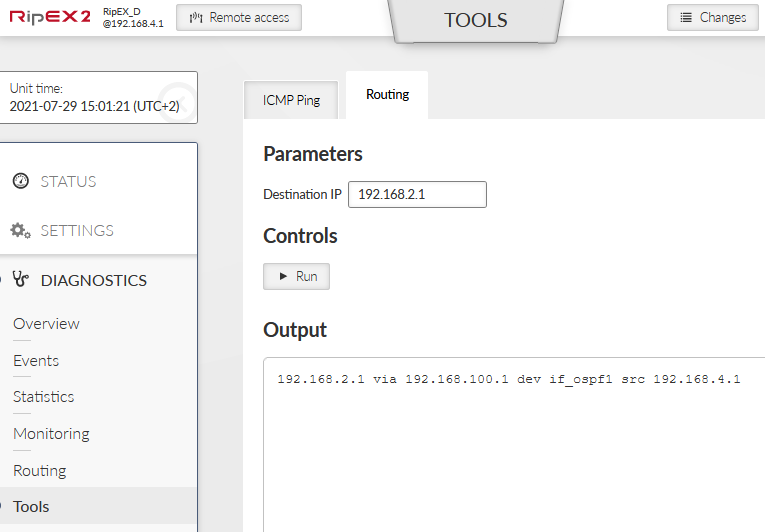
Go to the DIAGNOSTICS – Tools – Routing. Check what gateway is used for a particular IP. We should see 192.168.100.1 for 192.168.1.1 and 192.168.2.1. A gateway 192.168.200.2 should be seen for 192.168.3.1.
Select ICMP ping tab and ping the mentioned IP addresses.
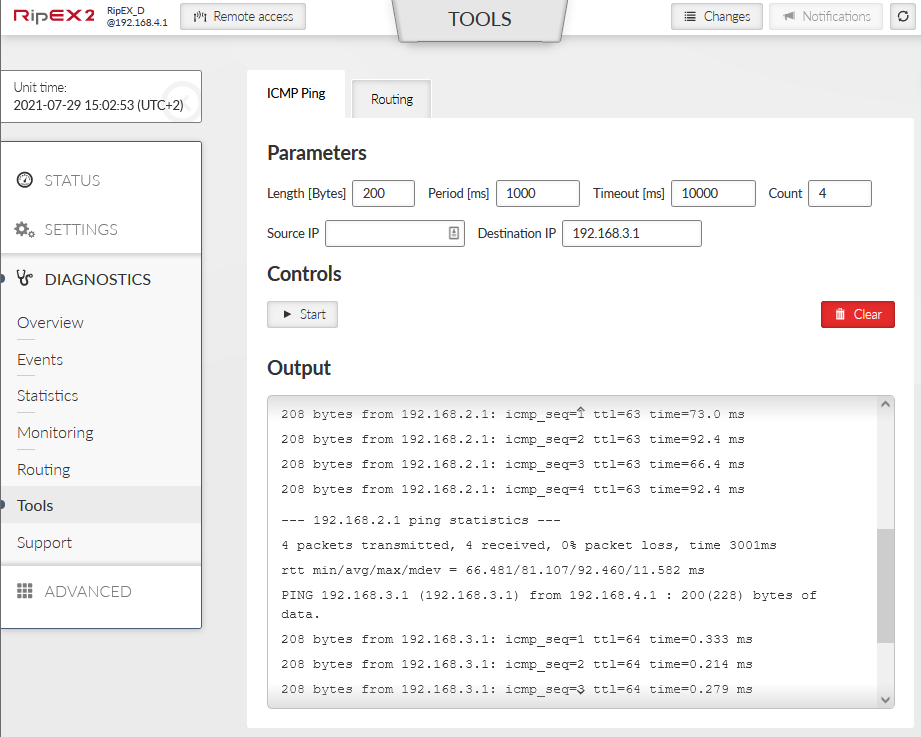
You can also ping from connected PC/laptop to remote IP addresses rather than a ping started in web interface. As the 1st test, we start a ping to 192.168.2.1 from PC 192.168.4.254 connected locally to RipEX_D.
Once the ping is running successfully, disconnect the Ethernet cable between RipEX_D and RipEX_A. Keep checking current dynamic routing rules continuously and wait for ICMP ping to start working again (via RipEX_C).
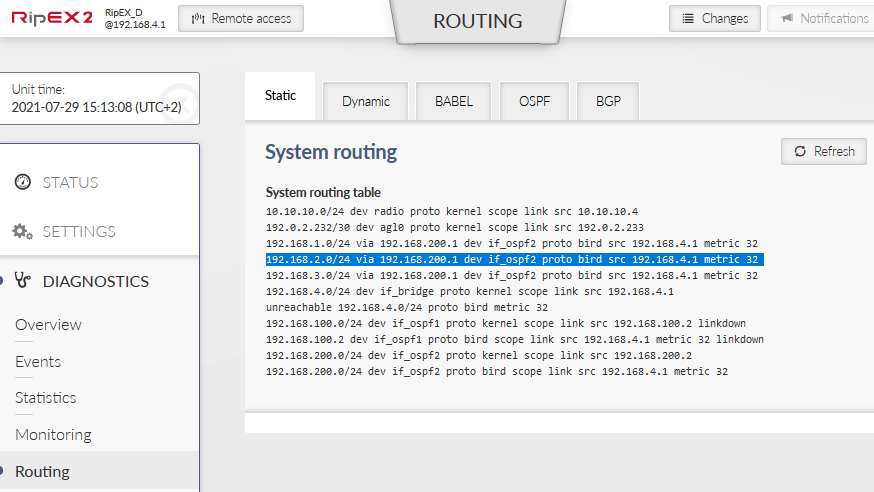
Because the OSPF timing is set to be very fast, you should also see a rapid (within several seconds) change in the mentioned routing.
Connect the Ethernet cable back and see when the communication comes back via primary ASBR RipEX_A.
Connect locally to RipEX_A, e.g., using 192.168.1.254/24 IP address and static routes to remote networks.
Start a ping to 192.168.3.1 (RipEX_C). The ping should be running over the Radio channel and RTT should be in tens/hundreds of milliseconds (based on selected modulation).

Remove RipEX_A and RipEX_C antennas to stop Radio traffic communication and keep checking Dynamic routing in RipEX_A diagnostics.
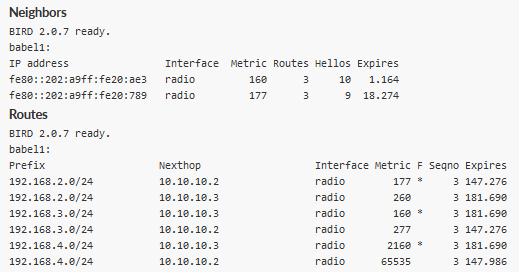
Also keep an eye on running ping. The communication should stop working until a route via Ethernet (RipEX_D) is used an RTT drops to units of milliseconds. This process is much slower due to Babel settings on the Radio channel (30 seconds Hello intervals, …) and big difference in metrics (100 for one Babel hop, whereas 1000 or 2000 metrics for OSPF).
Ping starts working via Ethernet.
OSPF works fine, whereas Babel has no route to the destination.
Connect antennas back and see if and when it comes back. This operation should take less time than going from primary to backup route.
For the whole process, you can also check Monitoring and Statistics pages of RipEX2 Diagnostics.