Coordinate Systems
In menu > or Use JTSK it is possible to select the mode of displaying on the desktop. JTSK is only used for maps of the former Czechoslovakia. The WGS system allows maps of all countries of the world to be displayed, however, distortion grows in the direction of the poles, which is even noticeable on the map of Czechoslovakia. The type of coordinate system is indicated on the lower left edge of the screen. The numerical value of the cursor coordinates are printed here in the WGS or JTSK form according to the selection > or Show JTSK. The WGS coordinates in decimal are printed here in brackets, however, without the W/E and N/S differentiation. Other data contained here is the scale of reproduction. To set this value enter the dimensions of the screen to “screen width” and “screen height” in the table >>. Owing to the principles of reproduction the scale is only a guide, especially in WGS in the North-South direction.
Cursors
Cursors may be used in all types of layers. On determining distances click on the selected area using the right mouse button and select >>. The “distance” and “azimuth” giving the position of the mouse cursor in relation to Cursor A then appear on the left of the lower bar. If we also place a Cursor B the distance and azimuth give the position of B in relation to A. The cursor can be removed by clicking with the right mouse button on the cursor or using command >.
Region of Interest ROI
ROI (region of interest) is a defined region of the desktop used for separating points lying outside of it, e.g. for erroneous coordinates. It is defined as the outline of the current desktop using command >. If > is also selected the ROI region is marked by a frame. The region is activated using command >. Each further use of the command > defines a new region according to the current desktop cut out.
Size of Desktop
Using command > all layers marked as “visible” are loaded to the desktop. Icons Window scrolling, Zoom in, Zoom out are used in all types of layers. They are used to change the desktop cut out by dragging or using the selected rectangle. On the contrary Zoom to display all sets the cut-out to contain only the “active” layer. In the case of the active layer Topology, Rss, Log, Loc display an intersection of the territory of this layer with the region of interest ROI, if ROI is defined.
A vector map file uses the suffix .rvm (racom vector map). It can be
used in both systems WGS and JTSK. A vector map is created by abscissas
described by vectors which display, for example, the outline of the
territory or road lines. A vector map containing contour lines is used
for constructing altitudinal cross-sections through the terrain, see
Point maps. The vector map containing the digital
model of the terrain has the .rem extension and allows cross-sections
and models of terrain coverage by the radio signal to be created. If it
is selected as “active” the Vector map item
containing the already known commands for moving the desktop cut-out
appear in the command bar. The new command Zoom all
applies to the desktop cut-out changes.
The map is contained in a .bmp type file and a .rrm (racom raster map) type
positioning file appertains to it. Only the
.rrm file which already contains the link to the
bitmap .bmp is inserted into the List of map
layers. Raster maps are different for the WGS and JTSK systems.
This coordinate system uses the Cartesian network of
meridians and parallel lines. The model should have the same
character. If, however, meridians converge on the model only a small
section of this model may be used depending on our demands on map
accuracy. On scanning we should take note of the alignment of
meridians with the north-south direction. Save the the file as
name.bmp. We should also create a positioning
file with the same name name.rrm, which has the
following structure:
filename=svet.bmp
top=      +81.00
bottom=   -62.00
left=     -95.00
right=   +129.00
coordinate system= WGS
minscale=  10000000
maxscale= 200000000
Meaning of items:
| filename | path to file name.bmp |
| top | latitude of the upper edge of the map, degrees in decimal |
| bottom | latitude of the lower edge of the map |
| left | longitude of the left edge |
| right | longitude of the right edge |
| coordinate system | type of system for displaying map – WGS/JTSK |
| minscale | determination of the limit of the scale when the map is still displayed. On selecting a more detailed view the map no longer appears. |
| maxscale | determination of the limit of the scale. On spanning a larger territory on screen the map no longer appears. |
Maps of Czechoslovakia were created in the JTSK system and the system can also be used for nearby surroundings of Czechoslovakia. Meridians converge here to the north and parallel lines are cambered. On scanning it is necessary to place the model in such a way that its meridians are inclined to the right compared to the vertical edges of the image according to this specification:
meridian   is in lined by distance   for the distance belonging to
 10°v.d.          1°30'                      5°s.z.š.
 15               1°
 20               0°30'
 25               0°
A positioning file, e.g. prehledka.rrm, consists of:
filename=prehledka.bmp
bottom= -1231258.36
top=     -928690.617
right=   -426427.2
left=    -909188.46
coordinate system=JTSK
minscale=250000
maxscale=2000000000
The meaning of items is similar to the previous case. Coordinates of the edges of the map are entered in another way, however. In the JTSK system they are set as coordinates in metres from the reference point, which lies approximately at coordinates: 24°49′ v.z.d., 59°51′ s.z.š. (near Helsinki). We can find the necessary coordinates using Ranec and its data on the lower left of the desktop.
If the raster map is selected as “active” an option of 4 cursors
appears on clicking the right mouse button on the desktop. They are
used in the WGS only for specifying map positions on the
desktop. Cursor A can be located in the upper left edge of the
map in a familiar location. Cursor C can be located at the coordinates
where we want to shift the map with point A to. Similarly we can
locate cursor B on the lower right and mark its position with cursor
D. Now use command >. Acknowledge or correct the target position of point A
which is offered to the place of point C. Similarly point B is placed
to point D. Now open the directory where ranec.exe is located and view
the new positioning file hokus.rrm. If satisfied with it
copy it to map.bmp, for example, under the name
map.rrm. On opening this map again its position
is amended according to the definition of point A,B.
This map allows you to insert points designated by geographical coordinates and to name them. The point map supplemented by the respective vector map allows altitudinal cross-sections of the terrain to be taken and also simulation of propagation of the radio signal into the terrain. Maps of type .rsm (racom simple map) can be used in WGS84 and JTSK coordinate systems. Point coordinates are entered in WGS84.
A map is created in file name.rsm and contains records in this format:
longitude;latitude;name;height;type;size;color;
longitude and latitude can have one of three forms:
degrees.minutes.seconds.tenths and hundreths of a second:
00.00.00.00;00.00.00.00; (3 decimal points) nebo

degrees.minutes.tenths and hundreths of a minute:
00000.00;0000.00; (5 and 4 places before the dot) or

degrees in decimal:
000.000000;00.000000; (1 to 3 places before the dot)
the number of places before the decimal point and the number of decimal points is decisive
a name is an arbitrary label which then appears in the map
type determines the form of the label in the map: 0 – nothing, 1 – cross, 2 – circle, 3 – square, 4 – diamond, 5 – triangle, 6 – triangle on its tip
size of symbol if it shoud be different from the common parameter >>>
colour of symbol in 0xBBGGRR format, if it should be different from the common parameter >>>
example of colour: 0xFF0000 is blue, 0x00FF00 is green
Example of file mesta.rsm:
14.25.00.00;50.05.00.00;Praha;;1
#01425.00;5005.00;Praha;;1
01548.00;5013.00;Hradec Kralove;50;6
-2.688256;5.058072;Tikobo;300;1
Items behind the # symbol are notes and do not appear on the map.
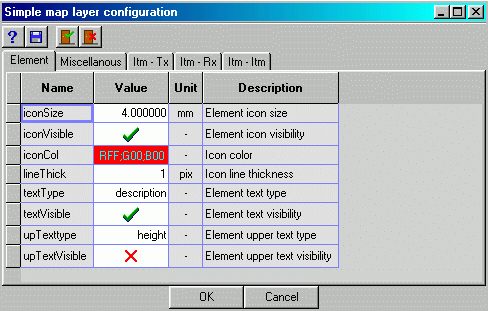
The active Point map allows for selection of basic display parameters using the command > (Ctrl+E). The meaning of parameters is described in the table. The textType offers a selection for the name of the point or its height.:
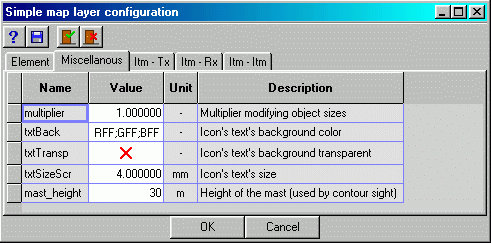
The Misc. menu provides several other parameters:
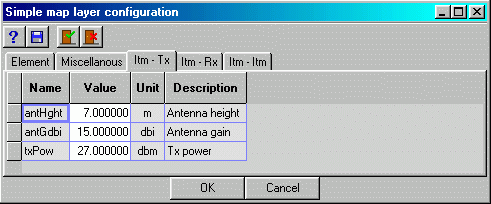
For computer simulation of propagation of the radio signal transmitter parameters are required:
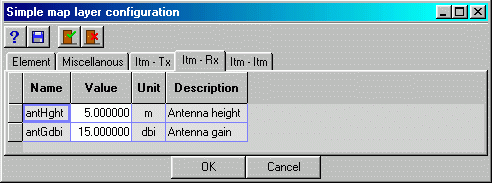
Parameters of the receiving antenna are in menu Itm – Rx:
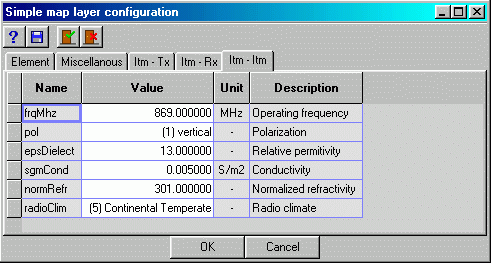
The last menu contains attributes of the environment which are important for propagation of the radio signal:
It is worth mentioning the principles of switching between
working modes here. We can use the icon  for opening the menu Map list
and here we select one of the layers as active:
for opening the menu Map list
and here we select one of the layers as active:
<NETWORK> for editing network elements
map.rsm for generating cross-sections and a model of coverage
<RSS> for changing the size of RSS symbols
Click with the right button on the rsm map element to enter the context menu:
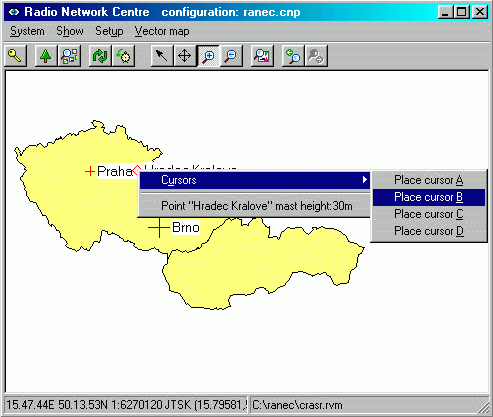
Here there is information about the name of the point and the height of the pylon at this point. It is also possible to place a cursor at this point. Cursors can be positioned at any point on the map.
Terrain profile using the digital model
A point map is selected as the “active” map. Map.rem containing the digital model of the terrain is marked as “selected”. Using the right mouse button place cursor A at the beginning of the cross-section and cursor B at the end. Using command > generate a cross-section of the terrain. Place A is on the left and B on the right. We can modify the appearance of the graph using Legend icons. The height of the antenna above the terrain at point A is defined in menu >>>, the height of the receiving antenna at point B in >>>.
Radio signal coverage
The digital model of the terrain allows you to determine the theoretical coverage by the radio signal. Again the Point map is “active”, the map of the digital model is “selected”, and the receiver is marked by cursor A. Cursors C and D are placed in the two opposite corners of the rectangle which designates the modelled area. Create the model using command >. In the example of coverage the route of the cross-section from the previous example is drawn.
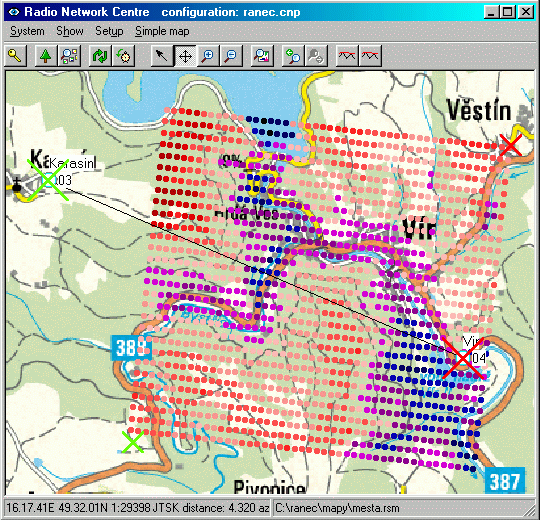
The strength of the signal received from the transmitter at point A is calculated and highlighted in colour in the grid points. Its density is defined in menu >>>. The grid must be suitably defined so that its points lie within the modelled area. We can view the grid using command >. A new map layer <RSS> was formed when creating the model of coverage. If we select it as “active” we can then set the necessary parameters, such as size of coloured symbols and visibility of text in menu >>. The text is set to “rss”. In menu >> we can read and even change the colour scale, which expresses the calculated strength of the signal at individual points. We can also obtain the strength of the signal from the context menu by clicking the right button on any of the points of the Rss network.
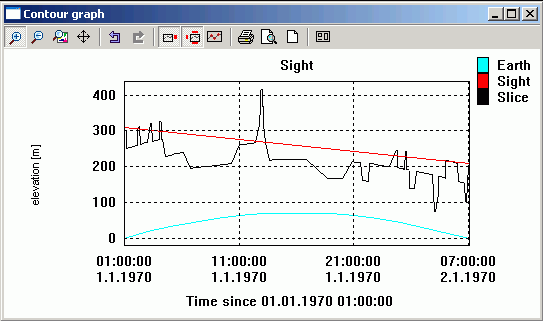
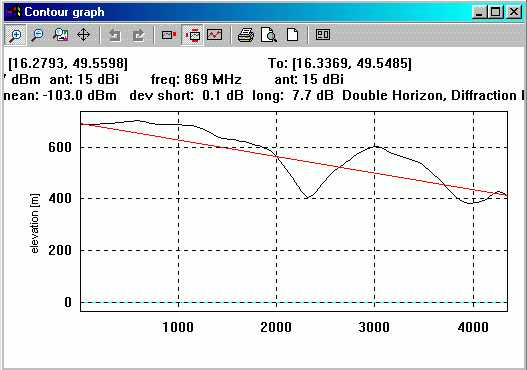
Profile of the terrain using map contour lines
If the point map is selected as “active” it is then possible upon using vector maps with contour lines to draw a cross section through the terrain with the direct view between end points. In the menu > mark the point map as “active” and “seclected”, vector map with layers as “selected”. Use the right mouse button to select the starting point of the route and Site cursor A here, and cursor B at the end point. On the lower bar of the screen read the distance and bearing from point A to B. If any of the selected Sites were located to a point of an .rsm map then mast height is defined at this point and the view is taken from this height above the sea. If a point not on an .rsm map was selected then the height defined in >>> is taken as the mast height . Now using command > draw the profile from point A to B. Use the Zoom all icon to display the whole length of the graph. The curved surface of the earth at sea level and the height profile of the terrain including the curvature of the earth´s surface and a straight view from point A to B is seen here. Point A is on the left side of the graph, point B is on the right. Additional data can be added using the three Legend icons. The time scale on axis X has no sense here. The quality of the cross-section is given by the contour lines used by the map.