The layout of the desktop
At the upper edge there is a command bar which can be used to start part of the commands. The second part is started from the context menu on clicking the graphic symbols of the network with the right mouse button. Some of the commands are also available on the tool bar, and the menu also contains certain hotkeys. These hotkeys, e.g. Ctrl+W, are not included in the description and therefore it is useful to observe the open menus. In the lower part of the screen there is a switch on/switch off console window where messages about potential errors in the progress of work are written. Information about coordinates are written at the bottom on the left and on the right information about displayed networks and databases.
The command bar contains the general control menus. The last of them changes according to the selected working layer, see section Section 2.2, “Desktop options”. Those commands which are used often also appear as icons on the toolbar. Here is an overview of the control menus and the functions they contain:
System menu
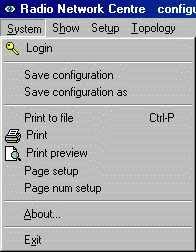
Login – connecting Ranec to the database, see Section 4.1, “Database”.
Save configuration – saves the configuration to file ranec.cnp
Print – prints the active area on screen.
About – contains the stated version of Ranec, e.g. 5.0.6.53
Exit – ends work with the Ranec application.
Show menu
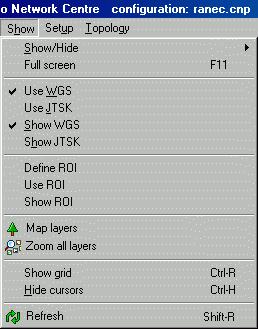
Show/Hide – option for displaying the toolbar with icons and the console with messages about program operations.
WGS/JTSK – select between WGS84 and JTSK, see Section 3.1, “Maps – Introduction”.
Define ROI – work with Region of interest, see Section 3.1, “Maps – Introduction”.
Map layers – switching between modes of operation, see Section 2.2, “Desktop options”.
Zoom all layers – for setting such a scale so that all desktop layers marked as visible are visible.
Show grid – switches the grid on, see Section 4.4, “Geographical and Logical Coordinates”.
Hide cursors – hides cursors which have been created for various purposes.
Refresh – refreshes the colour scale indication of the availability of individual nodes.
Setup menu
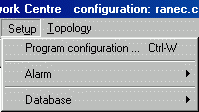
Alarm
Alarm setup – selects the networks in the database which will be monitored by the alarm daemon, see Section 6.6, “Displaying Alarms”.
Alarm history – history of changes to alarm states, see Section 6.6, “Displaying Alarms”.
Periodical alarm refresh – automatically refreshes the normal state.
Database info – name of database, log database, name of server and user.
Select Main tablespace – selection of database for topology.
Select Log tablespace – selection of log database.
Remember password – helps if you forgot your password.
Privileges – changing passwords, access for new users.
Debug – for development purposes.
Program configuration…Ctrl+W
Miscellaneous
startup login – only in Linux
verbose – number of system messages, basic setting is 0
Net resource – ZD settings, see Section 4.2, “Data Source”.
Coordinate system
doraster – switch grid on / off
gridX, gridY – grid dimensions, see Section 4.4, “Geographical and Logical Coordinates”.
screen width / height – screen dimensions, see Section 3.1, “Maps – Introduction”.
surfBack – background color
Intervals – time intervals for:
displaying alarm and log graphs
generating links between nodes
RSS distribution
location of mobile station
Cursors – parameters for drawing auxiliary surveying circles, see Section 5.3, “Context Menu”, Cursor
Alarm color – assigning colors to individual alarm states.
Alarm parameters – see Section 6.6, “Displaying Alarms”.
Refresh alarms on startup – only in Linux
Length, offset – parameters for alarm history
Check alarm daemon, see Section 6.5, “Daemons ”.
Connection
addrMAS – daemons connect to the MORSE network via this address
nettim – timeout for access to the network
Diagnostic – for development purposes
Alternative menu
This menu changes according to the selection >. See the links below for individual descriptions of work with them:
Topology –Chapter 5, Network Topology – Network containing nodes and other network elements
Vector map –Section 3.2, “Vector Maps”
Raster map –Section 3.3, “Raster Maps”
Simple map –Section 3.4, “Point Maps (Simple Maps)”
RSS mapa –Chapter 7, RSS map – Strength of RSS signal on mobile station route
Mobile –Chapter 8, Mobile Station Map – Mobile station route
Location –Chapter 9, Position of Mobile Station – Immediate position of mobile station
Using command > open the window Map list, which changes the further behaviour of the desktop and the alternative menu. The window contains a list of various types of map and network layers used:
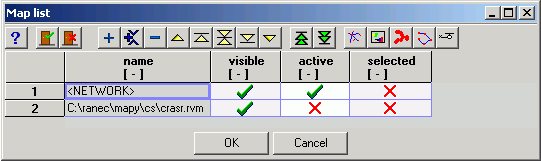
Layers are drawn and overlap in order from the lower row to the
upper row. The order of selected layers can be changed using the arrows
 Move row up and
 Move row down. In
the column visible displayed layers
are marked by a tick and invisible layers by a cross. The mark can be
changed by double clicking or pressing the space bar.
Move row down. In
the column visible displayed layers
are marked by a tick and invisible layers by a cross. The mark can be
changed by double clicking or pressing the space bar.
In the column active only one symbol must be ticked. According to the type of layer selected in this way (rvm, rrm, rsm, topology, rss, log, loc) the offer of the command and tool bar and context menu changes. The active layer file appears at the bottom edge of the screen.
Layers can be added using the icons:


New layers can be added also using icon
 , the highlighted layer can be removed
using icon
, the highlighted layer can be removed
using icon  .
.
First we will look at working with maps, and then with networks and mobile stations.
It is possible to work with Setr at nodes drawn on the Ranec screen. This provides us with a wide range of possibilities for carrying out diagnostics and configuration within the network. Setr can be started by clicking the right mouse button on the node symbol: >>>.
Selection of the version of Setr
From version 6.0.0.12 and higher it is possible to automatically select the version of Setr based on the version of firmware in the called radio modem. The function can be switched on or off by selecting >>>.
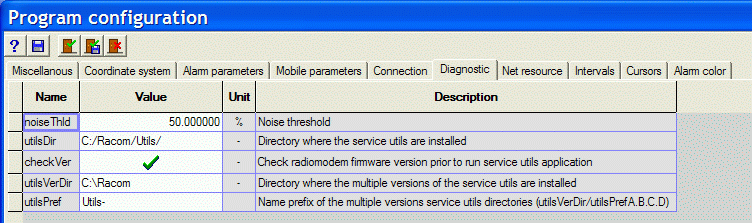
The parameter utilsDir is used to designate the
folder in which Setr is launched without distinguishing between
versions. Parameter checkVer is marked with a cross.
If checkVer is marked with a check then the version
of Setr is ascertained. After the application of command >>> a packet is sent to the destination CU with a query for
the version of firmware. Based on the ascertained main module fw a
folder is defined in which Setr is searched for communication with the
CU:
the first part of the address is determined by parameter
utilsVerDir, here it is C:\Racomthe second part of the address is determined by parameter
utilsPref, here it is Utils-, this parameter can also be emptythe third part of the address is formed from the received version of fw, for example:
version of fw address Setr location 745 7.0.45.0 C:\Racom\Utils-7.0.45.0\setr.exe 10.0.90.0 10.0.90.0 C:\Racom\Utils-10.0.90.0\setr.exe
These folders need to be prepared and the respective versions of Setr added to them. Setr selected in this way is launched and we can then use it to work with the selected CU, and where necessary with others too. For any further communication the version is not monitored again.
If we seek for Setr a missing folder, an error message appears and
Setr is not launched. It is then possible to cancel the check mark
in checkVer and try Setr from the folder according to
utilsDir.
It is not necessary to have precisely the corresponding version of Setr in each of the folders. For example, Setr 745 will work well in folders Utils-7.0.30.0 and Utils-7.0.57.0. However, it is not a good idea to mix Setr and firmware between versions outwards the boundary 7.79 and 8.11. It is also advisable to add the respective VERSION.txt file to the folder with Setr.