If the <NETWORK> layer is switched on as “active” the option Topology appears in the command line and on clicking on various desktop elements with the right mouse button various context menus appear. These tools can be used to edit the network image.
The Topology menu offers three types of return commands:
| Undo zoom/scroll | returns or refreshes changes of desktop cut outs and shifts |
| Undo change | returns or refreshes editing changes |
| Network history: go back | returns or refreshes the previously displayed network |
For editing a network image 3 groups of tools are available:
| Editor configuration | Open: > (hereinafter Ctrl+E). Properties common for the whole topology layer such as size and visibility of elements… In dialogue tables white fields can be edited. Enter them using the spacebar or double clicking the left mouse button. |
| Context menu | Open: Click on the network element with the right mouse button. For editing individual elements such as add, delete, shift, find position… |
| Attributes | Open: Context menu, first active item. Properties of individual elements and their modification such as position, name, address … |
These tools are further subdivided according to network elements
Below is an overview of the tools available.
Open using command Ctrl+E. The submenus for individual elements are presented here in a single table:
| General | Site | Net | Node | Mobile | IP host | Bus | Text | Link | Double click |
|---|---|---|---|---|---|---|---|---|---|
| icon size | icon size | icon size | icon size | icon size | icon size | icon size | Desktop | ||
| icon vis | icon vis | icon vis | icon vis | icon vis | icon vis | icon vis | Site | ||
| txt size | text type | text type | text type | text type | text type | text type | Net | ||
| txt colo | text vis | text vis | text vis | text vis | text vis | text vis | Node | ||
| txt trans | utex typ | utex typ | IPhost | ||||||
| utex vis | utex vis | Bus | |||||||
| dim vis | arr size | arr size | Text | ||||||
| dim abs | link vis | link vis | Link | ||||||
| CUvert | tlink typ | tlink typ | |||||||
| CUcon | tlink vis | tlink vis | |||||||
| hideDE | dA off | aliasB | |||||||
| hideDM | dB off | aliasMS | |||||||
| shift G | aliasMC | ||||||||
| usePath | as CU | ||||||||
| fPath | as M-L | ||||||||
| sPath | as Site |
Meaning of abbreviations in the table :
Working with the editor
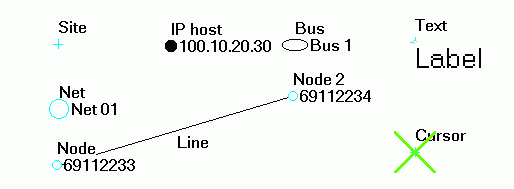
The basic element is the Site with geographical coordinates X,Y (see Attributes). Other elements with logical coordinates, e.g. nodes, are located on it.
The element´s symbol for each type of element has a designated size and visibility (>> and icon visible). The element comes with text with optional content and visibility (>> and text visible). The Site text is positioned higher than the text of the connected element so that they are both visible at the same time. In addition the node can use the upper text which can only be viewed alternately with the Site text (>> and up text visible).
The size of all element icons can be set in the menu (>>). From here it is also possible to jointly control the common parameters like the colour or transparency of text backgrounds and font size (>>, text Transparency, text Size). The content of text blocks is entered when inserting individual elements, or using the Attributes menu.
The basic element of the MORSE network is the node. One to five nodes are contained in the Communication unit (CU), which most frequently is an MR400 series modem or the older MR25 model. For more information see the MORSE Firmware Documentation on www.racom.eu..
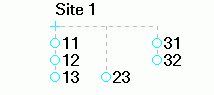
If more nodes in a common CU are used at one Site, the mode symbols are positioned with their addresses under them with a spacing of rows >> . The number of spacings from the Site is given in >>. Similarly there can be more CU at one Site, which then form another column. The spacing of columns with symbols is >>, the order of the column for the given element is in >>. Additional links which connect added elements to the Site can be visible or hidden >>. The location of elements in relation to the Site can be represented absolutely or relatively (the positions of unused elements are not empty, but elements with higher dim coordinates are moved onto them). >>.
Element shifts are possible in LOG coordinate mode >, or possibly with a subsequent Site shift (see above). The second possibility for a Site shift in GEO mode is using the switch >>.
In the editor it is possible to define operations generated by double clicking the left mouse button on various elements of the network. Select in the dialogue box >.
In the dialogue box > it is possible to define 10 different colours for marking the states of nodes. They are used for illustrating the result of the operation “Obtain the state of time synchronisation”, see the desktop context menu.
The context menu is the main editing tool. By clicking with the right mouse button on certain elements of the network the respective menu will open. All menus can be seen below.
| Desktop | Site | Network | Node | Mobile | IPhost | Bus | Text | Link |
|---|---|---|---|---|---|---|---|---|
| Nm Net | Nm Node | Nm Node | Nm IP | Nm Bus | Nm Text | Nm Nodes | ||
| Nm Site | Nm Site | Nm Site | Nm Site | Nm Site | Nm Site | Nm Site | ||
| Attributes | Attributes | Attributes | Attributes | Attributes | Attributes | Attributes | Attributes | Attributes |
| Site | Site | Site | Site | Site | Site | |||
| Cursors | Cursors | Cursors | Cursors | Cursors | Cursors | Cursors | Cursors | |
| Tools | Tools | Tools | Statistics | |||||
| Diag mob | Diag mob | |||||||
| Add | Add ….. | Add link | Add link | Add link | Add link | Add link | Add link | |
| St link | St link | St link | St link | St link | St link | |||
| Fin link | Fin link | Fin link | Fin link | Fin link | Fin link | |||
| Delete | Delete | Delete | Delete | Delete | Delete | Delete | Delete | |
| Search | Position | Coord | Coord | Coord | Coord | Coord | Coord | |
| Snap | ||||||||
| Paste | Copy | Copy | Copy | Copy | Copy | Copy | Copy | |
| Add sel | Cut | Cut | Cut | Cut | Cut | Cut | Cut | |
| File | Enter sub | |||||||
| Undo | Info mobil | |||||||
| Redo | LOG map | |||||||
| Custom | RSS map |
Meaning of abbreviations in the table :
| Nm element, Nm Site | The name of the element with the address and name of the Site to which the element belongs. |
| Nm Nodes | Addresses of nodes between which there is a link |
| Attributes | Specifies parameters, whose common properties were set in the editor, for individual elements. The white field describes the state of the element and can be edited upon double clicking with the left mouse button. The grey fields are only for information, containing records from the database and serving for debugging needs. More detailed see the next section. |
| Site | Links to Site submenu, which is part of each element. |
| Cursors | Allows cursor A to be inserted, which serves for making immediate distance measurements here. If cursor B is entered then the distance A-B is measured. Distance and bearing are printed on the lower edge of the desktop. |
| Tools | The tools submenu has more functions and will be expanded below. |
| Statistics | A graphical representation of logs is described in section Section 6.7, “Displaying Logs” |
| Diag mob | Diagnostics of mobile network elements |
| Add | The submenu Add serves for positioning new elements in the network. On inserting a new element coordinates, the name of the Site and the address are produced for approval or correction. On inserting the element to the Site the table of attributes of the inserted element opens for filling with parameters. “Add net” means inserting a new network. “Add net icon” means adding a link to an existing network. |
| Add connection | The command starts to draw the connection from the selected element. End it by clicking the left mouse button on the destination element.
|
| Delete | Deletes an element from the network. The Hide cursor command deletes the cursor from the desktop. |
| Search | Allows a Site or node to be found from the list. |
| Position | Provides the coordinates of Site. |
| Coord | The Coordinates menu provides the option of transferring an element or Place. A more detailed description is given in chapter Section 4.4, “Geographical and Logical Coordinates”. Besides the Geografical and Logical position the Relative position is also here, see Figure 5.2, “Relationship to Site”. |
| Snap | Allows elements to be moved to the nearest point of intersection on the auxiliary raster. The raster is switched on using command >>>. Snapping to the raster can only be used in the Logical coordinates mode. Cancel snapping by using command >. It is used on drawing logical drawings of the network irrespective of geographical location. |
| Copy, Cut, Paste | These commands are used for moving elements to another network. It is not suitable to paste to the original network as an element is positioned in the same Site according to its own coordinates resulting in unwanted duplicity in the database. Before copying “Select object” needs to be selected on the tool bar and an element selected by pressing the left button. |
| Add sel | Add to selection – Submenu shall be expanded below. |
| File | Offers opening and saving of the topology to file. |
| Enter sub | The command Enter subnetwork replaces the current network with a new network. If any changes were made in the current network a message appears. Caution – on selecting “Yes” nothing happens and we still have the possibility of saving the current network. On selecting “No” a new network is entered and the current network is left without saving the changes! |
| Undo, Redo | Returns to the last editing step. |
| Custom | Submenu Configuration offers switching to the menu > (Ctrl+E), and also
|
| Info mobil | Information about the mobile station. |
| LOG map | Switches to layer LOG. |
| RSS map | Switches to layer RSS. |
Context menu reacts to the selection of an element using the right mouse button. Besides elements of the current layer we can also select elements of other displayed layers (topology, rsm, rrm, log, loc). Selection procedure:
In the order according to the Map list from top to bottom Ranec ascertains whether the mouse cursor pointed to an element in any layer. The first element found this way calls up the context menu.
If no element is found the context menu of the desktop for the active layer appears.
Attributes of the context menu
Attributes of elements of the topological layer are the first item of context menus. Each item has its own attributes which describe the element´s properties. Attributes have a similar structure which can be seen below:
| Desktop | Site | Network | Node | IPhost | Bus | Text | Link |
|---|---|---|---|---|---|---|---|
| geoX | logX | logX | logX | logX | logX | ||
| geoY | logY | logY | logY | logY | logY | ||
| dimA | dimA | dimA | dimA | dimA | |||
| dimB | dimB | dimB | dimB | dimB | |||
| state | state | state | state | state | |||
| flags | flags | flags | flags | flags | |||
| net | net | net | net | ||||
| descript | descript | descript | descript | descript | descript | ||
| nm net | label | nm net | M addr | IP addr | bus nm | Text | colour |
| altitude | nod freq | IP name | size | line type | |||
| valid | country | type | bus type | type | thickness | ||
| note | note | note | note | note | bidirect |
Meaning of abbreviations in the table :
Other context menus
differ from each other and so are listed individually below:
Cursor
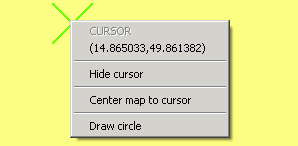
By clicking on the cursor symbol we obtain a short menu .
The item Draw circle draws an auxiliary circle. Finish it by click. Delete it at the same time with the cursor or by cancellation by checking off in command Draw circle.
.
Selection
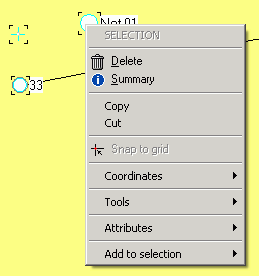
Elements of the network can be included in the selection in mode
> (icon  ). On selecting one element using the left button
it is possible (in LOG coordinates) to move the element. On pressing the
Shift button we can add other elements to selection using the left mouse
button. We can also select more elements at once by dragging the left
mouse button. By grabbing any of the selected elements with the left
mouse button we can move the whole group. Pressing the right mouse
button on any of the selected elements opens up the context menu of
selection:
). On selecting one element using the left button
it is possible (in LOG coordinates) to move the element. On pressing the
Shift button we can add other elements to selection using the left mouse
button. We can also select more elements at once by dragging the left
mouse button. By grabbing any of the selected elements with the left
mouse button we can move the whole group. Pressing the right mouse
button on any of the selected elements opens up the context menu of
selection:
The menu applies to all selected elements. The last item “Add to selection” allows nodes of a certain shape to be added, see >>.
Raster and Point Map
Context menu in the Working with Map Data chapter.
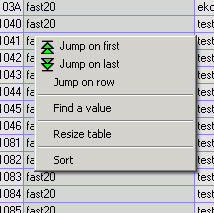
Table
By clicking on the inner field of the table we obtain the context menu. Items Jump on … concern searching for a row in a table according to its number. Items Find a value and Sort work with columns. Use the left mouse button to select a column and then the right to draw up the contect menu. We can now find the row in which our column contains the required value or we can sort table rows according to rising values of the selected column. By selecting Resize table we can tidy up the width of the table columns.