Program daemons in the central Ranec server cyclically call designated nodes, read the necessary data from them and then store it in the database. This data is then displayed by other Ranec tools in graphs and tables. Before launching the daemons a picture of the network is created and stored in the database. Selection of queried nodes is given by their presence in the network allocated to the daemon. Nodes can be individually disabled from this selection by marking grey >>> or it is possible to disable all nodes of the network using >>>. daemons can monitor nodes in several networks. After defining the network the daemons can be prepared.
information about the existence of a connection with a node
information about the state of its supply network/battery
processor temperature
LOGS are records about operation read from CU statistical logs
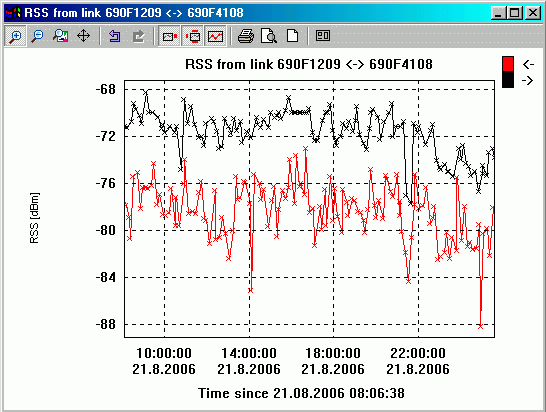
la – log ila = calls log, RSS signal strength, DQ, frequency of received packet
ll – log ill = link log, number of packets successfully and unsuccessfully sent and received between two specific nodes
lo – log ilo = SCC ports log, packets which have passed through a physical SCC terminal
lu – log ilu = net user log, packets sent between SCC and a node
lm – log ilm = media log, overview of loading of the radio channel as a result of transmitting and receiving data and various intensities of interference
GPS daemon stores data which arrives from nodes with a connected GPS signal receiver.
The daemon calls all network nodes one by one at the designated intervals and obtains the respective data from them.
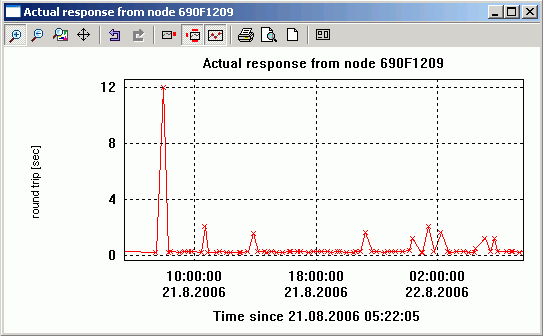
Alarm daemon monitores the node response time for standard calling. If the line is quiet for sometime it sends it own check query. The result is a graph with the node´s reaction time to calling. If the connection is lost the node turns red, as opposed to green indicating normal status. The third possibility is that the node is blue, which indicates that a node is switched to battery supply.
The daemon for logs reads the status of the respective statistical log. It then counts increments from the last call from obtained data. This can then be displayed in a graph.
The GPS daemon processes the position data from the station with the GPS. The results in a picture of the immediate position of the station, the route traced or a view of RSS on the route.
The starting point is the current network in Ranec and its nodes which are not grey. A randomly ordered list of the nodes that will be polled is generated.
In the interval >>> row: a_alarm3 column: delay
e.g. -nd60000, i.e. 60sec, nodes from this list are polled.
The polling frequency i.e. the parameter -nd is choosen with regard to
the acceptable net load with this communication. The recomended value of
this additional load is around 1% of the network capacity. Select
parameter -nd in the interval:
60 000 < nd < 4 x 3 600 x 1 000 / N
where N is the number of polled nodes and 4 (= 4 hours) represents the longest recommended query interval at one node. A long interval is selected in a large radio network with a lot of retransmissions, a shorter interval in a small network and the shortest interval in an Ethernet network which does not contain radio links.
It sends a so-called Long packet which ascertains, amongst other things: Ucc, power supply from the battery or network, Temperature, Rtt (round trip time), checks the setting of crons in the CU. A cron in the CU with a small delay notes a change: switch on, switch to battery, switch to network. The cron can´t announce the modem is switching off, it is registered by the alarm daemon,as described below. The cron remains active even after resetting the CU to default mode, it can be switched off using command icc. For starting the alarm daemon against networks with modems, using older versions of fw < 5.79, in which cron is not implemented, parameter -aD can be used. Cron will not be started and indication of status (colour) is slower until the alarm daemon´s query.
After polling the list a new list is compiled.
The alarm daemon monitors whether a packet arrived from the node in the interval 10 to 1200 sec. The interval is calculated with regard to the response time Rtt and other aspects of network loading (fast connection 10s, slower more). The alarm daemon has a separate timer for each monitored node. If a packet doesn´t arrive a short packet called a sniff is sent. After three unsuccessful sniffs the node is marked red. It continues to be monitored. After the first operational packet or response to a sniff is received the node changes to green.
This process can be used in the case that monitoring is switched
on for packets arriving from the network and being sent to the alarm
daemon, e.g. xxxxxx0A. This address is in table >>>. In the columns name and
daemon there is the name of the network and the
designation of the daemon a_alarm3, and in column
endofpw there is the end byte of the alarm daemon address.
Information arrives to the alarm daemon without monitoring the next time
it is queried.
The alarm daemon writes the ascertained changes to a database. In
addition to this about once every minute it writes the node status to
the database even if there has been no change to the node. Therefore,
gradually over approximately a four hour period (see above) a record is
made for each node. The function >> monitors whether these records are being taken. If in
time Alarm daemon daed timeout there is no communication
between the daemon and database all nodes are changed to white
indicating an indefinite monitoring status.
5 types of statistical daemon exist for individual logs -aa, -al, -ao, -au,
-am. The statistical daemon only queries those nodes for which
the alarm daemon found a functional connection. An exception can be made
using parameter -aA0, when the statistical daemon sends
queries to nodes even when the alarm daemon is not on. This attribute is
useful in networks with older fw, where the alarm daemon may be a
nuisance.
The dialogue table “List of controlled daemons” can be found in the menu >>>. Here a list of daemons which are prepared for collecting data from network nodes is made. Up to 250 rows with daemons can be prepared and these are activated as required.
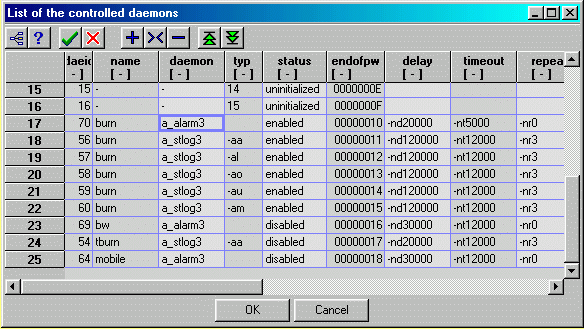
Content of table row :
| name | name of the network in which the monitored nodes can be found |
| daemon | name of daemon. There are daemons for alarms a_alarm3, for statistical logs a_stlog3, and for gps a_gps3 |
| type | there are various types of daemon a_stlog3 for individual logs -aa, -al, -ao, -au, -am |
| status | states are disabled (forbidden), enabled (permitted) and uninitialized |
| endofpw | here we read the end byte of the morse address, which the daemon delected and uses for sending queries |
| delay | e.g. -nd60000 is a pause in milliseconds between two queries sent by a daemon |
| timeout | e.g. -nt12000 is the time, in ms, the daemon waits for a response from the node |
| repeat | e.g. -nr3 is the max. number of attempts at making a connection |
| param | next parameters can be added here |
Double-clicking on the table row opens Daemon control record which can be edited by clicking on the item. The new status is activated by pressing OK in the Daemon control record table. The history of changes in the Daemon control record table can be found in >>>.
In table >> using icon “+” we can select the network where we want to obtain an indication of colour states of nodes. These networks must be allocated to an alarm daemon in advance for monitoring, see previous paragraph. In menu > mark Periodical alarm refresh. Manual updating can be performed from here using command >. Now, after a certain time necessary for querying all nodes, the nodes change colour to green, red or blue. An overview of the states and changes to alarms over the past period can be viewed using command >>. This command prepares information from the database in the scope according to menu >>. Only the last states of alarms for individual nodes are prepared for the interval between offsetFrom and offsetTo. For the interval from offsetTo to the present all changes of alarm states are prepared. The maximum overall number of alarms in History is determined by the Alm Hist Len parameter. If Refresh alarms on startup (Linux) is checked the nodes are coloured on starting with their current colours. In table >> it is possible to select other colours for indicating the states of nodes.
It is possible to graphically display data obtained by the alarm daemon over the elapsed period using >>>. It is first necessary to select the time interval for displaying the record using >>>. The upper row determines the beginning (year, month, day, hour, minute) and the lower row the end of the displayed interval of records from the database. If Until now is used then the difference between the two rows determines the length of the interval which ends at the present time. Now it is possible to test other selections in menu >>>
Graphs come with a tool bar with familiar functions. For example, zoom can be used for zooming in on the graph. The following icons are new:
 | switch on key, for explaining the meaning of graphs |
 | switch off the description of coordinate axes in favour of the size of the graph |
 | switch off displaying x denoting measured points on the graph line |
Logs are split into two groups according to whether they refer to the node or the line between nodes. By selecting >> we obtain:
Serial communication port – information from log “ilo”, loading of physical serial ports
User operation – log “ila”, i.e. operation between the user channel SCC or ETH of the port and the node
RF channel – log “ilm”, loading of the physical radio channel split into radio transmission, reception of noise and reception of the decoded signal.
Clicking on the link between two nodes > it is possible to select the following information in the menu:
Call log – from log “ila” value RSS, DQ and frequency of how they developed in time
Link log – from log “ill” overview about the exchange of packets between two nodes; for a precise meaning of items see MORSE firmware documentation
| Important | |
|---|---|
The time synchronisation must be set in the followed CU for properly displaying of logs. The daemons fetch the log report including the time GMT set in the asked CU. This information is saved in the database. At the displaying the time is modified according to local setting (timezone, summer time) in the Ranec client PC, which displays the diagram. When the time in CU is set wrongly, than the diagram has the wrong time coordinate also and is not visible. This condition does not refer to the Alarm daemon diagrams. They use the Ranec server time only. |
Other tools are available in the Linux operating system for working with networks.
Using commad >>> it is possible to start the Setr program at the selected node. This provides us with a wide range of configuration and testing tools.
Besides files ranec.exe and ranec.mo
RanecClient running in Windows uses file rr_setr.bat,
which starts Setr in the network, e.g.:
C:\morse-745\setr -pIP192.168.0.7 %1
With the help of this batch file it is then also possible to start Setr in OS Windows from the Ranec screen.
Using command >>> it is possible to save the configuration of the selected node or using CNF download to save the configuration to the node. Upload configuration from the whole network is possible using the command >>>.
Command >>> is used to start the process for ascertaining how different set times of internal clocks are in network nodes. The result can be displayed using command >>> in the form of colour-labelled nodes. Before importing clear the current colours of nodes using command >>>. The colour scale is defined in menu >.
Using tool >>> it is possible to start searching for links between nodes which are defined by routing, and possibly also with distinguished line frequencies (Obtain topology according to frequencies and routing). >>> is another tool. This gives us a view of how information about the time of internal clocks is transferred between nodes. To display the result it is first necessary to delete the current drawing of connections using >>> and then import the new diagram using >>>.