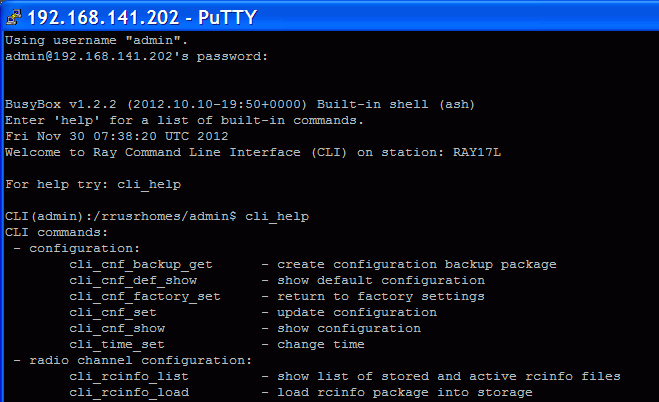
Command Line Interface (CLI) provides an alternative to HTTPS access. CLI allows you to work in text regime using a ssh (putty) or telnet client.
Using the telnet client to connect to unit with service IP address 192.168.169.169. Type this in the command prompt:
telnet 192.168.169.169
Then use the username and password from the menu Service
access/Users for https access (by default admin,
admin). Works if Service access/Services/Telnet is
checked in https access.
Connection using putty client. Type this into the Host Name (or IP address) field:
admin@192.168.169.169
Click Open. Then enter the password admin. This
procedure (without key) is subject to selection Service
access/Services/SSH on in https
access.
If you own the private key part, then you do not need a password.
In putty, continue by selecting Connection/SSH/Auth and
selecting path to file with key e.g. key.ppk. Use
Session/Logging to save the putty configuration. To access the
unit via CLI simply select the connection in putty and click
Open.
Connection using client ssh in Linux.
ssh admin@192.168.169.169 -i key
If you know the password and it is enabled in Service
access/Services/SSH onlykey in
https access, you can skip the key and use password in the next
query.
Overview of CLI options
cli_helpParameters of CLI commands are listed in the help. For example:
-hhelp listing -ttarget unit -t llocal, default option -t bboth, both units, command item for remote unit has PEER_ prefix -t ppeer, opposite unit, when reading using the show command When inserting commands, adding with tabulator can help
Incorrect command is rejected (e.g. inserting forbidden frequency)
Parameter that caused the loss of the connection is restored after 1 minute (Rollback)
Reading parameters of local unit
Reading radio parameters of peer unit
cli_cnf_show
          -t p | grep RADIO
Entering parameters (TX power of local unit)
cli_cnf_set
          RADIO_TX_PWR=-3
Items of command (RADIO_TX_PWR=) are taken from the list cli_cnf_showEntering more parameters in both units
cli_cnf_set
          -t b RADIO_TX_CHAN=17128000
          PEER_RADIO_RX_CHAN=17128000
Put parameters containing space in quotation marks:
cli_time_set -t b
          -T '2012-11-27 10:55:00'
Set time in both units
Generation using ssh-keygen
[user@laptop
            ~]$ ssh-keygen -t dsa -f usr_ssh_key
Uses working directory to save privateusr_ssh_keyand public part of the keyusr_ssh_key.pubCopying the key into the RAy unit
[user@laptop
            ~]$ scp usr_ssh_key.pub admin@192.168.141.202:/tmp
The public part of the key is written to the folder/tmpInstallation of key in RAy unit
CLI(admin):/rrusrhomes/admin$
            cli_user_authkey -c a -k /tmp/usr_ssh_key.pub
Test of access to RAy unit using SSH key
[user@laptop
            ~]$ ssh -i usr_ssh_key admin@192.168.141.202
Script example with access using key
[user@laptop ~]$ ssh -i usr_ssh_key admin@192.168.141.202
"source /etc/profile;cli_info_link;echo \$?;cli_cnf_show | grep TX_PWR;echo $?"
Warning: Permanently added '192.168.141.202' (DSA) to the list of known hosts.
cli_info_link: Link status: up
0
RADIO_TX_PWR=4
0
[user@laptop ~]$
The script contains:
source /etc/profile;environment settings cli_info_link;query for link status echo \$?;reading return value cli_cnf_show | grep TX_PWR;query for radio power echo \$?reading return value cli_info_link: Link status:upreturn value 0OK command RADIO_TX_PWR=4power +4 dBm 0OK command
Configuration backup
cli_cnf_backup_get
Saves the configuration of both units to filecnf_backup.tgzinto the working directory.Configuration restore
cli_cnf_set
            -t b -b cnf_backup.tgz
Restores configuration of both units from filecnf_backup.tgzDefault configuration – list
cli_cnf_def_show
Attention, the commandcli_cnf_factory_set
is not a default setting – it uses factory settings, deletes all logs and saved data. It is very likely that the connection to peer station will be interrupted!
Current version of fw
cli_info_stationPreparation of files
fw package, for examplebm4-RACOM-0.1.12.0.cpiocopy using ssh or putty into folder/tmpin RAy17
Command
cli_fw_clear_buffer
Clears the RAy buffercli_fw_buffer_status
Checks buffer statusSaving into buffers
cli_fw_load_package
            -f /tmp/bm4-RACOM-0.1.12.0.cpio
A new fw package is loaded into the buffer (20 sec)cli_fw_upload2peer
The fw package is also loaded into the peer unit (20 sec)Upgrade
cli_fw_upgrade
            -t b
Firmware in both units will be replaced with new version from the buffer. After 3 minutes, this message appears:Firmware upgrade started. Estimated time to finish is 370 s.
Connection is terminated. After a few minutes, log in to RAy again
The RAy unit in default configuration, establishes a connection with any remote unit and both units act as a communication pair. Should the higher protection from the unauthorized communication take-over be required, it is possible to use so called Secured mode of remote unit authorization. This mode is based on locking the two specific units into one communication pair. The units with Secured mode activated refuse to make a connection with any other communication unit. The units are locked using the unique authorization keys. The keys are exchanged between the affected units. The authorization keys can be backed up to an external medium to be able to make a service unit exchange, if necessary.
The Secured mode set up process consists of a few steps:
Unique authorization keys generation:
cli_link_key_gen
            -t b
Authorization keys exchange between the two communication units:
cli_link_key_swapAuthorization keys activation:
cli_link_key_apply
            -t b
Parameter-tdetermines, whether we configure the whole link (-t b) or only one unit (-t l).Secured mode activation. Both sides of the link has to have identically secured mode set On or Off:
cli_cnf_set
            -t b SVC_SECURE_PEER_MODE=on
            PEER_SVC_SECURE_PEER_MODE=on
Secured mode de-activation:
cli_cnf_set
            -t b SVC_SECURE_PEER_MODE=off
            PEER_SVC_SECURE_PEER_MODE=off
Backup of the keys to an external medium. The backup has to be performed to be able to make service exchange of the corrupted unit, if necessary. The new exchanged unit is not able to make an active connection with the other unit if it is not loaded with the proper authorization key.
cli_link_key_save -s
            s -f <file>
The key is backed up to selected file in the internal unit file system. It can be transferred to an external medium for example using the scp client.Authorization key restoration from the external medium.
The key has to be transferred to the unit internal file system first. Scp client can be used. The CLI commands can be applied subsequently:cli_link_key_load -t b -f <file>
cli_link_key_apply -t b
