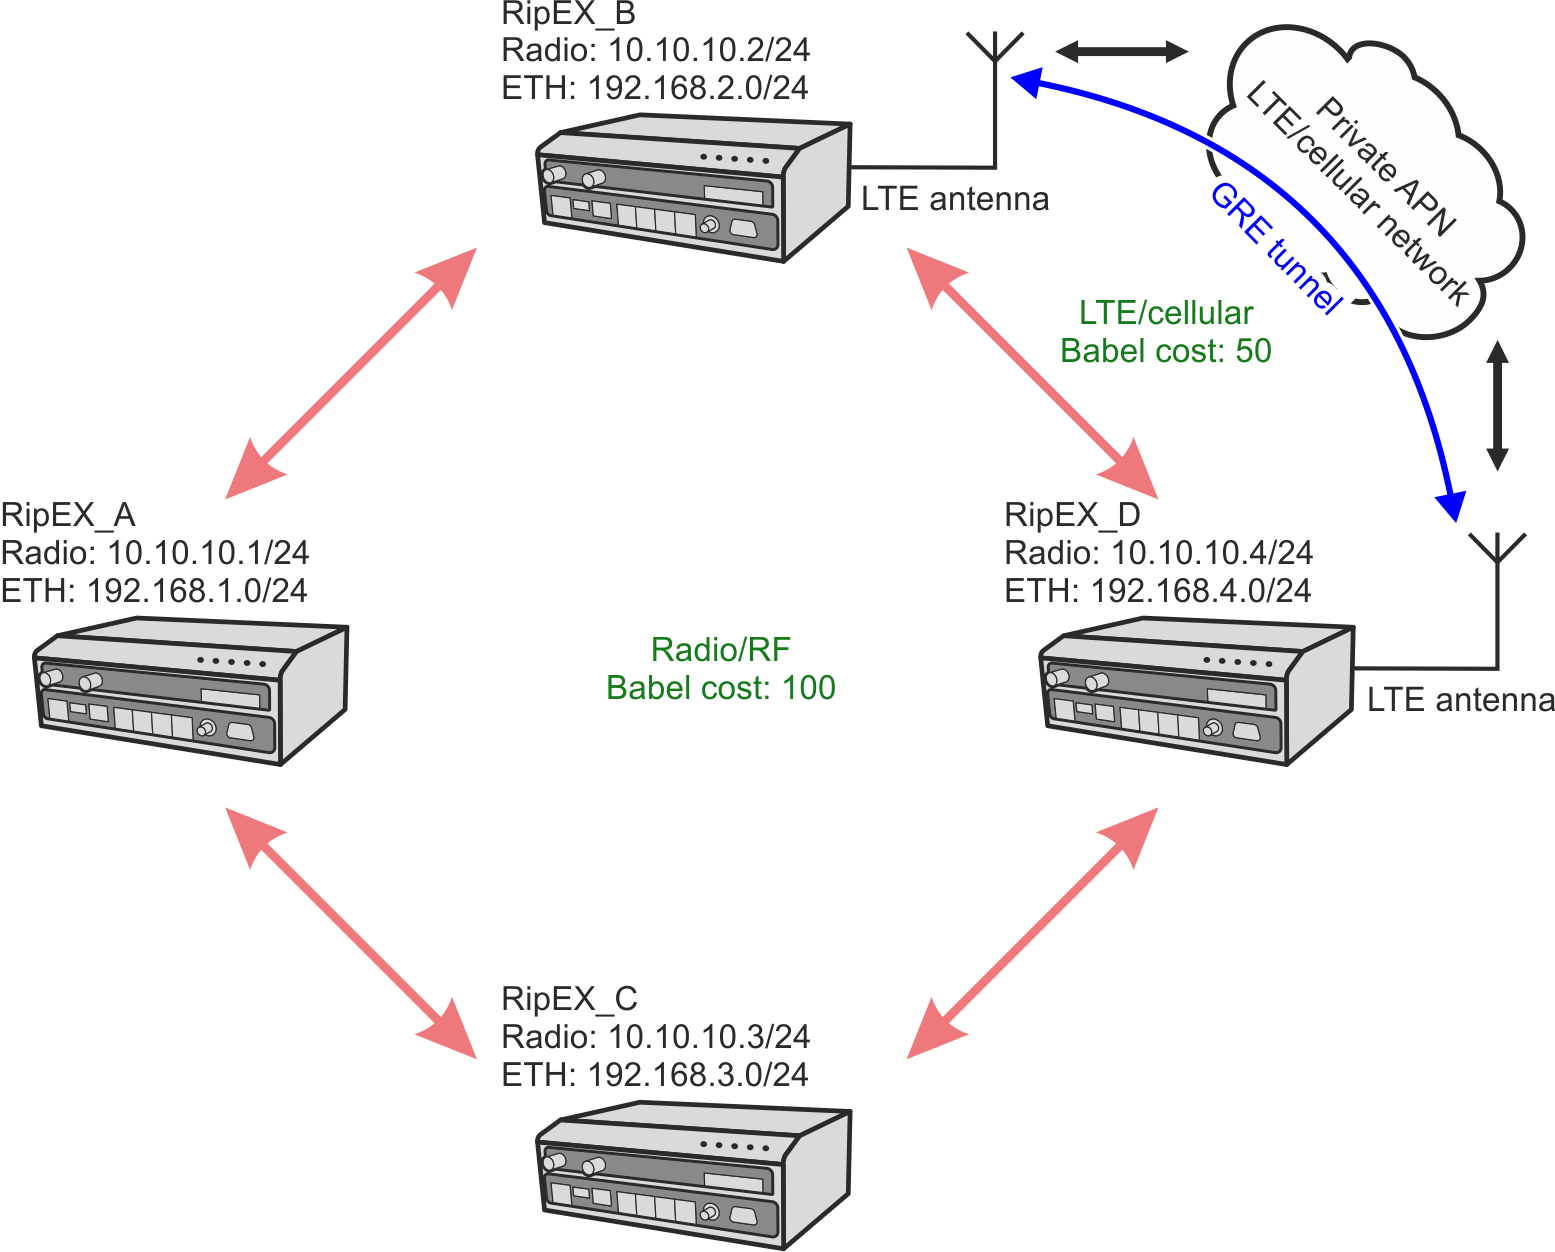
The fifth example depicts a situation with two RipEX2 units equipped with LTE module. Both units are connected to the private APN and GRE tunnel is built between them to enable mutual communication over the cellular network.
| Note | |
|---|---|
Check M!DGE2 application notes and manual for more details about cellular networks and APN explanations. |
This cellular path will be set with Rx cost equal to 50 to be better than RF channel, but worse than Ethernet connection. It can resemble Wired networks, but we will use Wireless. Choose whatever fits you more in your particular installation.
The example uses the third example configuration as a startup point.
| Important | |
|---|---|
Keep in mind we set up RACOM private APN. Your APN setup and IPs will be different! Make appropriate changes so that your configuration reflects your APN details. |
Enable the cellular interface.
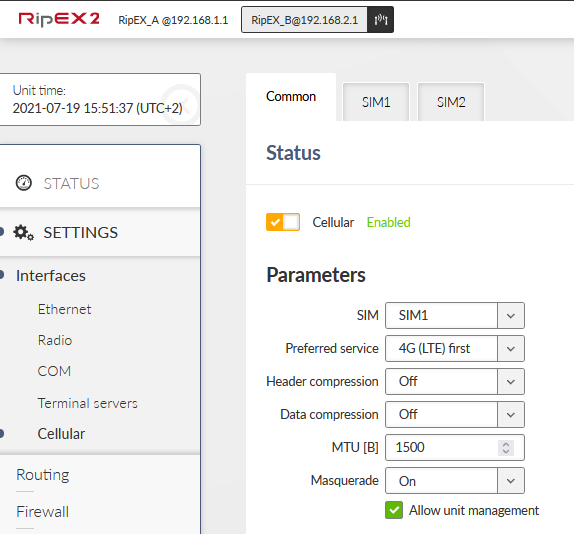
You can keep everything in defaults, but set it as required by you and the cellular operator.
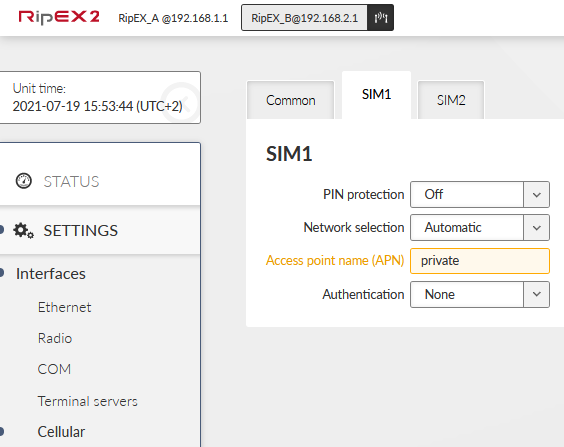
Configure your APN details in SIM1 panel.
Create a GRE tunnel interface.
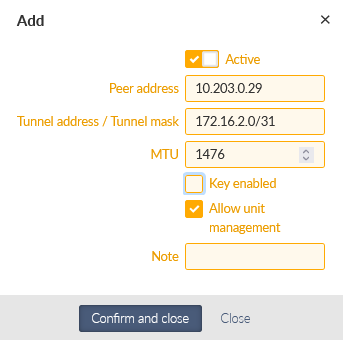
The Peer IP address is the IP of the RipEX_D cellular interface. Tunnel address/mask is a new setup for GRE tunnel addresses.
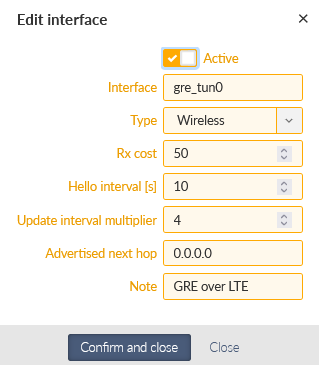
The last step is configuring Babel Network interface again. Add a new interface.

Note the cellular interface is called “aux”, but we need to define a GRE interface. Its name is “gre_tun0”. Change the Type to “Wireless” and set the Rx cost to 50. The Hello interval parameter is increased from 4 to 10. It is still faster than over RF channel (30 seconds), but not so fast as via Ethernet (4 seconds). Optimize this number to suit your needs and possible data usage of your SIM cards.
The Advertised next hop is its local GRE IP address.
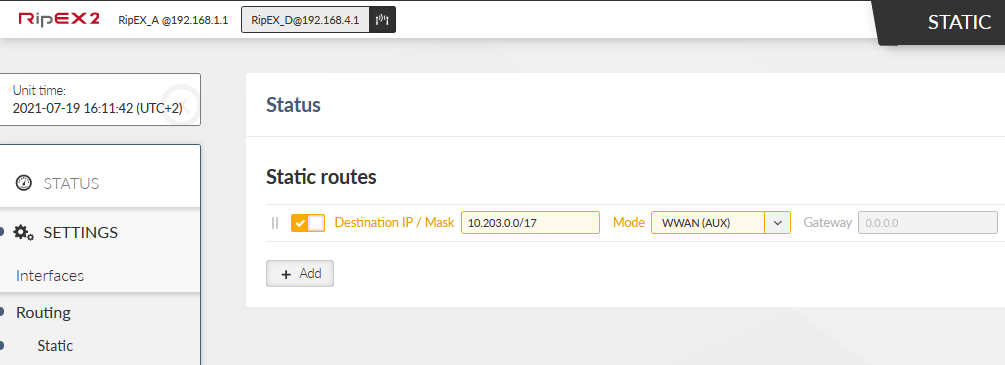
Do not forget to set a new static route over cellular/aux network. A new route should either be a default one, or like with our example, we route there APN’s subnet 10.203.0.0/17. Go to the SETTINGS – Routing – Static menu and add a new rule.
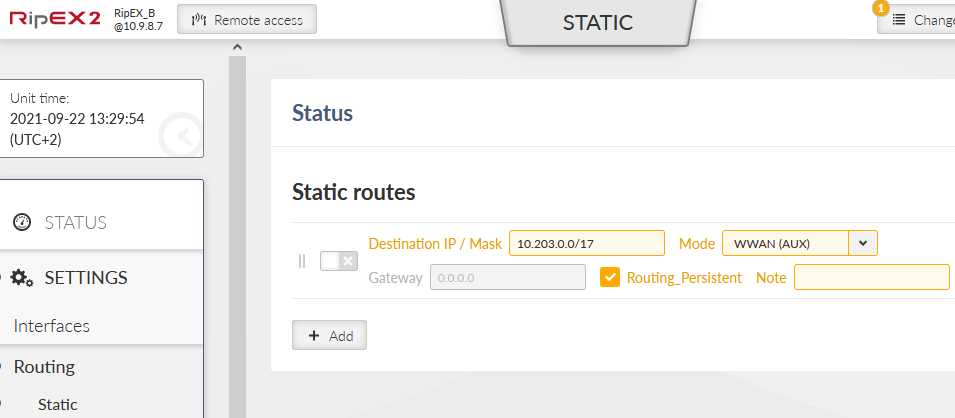
Note that you can make this cellular/LTE routing rule permanent causing that if LTE is down, the rule is still active and traffic for LTE segment is not handled by another Routing rule (unreachable messages). Once LTE comes up again, the routing rule works as expected again.
To do so, check “Routing_Persistent” parameter in this routing rule. Save the changes.
Common settings are the same. In your APN, you might have a different SIM1 setup compared to RipEX_B (each SIM can have different Authentication credentials).
Once the cellular interface is ready, create a new GRE tunnel setup again.
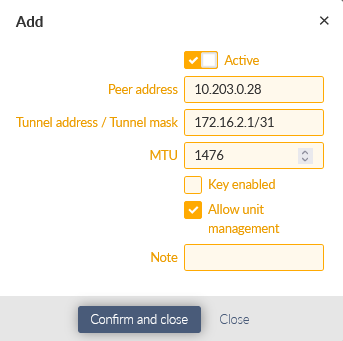
Peer address is the cellular IP of RipEX_B; 172.16.2.1/31 is a new local GRE IP address.
Add a new Babel Network interface.
Add a new static route via a cellular interface.
You can make the rule persistent again.
Save the changes.
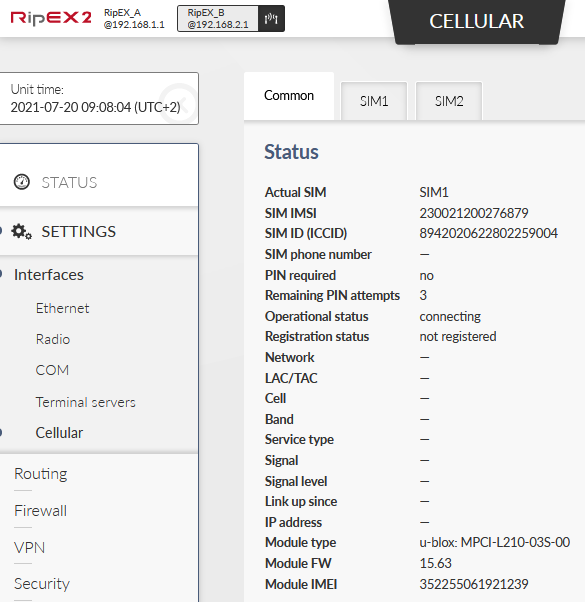
Check the Cellular/LTE status in SETTINGS – Interfaces – Cellular menu.
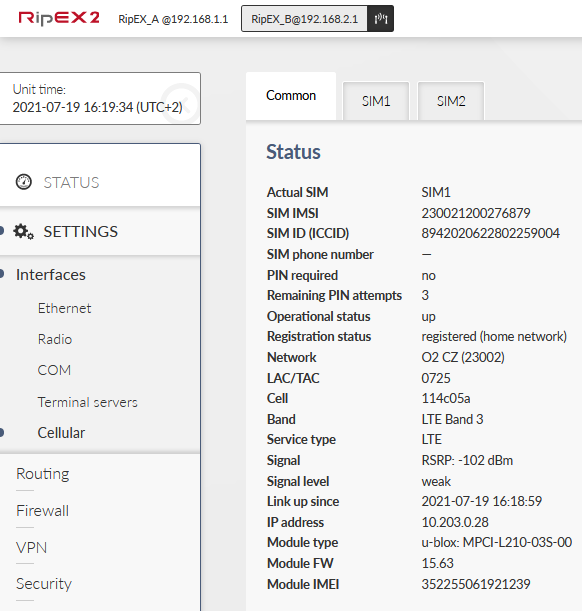
The status provides with a lot of information about current cellular connection.
Now, go to the Diagnostics and Tools menu. Try the mutual ping between 10.203.0.28 and 10.203.0.29. Also run a ping between 172.16.2.0 and 172.16.2.1 IP addresses.
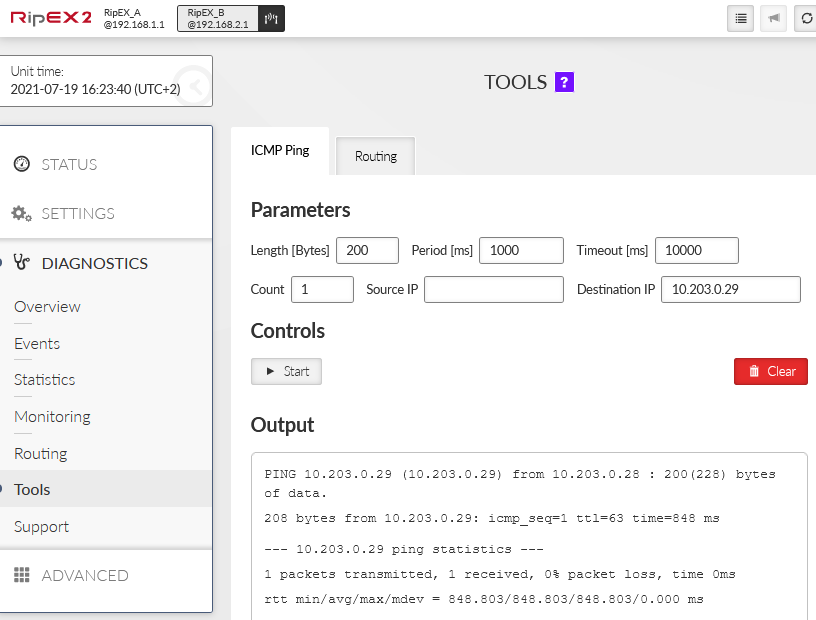
If these pings are not working correctly, check your APN setup and GRE tunnel configuration.
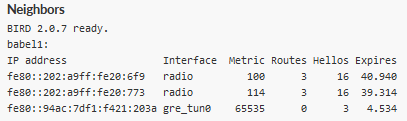
Go to the Diagnostics – Routing menu and check the Babel statistics.
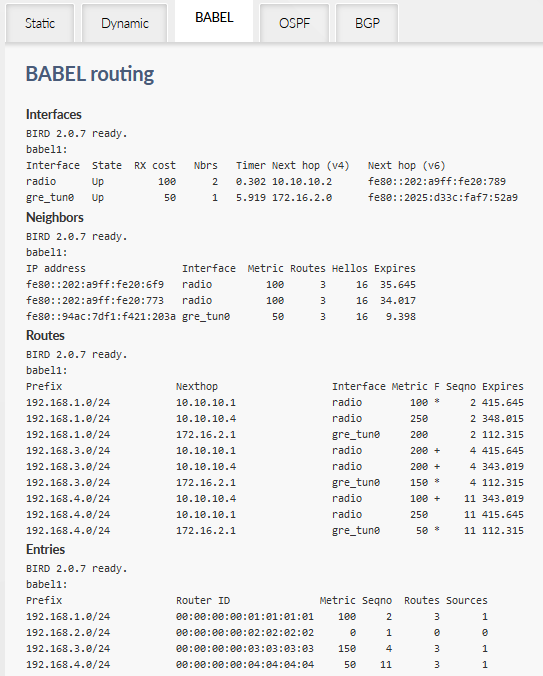
There are already 3 routes to each destination in RipEX_B radio. Two are using RF channel and one the GRE tunnel. Cost/Metric via LTE is set to “50” so you can see a route to 192.168.4.0/24 via “gre_tun0” with a Metric equal to 50.
You can test the scenario by unplugging the cellular antennas or turning off RipEX_B completely. Keep the ICMP ping running from your laptop to 192.168.4.1 IP address again.
Check Statistics and Monitoring menus. It is NOT possible to monitor cellular interface in RipEX2 firmware 2.0.5.0 and older. Also note that Monitoring via Remote access is only available since RipEX2 firmware 2.0.5.0.
You can also check if the cellular interface is “up” or “down” in the SETTINGS – Interfaces – Cellular menu.