Replaces the former application Uds.exe and is
used for upload and download of CU configuration structures. It is
possible to use this application locally or remotely, e.g. upload
configuration structures from all CU’s in the network.
Netcnf.exe (when upload) saves configuration
structures from FLASH or S-RAM memory of CU into
address.cnf file, where address
is the address of the connected node (locally or remotely), e.g.
690F0001.cnf.
Netcnf.exe (when download) saves configuration
structures directly into permanent memory in CU (FLASH, S-RAM). To use
these parameters immediately it is necessary to put them into RAM
too:
by the command
(s)ervice (g)o go MORSE (B)thus sgBor by the hw reset (off/on)
Fileaddress.cnf, which contains the CU
configuration can be archived and downloaded to the same or another CU. It
is important to make sure that more CUs with the same MORSE address are
not created in the network!
If we need to make a change in the stored configuration, we can use
from fw version 9.0.13.0 the Setr with -af parameter,
e.g. Setr -afcnf/anynet/690f0001.cnf. In older versions we
can download it to an auxiliary CU, use Setr to modify the configuration
and again upload it to the file in the PC.
Since fw version 10.0.27.0 the CNI monitoring setting include Split is contained in the configuration file. This parameters had to be set using macro or manually before.
Start program Netcnf.exe with the CU connected by the service cable :
By clicking on icon Configuration upload
 or selecting > we begin transmission of the configuration from
the CU to the file in the PC. Upload ends by displaying a message
containing the name and location of the generated configuration
file:
or selecting > we begin transmission of the configuration from
the CU to the file in the PC. Upload ends by displaying a message
containing the name and location of the generated configuration
file:File .\cnf\anynet\69000006.cnf created. UPLOAD FINISHED
Press Alt+X to end program
Netcnf.If we start the program with parameter application Upload -aU , it starts running without pressing icon:
Netcnf -aU
For downloading the configuration from a remote CU we need to be
locally connected to a CU which is connected to the remote CU via the
MORSE network. The Netcnf application can be
started in one of the following ways:
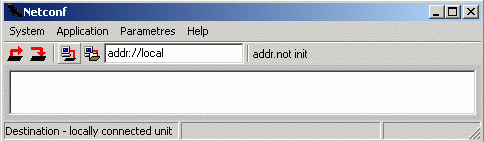
Start Netcnf, click on icon Destination local
 ,
, addr://localwill appear in the window, replace wordlocalby the destination address and press Enter, e.g.addr://690F0003and press EnterClick on icon
to start downloading the
configuration, which is stored in directory
.\cnf\anynet\Use parameter -da with the destination address, e.g.:
Netcnf.exe -da69000007
Click on icon
to start downloading the
configuration.Use parameter -aU with the destination address (application Upload), e.g.:
Netcnf.exe -aU69000006
Netcnfstarts running without clicking on the mouse. This is suitable method when generating batch files.
For downloading configurations from more CUs their addresses
first need to be added to a text file, e.g.
aaa.txt:
69000007
69000008
6900001A
Then we can use some of the following methods:
Netcnf – start the application.
Click on icon Destination file
 to open the dialogue window.
Select a file, e.g.
to open the dialogue window.
Select a file, e.g. aaa.txt, which contains one or more destination addresses.Click on icon
to start downloading
configurations.Configurations will be successively downloaded from these CUs and uploaded to the new directory
.\cnf\aaa\.Start Netcnf with parameter -df and file, e.g. bbb:
Netcnf -dfbbb
File
bbb.txtcontains the addresses and is located in directory.\net\, i.e..\net\bbb.txt.Click on icon
to start downloading
configurations.Files with configurations are uploaded to directory
.\net\bbb\Use parameter application Upload -aU:
Netcnf -dfbbb -aU
Upload begins without clicking the mouse, files are uploaded to
.\net\bbb\
| Local Upload | Result saved it: | ||
| Netcnf | click Upload | .\cnf\anynet\xxxxxxxx.cnf | |
| Netcnf | -aU | .\cnf\anynet\ | |
| Remota Upload for 1 CU | |||
| Netcnf | click Dest local > addr | click Upload | .\cnf\anynet\ |
| Netcnf | -daaddress | click Upload | .\cnf\anynet\ |
| Netcnf | -daaddress | -aU | .\cnf\anynet\ |
| Remote Upload for more CUs | |||
| Netcnf | click Dest file > aaa.txt | click Upload | .\cnf\aaa\ |
| Netcnf | -dfbbb | click Upload | .\cnf\bbb\ |
| Netcnf | -dfbbb | -aU | .\cnf\bbb\ |
Start program
Netcnf.exewith CU connected via the service cable. Click on icon Configuration download to open the dialogue window.
Select the configuration file, which should be sent to the
CU.
to open the dialogue window.
Select the configuration file, which should be sent to the
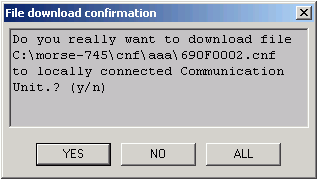
CU.Netcnfmakes connection with the CU and a message appears:By acknowledging YES downloading begins. Then the following question appears:
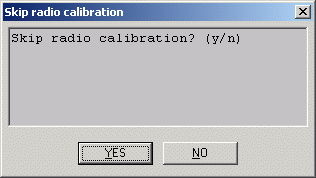
By acknowledging YES we jump the part of the configuration file which contains the calibration constants of the radio part. These constants are individually set up in each CU during manufacture.
After downloading has finished the following message appears:
DOWNLOAD FINISHED. By pressing Alt+X we exitNetcnf.The configuration has now been uploaded to the S-RAM (previously FLASH) in the CU. It is uploaded into RAM when restarting (switching the CU on and off). It is possible to restart from Setr using command
sgB.If we start the program with the parameter application Download -aD with the address of the file which contains the configuration then it begins running without clicking the icon:
Netcnf -aDcnf/anynet/690F0001.cnf
Acknowledge download with YES and ignore calibration with YES.
For transfer the configuration to the CU we need to determine the address of the destination CU and the file with the configuration which needs to be written:
Start Netcnf, click on icon Destination local
, addr://localwill appear in the window, replace wordlocalwith the destination address and press Enter, e.g.addr://690F0003and press EnterContinue by clicking icon Configuration download
and select the file with the
configuration. Acknowledge the control question by clicking
YES and ignore calibration by clicking
YES.Note: until a hw or sw reset the remote station continues to work with the old configuration. Using Setr we can communicate with it and even modify the configuration (e.g. the address). Only after a sw reset
sgBdoes the new configuration appear.Start
Netcnfusing the command with the destination address in parameter:Netcnf -da690F0003
Continue by clicking icon Configuration download
and select the file with the
configuration. Acknowledge download by clicking
YES and ignore calibration by clicking
YES.It is possible to designate the source file with the configuration by parameter -aD:
Netcnf -da690F0003 -aDcnf/anynet/690F0003.cnf
Netcnfstarts running and we only acknowledge download by clicking YES and ignore calibration by clicking YES.
Add addresses to a text file, e.g. aaa.txt
:
690F0002
690F0003
Continue in any of the following ways:
Start Netcnf and using icon Destination file
select file
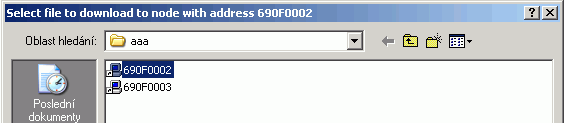
aaa.txt. Continue by clicking icon Configuration download. A question appears:After selecting YES select the configuration file for the first node. Its address is given in the header of the table for selection of the configuration file:
Acknowledge download by clicking YES and ignore calibration by clicking YES.
Once downloading has finished for the first node the selection table once again appears for the next node in sequence.
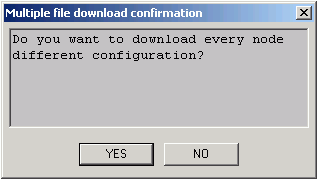
If we answered NO to the previous question
 Do you want
            to upload a different configuration to each node ?
            (yes/no)
, then the configuration selected as the first configuration is uploaded to each node according toaaa.txt.Add file
aaa.txtto directory.\net\, thus.\net\aaa.txtStart Netcnf with parameter -df and file aaa:
Netcnf -dfaaa
Continue by clicking icon Configuration download
. Acknowledge individual configuration by
clicking YES, select
cnf_file.cnf, acknowledge download by clicking YES and ignore calibration by clicking YES. Repeat selection of the file for other addresses from the listaaa.txt.Add file
aaa.txtto directory.\net\, thus.\net\aaa.txtFiles with configurations can be written, for example, to directory net1:
.\cnf\net1\690F0002.cnfand.\cnf\net1\690F0003.cnf.Start
Necnfwith parameters:Netcnf -dfaaa -aD.\cnf\net1\690F0002.cnf
Continue without clicking the mouse. If configurations for addresses listed in
aaa.txtare prepared in directory.\cnf\net1\then simply acknowledge the steps by pressing Enter.
| Local Download | Source of config. data | Down | Skip | ||||
| Netcnf | click Download | choice file.cnf | YES | YES | |||
| Netcnf | -aDsoubor.cnf | YES | YES | ||||
| Remote Download for 1 CU | |||||||
| Netcnf | klik Dest local > adresa | click Download | choice file.cnf | YES | YES | ||
| Netcnf | -daaddress | click Download | choice file.cnf | YES | YES | ||
| Netcnf | -daaddress | -aDfile.cnf | YES | YES | |||
| Remote Download for more CU | Diff conf | ||||||
| Netcnf | click Dest file > aaa.txt | click Download | YES | choice file.cnf | YES | YES | |
| Netcnf | -dfbbb | click Download | choice file.cnf | YES | YES | ||
| Netcnf | -dfbbb | -aDfile.cnf | NO | choice file.cnf | YES | YES | |
| YES | YES | ||||||
Parameters can be used at work from command line.
Common – see chapter Section 1.2.4, “Common parameters for all applications”
Special
-dl local access
Upload (download) configuration from locally connected CU.
Example:
-dlDefault value:
onConfiguration is saved into:
.\cnf\anynet\address.cnfExample of command from command line with application of default value
-dl: netcnf
-da[address] remote access
Upload (download) configuration from remote CU of given address.
Example
:-da69DF1234Configuration is saved into:
.\cnf\anynet\69DF1234.cnfExample of command from command line: netcnf -da69DF1234
-df[file] communication with CUs according to file
Netcnf.exeuploads configurations for all addresses (one by one) fromabc.txtfile. The fileabc.txtmust be put in.\netdirectory. If you do not specify filename,Netcnflooks for.\net\anynet.txtExample:
-dfabcConfigurations are saved into
:
                    .\cnf\abc\*.cnf
(* – for every address fromabc.txtone file).Example of command from command line: netcnf -dfabc
-aU application Upload
Accomplishes the configuration upload without mouse click, suitable for the batch files.
Example:
-aUExample of command from command line: netcnf -aU
-aD[addr.cnf] application Download local
Accomplishes the configuration download of file
addr.cnfinto locally connected CU without mouse click.Example:
-aD69DF1234.cnfNetcnf.exelooks for fileaddress.cnfin working directory. It is possible to specify complete path, e.g.-aDc:\com\morse\cnf\anynet\69DF8606.cnfor remaining part of the path only (e.g. from morse directory):-aDcnf\anynet\69DF8606.cnfExample of command from command line: netcnf -aDcnf\anynet\69DF8606.cnf
-aD[address1.cnf] -da[address2] application Download remote
Download the file
address1.cnfinto remote CUaddress2Example:
-da69DF1245
                    -aDcnf\anynet\69DF1234.cnf
Example of command from command line: Netcnf -da69DF1245 -aDcnf\anynet\69DF1234.cnf