In this chapter, we will go through several examples in order to explain Backup routes in practice.
Please follow the examples one by one to fully understand the configuration differences and benefits of various solutions.
| Note | |
|---|---|
The examples are configured similarly to the examples used in the RipEX Application note, see Address Planning in Application Notes |
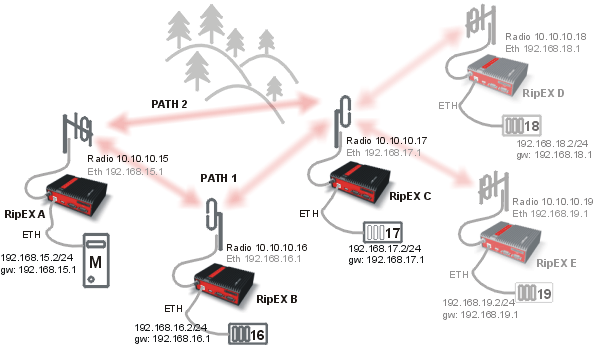
In the first example, there are five RipEX units in a network. All end devices are connected to the RipEX units via a serial interface. It is helpful to use only the radio IP addresses for translation and data routing. Ethernet IP addresses may be assigned randomly (you can keep their defaults, however we recommend setting Ethernet addresses similar to radio IP addresses to keep things organized).
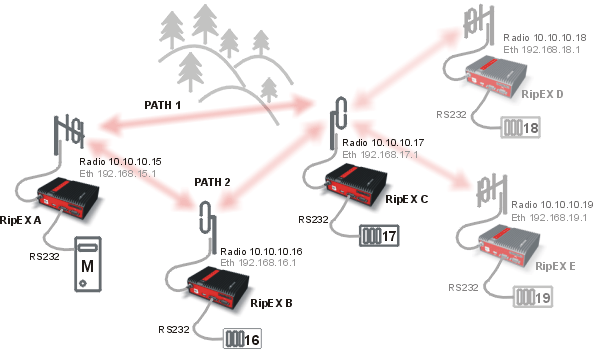
The device connected to RipEX A (10.10.10.15) is the Master station, others are slaves.
| Note | |
|---|---|
We will not configure RS232 devices in this Application note |
The Backup routes system can be used between RipEX A (.15) and RipEX C (.17), packets can be transmitted via:
the primary (direct) radio link between RipEX A and RipEX C, or
the backup (indirect) radio link over RipEX B.
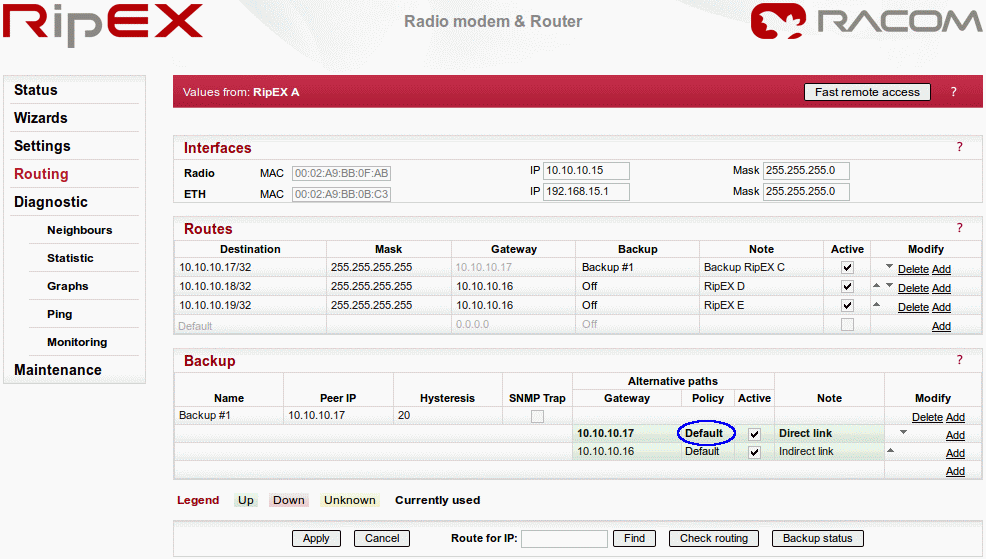
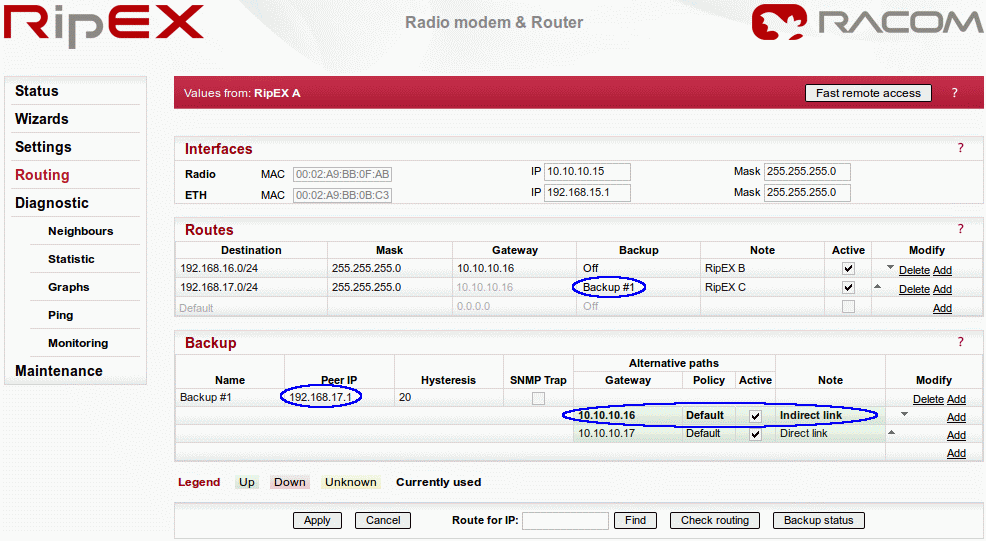
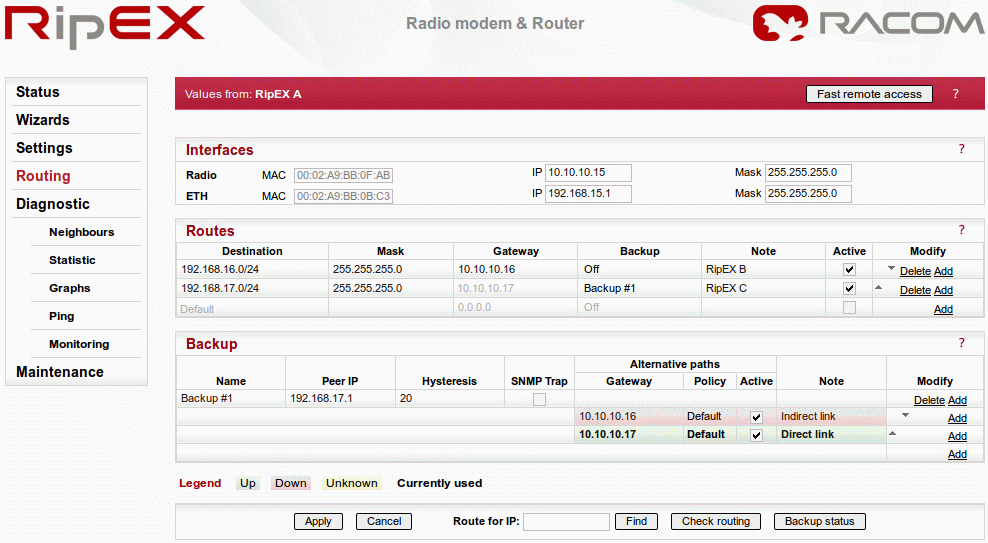
See the following RipEX A routing configuration:
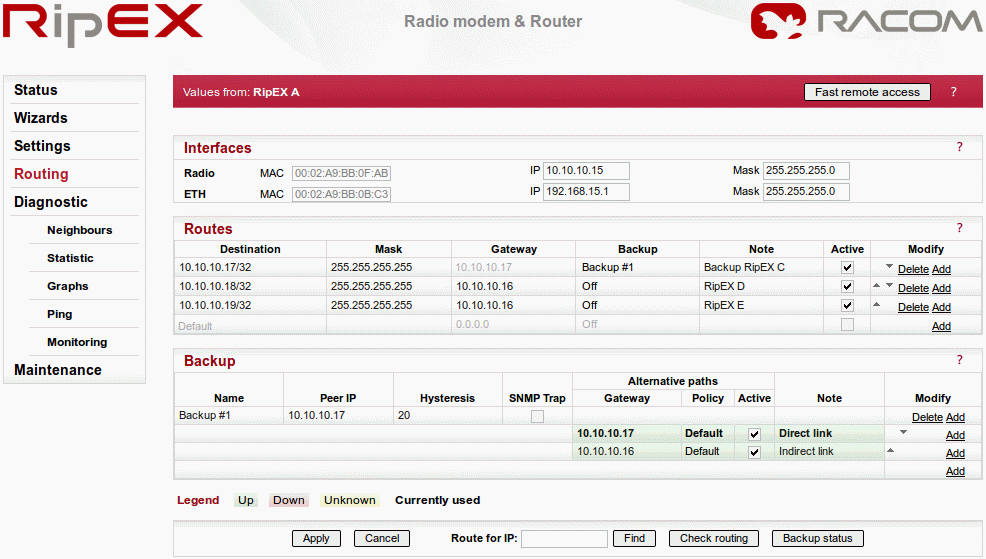
In RipEX A, we have one route which uses the backup configuration and two simple routes to other RipEX units.
The backup route is named “Backup #1” and it checks its health against the RipEX C radio IP address. The highest priority is set to the direct link and the second possibility is to use RipEX B as a repeater. Both paths are now checked by default and both are Up.
| Note | |
|---|---|
Only the remote RipEX radio or the main Ethernet interface IP addresses can be used (no subnet IP addresses on RipEX Ethernet or IP of connected device behind RipEX). |
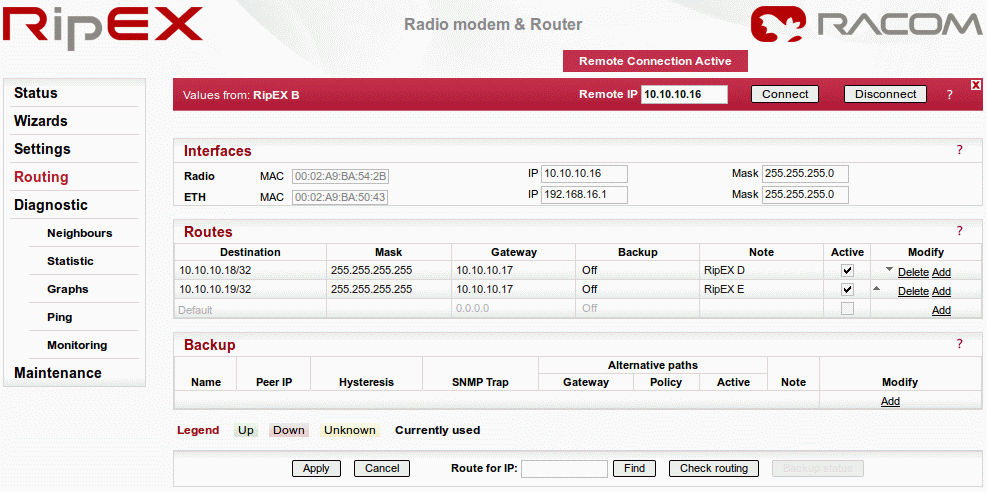
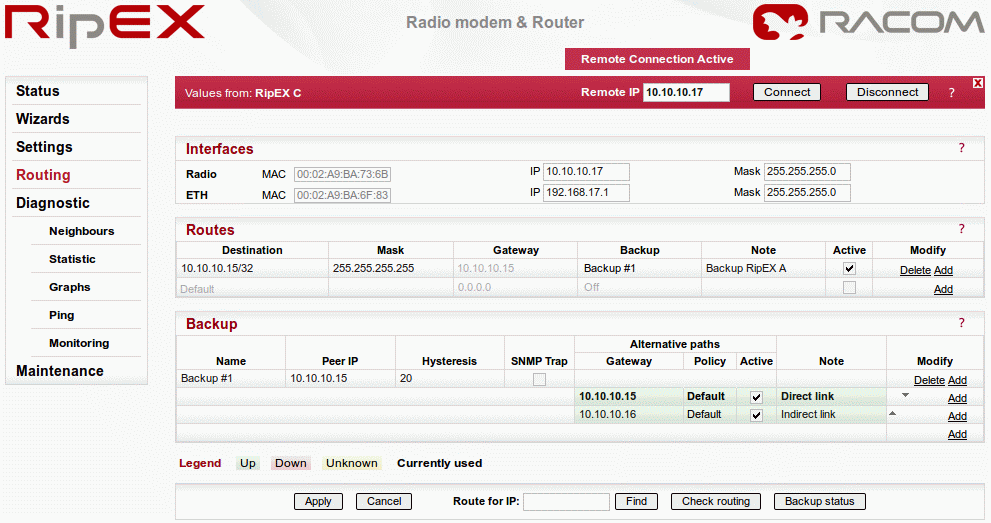
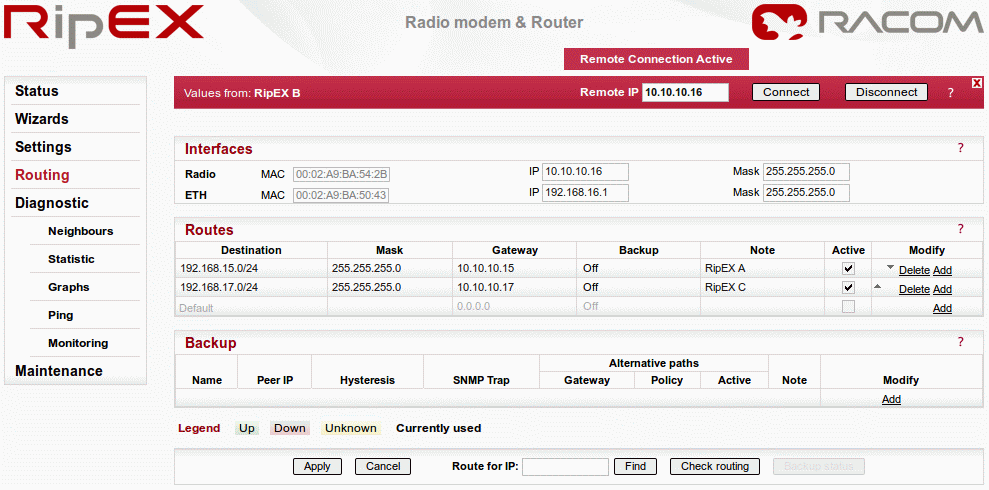
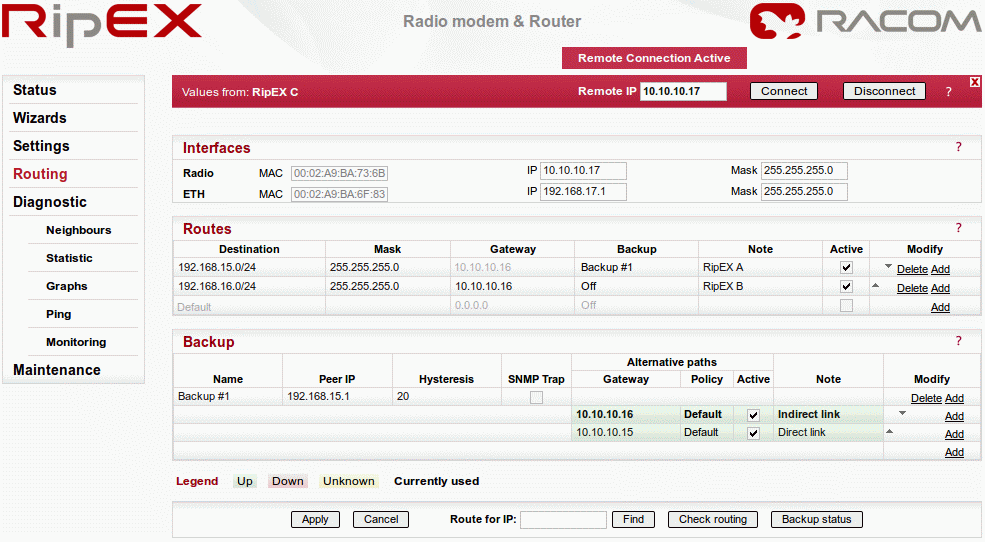
See the respective configurations from RipEX B and C.
| Note | |
|---|---|
RipEX B is not the end point (Peer IP) of the Backup routes system and so there is no backup route defined. |
| Note | |
|---|---|
See the configuration of RipEX D and E in the Application Note, see Address Planning in Application Notes |
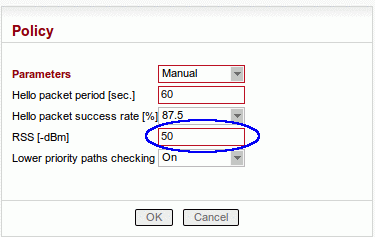
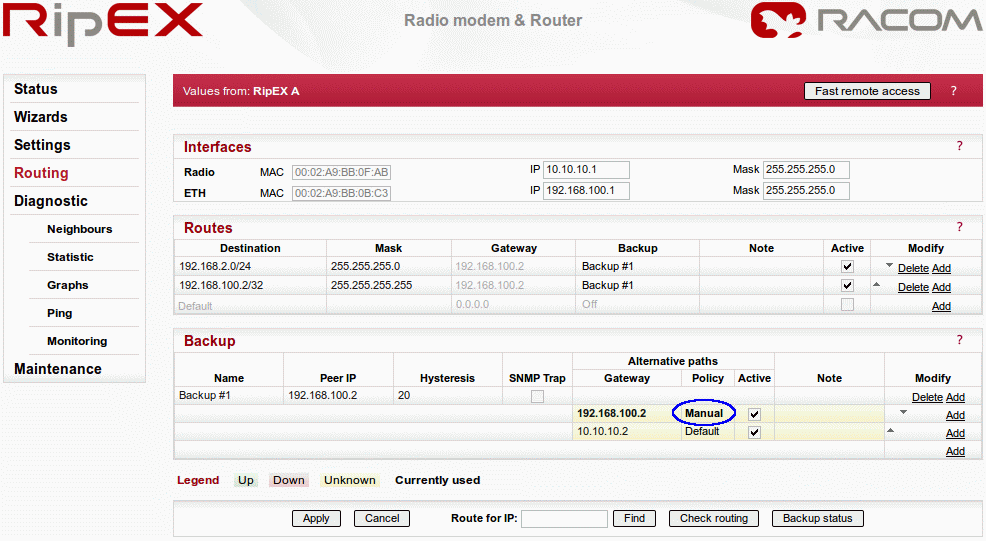
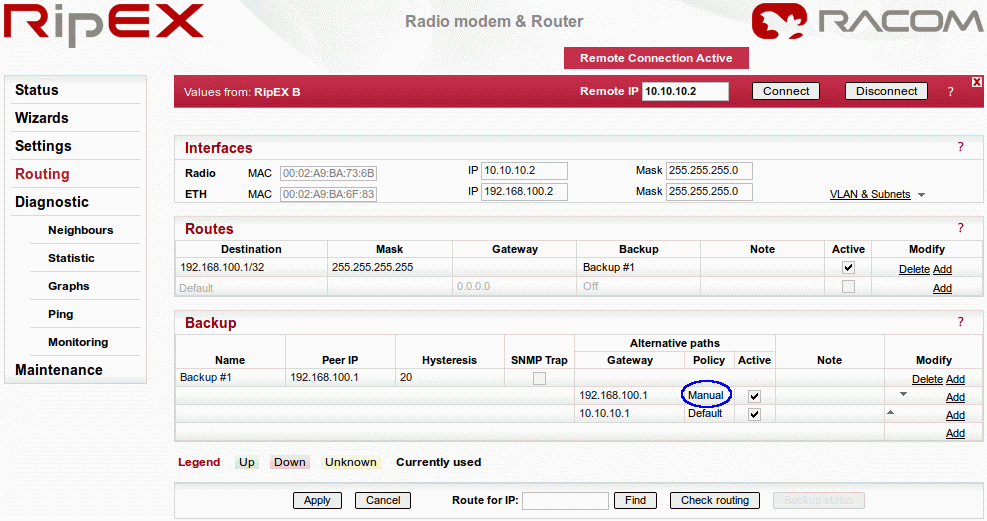
In this scenario, we will switch to the backup path due to a low RSS value. We must change the policy for the primary path to enable RSS checks. Click on the respective “Default” button in the Policy column.
| Note | |
|---|---|
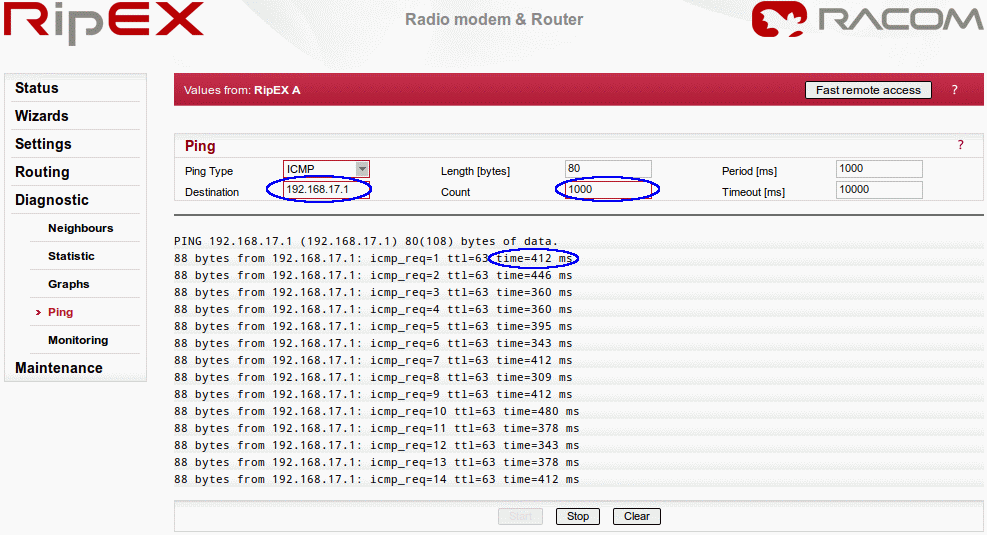
You can check the connectivity with a Ping feature (Diagnostic → Ping). |
The new pop-up window appears. Change the Parameters to “Manual” and fill in the RSS [-dBm] value according to the current RSS value (see the Neighbours menu). The value needs to be higher than the current value, e.g. in the example, the current RSS value is -56 dBm. The condition for switching to the backup (indirect) path is set to -50 dBm.
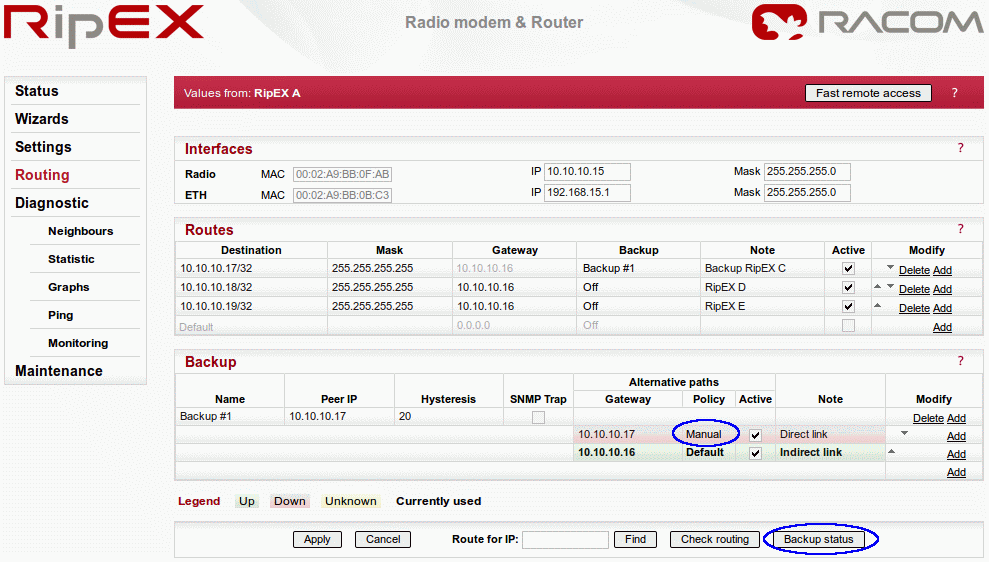
Apply the changes and click on the Backup status button to see the changes. The policy is set to “Manual” and the backup (indirect) path is being used.
| Note | |
|---|---|
For proper functioning, do not forget to repeat these steps on the partner RipEX C unit. If not set on both units, RipEX A can communicate with RipEX C via the primary path in one direction and via the backup path in the other direction (asymmetric routing). |
To revert to using the primary path again, disable RSS checks or improve the RSS signal between the RipEX units.
In the second example, we use the same configuration except that the RTU devices are connected via the Ethernet interface. See the following diagram:
| Note | |
|---|---|
In this example, we switched the priorities for the alternative paths. |
RTU units are now connected via the Ethernet ports, which means we need to add the correct IP addresses and routing into the appropriate RipEX units.
If not already set, change the Ethernet IP addresses according to this topology:
RipEX A – 192.168.15.1/24
RipEX B – 192.168.16.1/24
RipEX C – 192.168.17.1/24
…
Now we need to add the correct routing. To make the example simple, we will ignore RipEX D and RipEX E in our configuration.
See the following RipEX A routing settings:
Notice that we are using the Backup routes system for the devices on the 192.168.17.0/24 network. Also notice that we filled the Peer IP with the remote RipEX Ethernet IP address. The path used currently is the primary (indirect) one, but both paths are marked in color “Up”.
| Note | |
|---|---|
Only the remote RipEX radio or the main Ethernet interface IP addresses can be used (no subnet IP addresses on RipEX Ethernet or IP of connected device behind RipEX). |
We also added paths in RipEX B for the Ethernet networks located behind other RipEX units.
In RipEX C we have a very similar configuration to RipEX A, just in the opposite direction.
In this example, we will use a different method to switch between the primary and backup paths. We have set the highest priority for the indirect link (our backup path in the previous example). Whenever RipEX B is switched off, the Backup routes system will use the direct path instead.
The RipEX failure detection time is based on the Policy settings.
Note: If you set the “Hello” packet period to a low value (e.g. 10 seconds) and “Hello packet success rate [%]” to 100 %, the procedure will be very fast. But with these settings you are wasting the radio bandwidth with quite a lot of traffic and whenever a single “Hello” packet is lost, the active path is labeled as “Down”.
In the example, we will not alter the default values.

| Note | |
|---|---|
“Hello packet success rate” evaluation is based on last 8 “Hello” packets. |
To see the whole procedure, you can start with issuing ping packets. Go to the RipEX A Diagnostic → Ping menu and fill in the destination IP address (192.168.17.1). At this stage, ping packets will be successful and will be transmitted via the primary (indirect) path (e.g. check the RipEX RX/TX led diodes).
You can also turn on the radio interface monitoring. Go to the menu and check the radio interface. Leave other parameters at their defaults and click on the Start button. You can see all the packets in the radio network (ping packets, “Hello” packets, ARP, …).
Now turn RipEX B off, and see the differences. You can see that there are no replies to ping packets in and menu. Check the Routing menu (by pressing the Backup status button) to see when the active path is switched to the backup (direct) path.
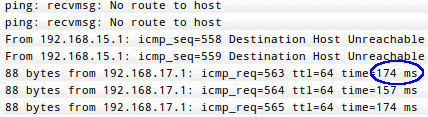
As soon as the Backup routes system evaluates the situation correctly, the ping packets are successful again. Also notice the ping packets RTT value is lower than with the primary (indirect) path being used.
Now you can turn RipEX B back on again. Because RipEX checks the primary (indirect) path with “Hello” packets periodically, it will switch back to the primary path. This change will not cause any loss in ping packets.
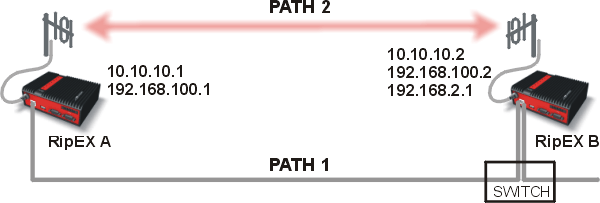
In this test, the primary route is via the Ethernet link and it is backed up by the radio link.
See the following example:
| Note | |
|---|---|
This example will not be explained in as such detail as the previous ones and we will use different IP addresses. |
The primary Ethernet link provides a high bandwidth capacity. It is appropriate to send “Hello” packets every second. This will lead to a rapid switch over to the backup radio link in case of the Ethernet link failure.
RipEX B is configured with 192.168.100.2/24 IP address which is used only for communication between RipEX units. The additional subnet 192.168.2.0/24 is used for the rest of the Ethernet communication. See the details in ARP Proxy & VLAN Application note.
The “Hello” packet period for the Ethernet link is also set to one second on RipEX B.
When you disconnect the primary Ethernet path, the system will automatically switch to its backup radio path. You can check this functionality using the same tools as in the previous examples.